Great Meatballs at Home


Meatballs – they seem so simple, yet let’s be honest – how many times have you tasted or made something that, when you bit into it, just didn’t quite cut it? Me too. No worries though – like all good things, there are keys to consistently exceptional meatballs, and if we know and follow the rules, we’ll churn out delightful little balls of deliciousness every time. 


Meatballs can be made from all kinds of proteins, from tofu to beef, pork, or poultry. Any of those options can and should turn out juicy and delicious. When they don’t, there’s almost always a broken cardinal rule or three to blame. Here, for your edification, are the most common culprits and solutions.

Dry Meatballs – Too little fat is the most common cause. Proper meatball mix fat content should be around an 80%-20% ratio of protein to fat – that’ll give you consistent results. If you’re adding cheese, sour cream, Crema, crème fraîche, chèvre, whole milk yogurt, etc, don’t forget to factor that in. As such, starting with 90%-10% protein will often do the trick. 

Overcooking – this happens most often because we disregard internal temperature when we’re cooking meatballs. You should pull ‘em when they hit 160° to 165° F – They’ll easily hit ten degrees higher than that after you yank ‘em, so don’t go any higher in the oven.

Keep overcooking in mind when you reheat/cook them further in sauce – yes, braising keeps things from drying out, but if you’ve baked to proper temp, the sauce session should be monitored for heat and time – it’s still possible to overcook meatballs in sauce – it happens a lot.

Overworking – this occurs most often due to mechanical interference, AKA mixing with something other than your hands. When meatball mix is ready to form and bake, it has a feel – firm, not too wet or dry, and slightly springy. You can see all your ingredients, and know that they’re well mixed – you can’t get there unless you work it by hand – do that, and you’ll feel, smell, and see when your mix is ready to go.

Wet/Loose Meatballs – Believe it or not, this happens most often due to improper ratio of breadcrumbs/bread to meat. Yes, breadcrumbs hold moisture and are vital to the proper texture of meatballs, but add too much and you overpower your binder and end up with soggy or weak meatballs. If you really go overboard on crumbs, you’ll produce something with the texture of a matzo ball, and that’s not so good. 1/2 cup of crumbs or one slice of bread per pound of protein is the sweet spot.

Egg Problems can also lead to loose meatballs. You may think eggs are adding moisture to the mix, but that’s not their job – they’re there as a binder, and they’re critical to firm, bouncy meatballs that hold their shape. Add too much egg and you get soggy or sloppy – add too little and your balls fall apart. A ratio of one medium egg per pound of protein is the rule of thumb – if you add significant quantities of uncooked veggies to your mix, another egg is warranted.

Boring meatballs – Don’t laugh, it happens a lot. I think that folks get a mindset along the lines of ‘I don’t need to season and add herbs to my meatballs, because I’ll have all that in the sauce.’ Let’s do a quick experiment to test that theory – take a bunch of rubber balls, and cook them in your best pasta sauce… But seriously folks, the insides of a meatball have to be as great or greater than whatever they’re served on or in. Add veggies, cheese, herbs, spices, including salt and pepper in your mix, period, end of story.

Size matters – when you’re ready to form, use a disher or an ice cream scoop if you’ve got one. If not and you’re rolling your own, thoroughly clean and dry your paws, then oil them lightly – that’ll keep the mix from stickin’ to ya. In essence, size should based on what you plan to do with ‘em – if you’re not sure/gonna do different things, a 2 oz. ball should work great. If it’s something like Italian wedding soup, 1 oz. is better. If it’s something where you really want them to stand out, and will serve maybe 2 or 3 per person, a 3 oz. ball is fine. 

Enough about problems – let’s flesh out ratios, so we can build our own recipes with whatever we want.

Cheese – You can use dang near anything you like, but consider properties when you do – A cheese that melts really well will want to leak out of meatballs – harder cheeses, not so much. 1/4 to 1/2 cup per pound of protein is the sweet spot. If you use something really soft like ricotta or chèvre, you may want to deploy that second egg in order to keep everything tight.

Veggies – you can add up to 1 cup per pound of protein with few worries, but there are caveats – if you’re adding something really wet like fresh tomato, consider gutting them prior to deployment. Onions, shallot, garlic, fennel, carrot, and celery will all be fine, just make sure to prep them to a fairly uniform fine dice and watch the ratios – too much of a good thing will overpower your binder and lead to loose or soggy meatballs.

Herbs – fresh or dried is fine. I like to plan on a ratio of about 1 1/2 to 2 tablespoons of herbs per pound of protein – again, boring sucks, so make ‘em speak. I’ll generally go heavier on dominant notes and lighter on minors.

Seasoning – Salt and pepper are musts, period. A teaspoon of salt per pound of protein is about right, but don’t forget to factor in other ingredients – for instance, the feta I used in the recipe below is brined, so it’s definitely gonna add some salt to the mix, and hard cheese like Parmigiano and Pecorino carry a pretty good salt load too, so adjust accordingly. A teaspoon of pepper per pound of protein is about right for most tastes.

Liquids – Keep citrus juice, etc olive oil, to a teaspoon or two each and you’ll be fine. The liquid dairy stuff, if full fat, can be treated like cheese, but again, keep an eye on your binder ratio if you use them.


Enough about that, let’s make something. I told M I wanted to make turkey meatballs – her response was perfect – ‘why?!’ Ground turkey is not a fave for a lot of folks – I’ve heard it described as dry, tasteless, and downright gross. That’s exactly the challenge I was looking for to work up a perfect meatball. When I told her I was thinking about feta, fennel, and sage as major notes she allowed, ‘that might not be too bad.’ So off I went. 

Ground Turkey isn’t gross, and done right, it’s neither dry nor tasteless. It can easily be found or ground in the 10% to 15% fat range, and as long as it’s fresh, it’ll have a great texture as well, but it does not pack a whole ton of flavor. As such, I was loosely thinking of Keftedes, the signature Greek meatball – something with some serious zing to it. What I took from that was dominant notes of garlic and lemon, with a robust herb punch. Try these in your kitchen just as I detail below, then make them yours. If you wanted to go further down the Greek theme, you could add curly leaf parsley, mint, cumin, or warm spices like cinnamon and nutmeg.


Urban’s Perfect Turkey, Feta & Fennel Meatballs

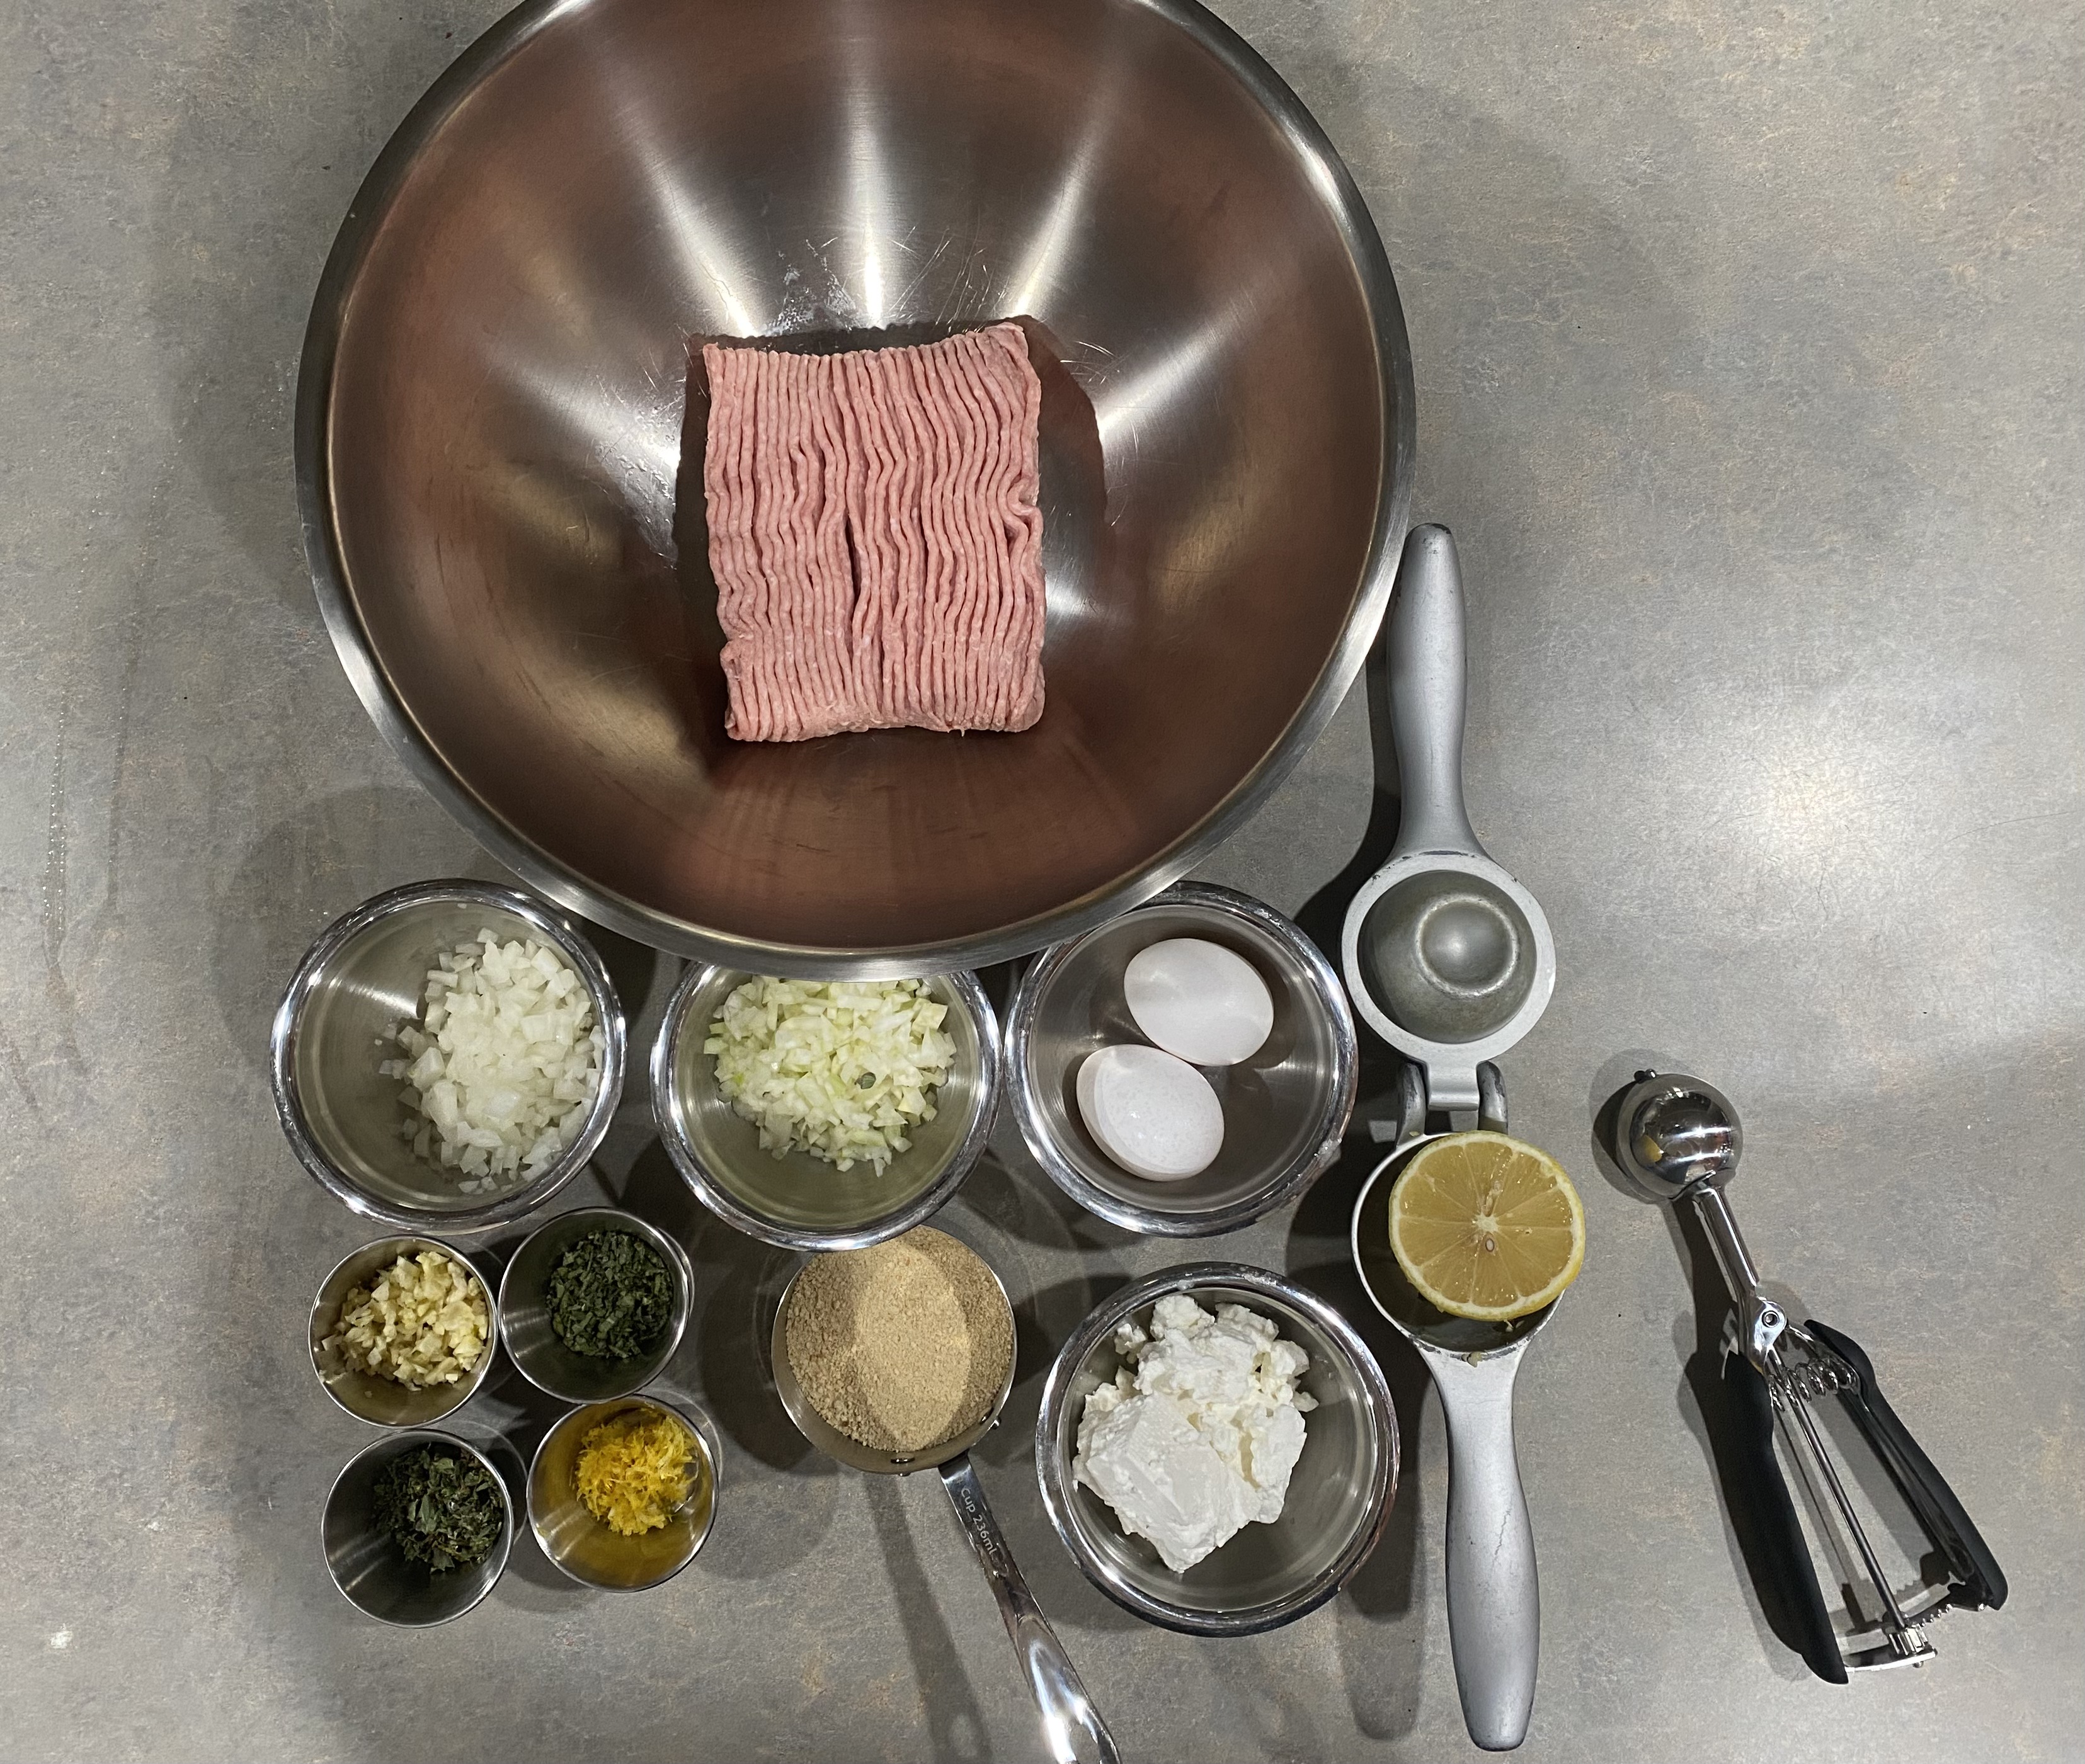
1 Pound 90%-10% Ground Turkey

1/2 Cup Feta Cheese

1/2 Cup Onion

1/2 Cup Fennel Bulb

1 slice Sourdough Bread

3 fat cloves Garlic

2 medium fresh Eggs

Zest & Juice of 1/2 Lemon

1 Tablespoon Greek Olive Oil

3-4 fresh leaves Sage (or 1 teaspoon dried)

2 teaspoons dried Greek Oregano

1 teaspoon fine Kosher Salt

1 teaspoon ground Black Pepper


Set an oven rack in your upper middle slot and preheat to 400° F.

End trim, peel and slice onion roughly 1/8” thick – fine dice 1 cup and toss into a large mixing bowl.

End trim, smash and peel the garlic, then mince and add to the onion.

End trim, thinly slice, then mince the fennel.

Chiffenade, then mince the sage leaves, if using.

Zest and juice the 1/2 lemon – reserve both for now.

In a small mixing bowl, vigorously beat the eggs.

Portion feta, and olive oil.

Portion and combine oregano, salt, and pepper.

Toast the bread until lightly browned. Transfer to a shallow bowl and cover with warm water. 

Let soak for about 5 minutes, then pour off the water and squeeze the bread dry. Crumble that into the mixing bowl. NOTE: You can sub 1/2 cup of plain bread crumbs if you prefer.

Add turkey, and all remaining ingredients. Mix well by hand to thoroughly incorporate, but don’t smash and mash – a firm but gentle massage is what you’re after.

Line a rimmed baking sheet with parchment. 

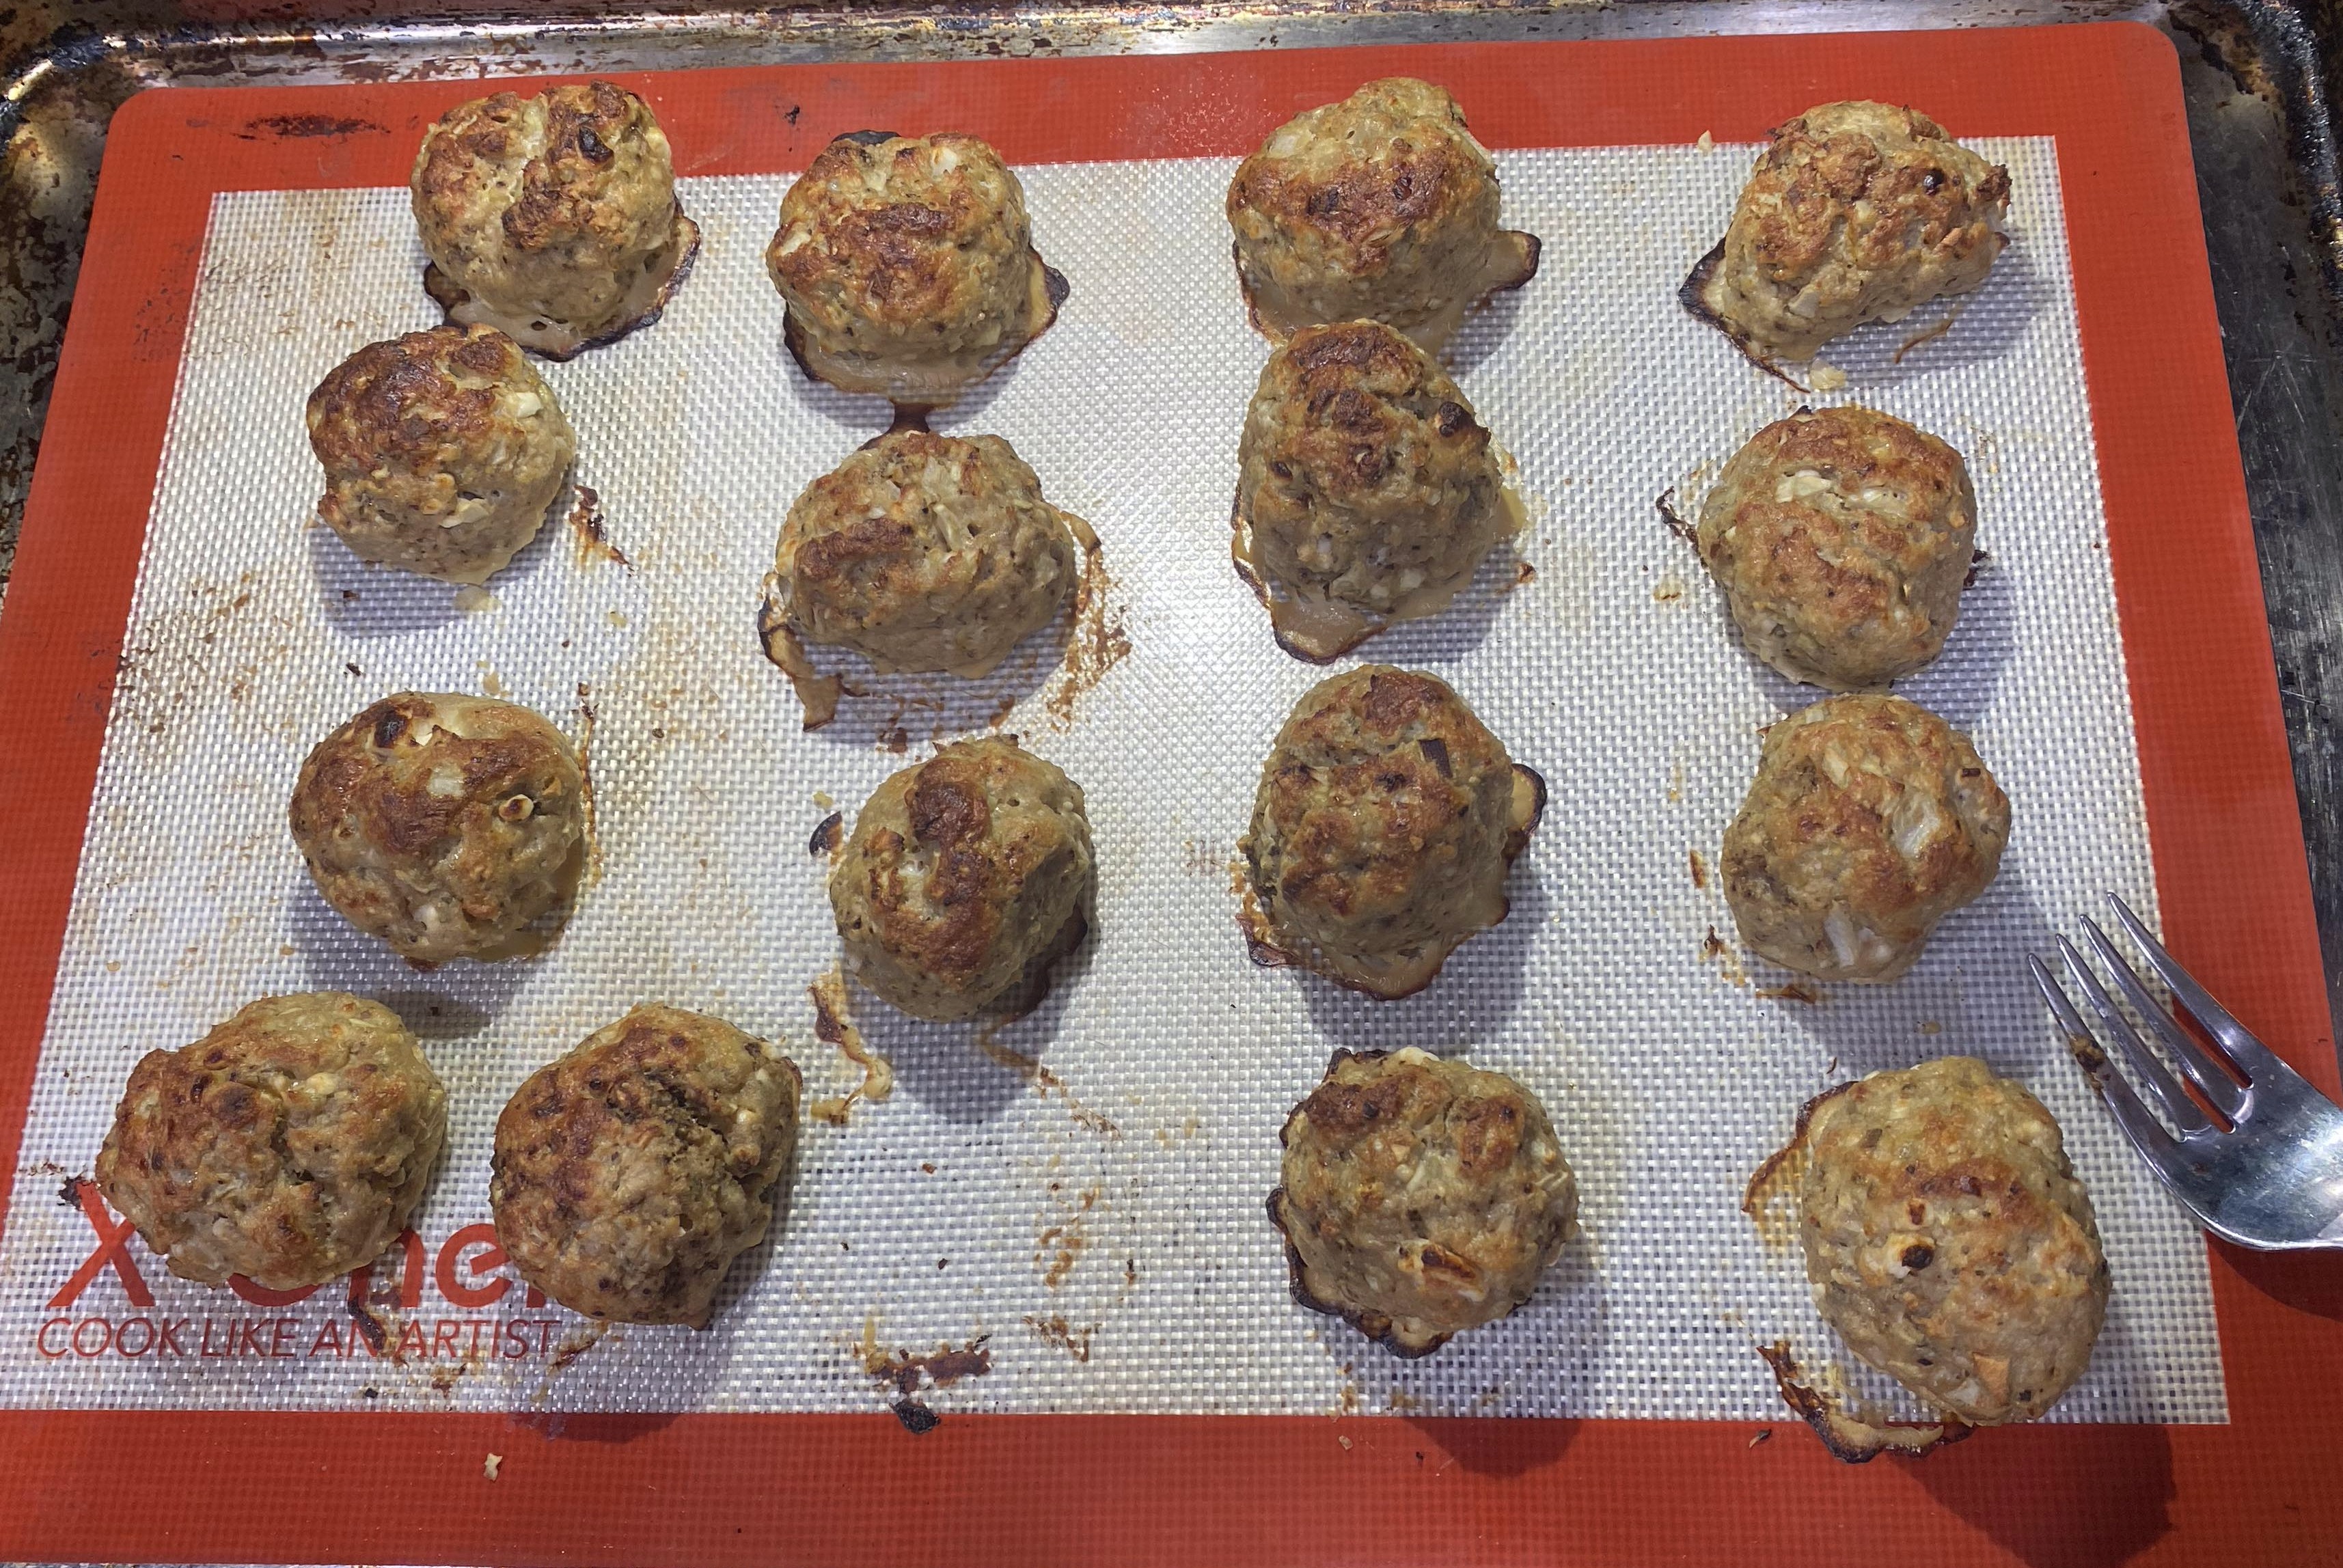
Use a 2 oz. disher, scoop, or 2 tablespoon measuring spoon to portion and form meatballs – place them on the lined baking sheet with a bit of space between each.

Bake at 400° F for about 20 minutes, then check internal temperature – you’re looking for 165° F.

Set oven to broil, move baking sheet to upper rack and broil for 2-3 minutes until lightly browned. You can roll ‘em over and do the other side, or call it good as you see fit.


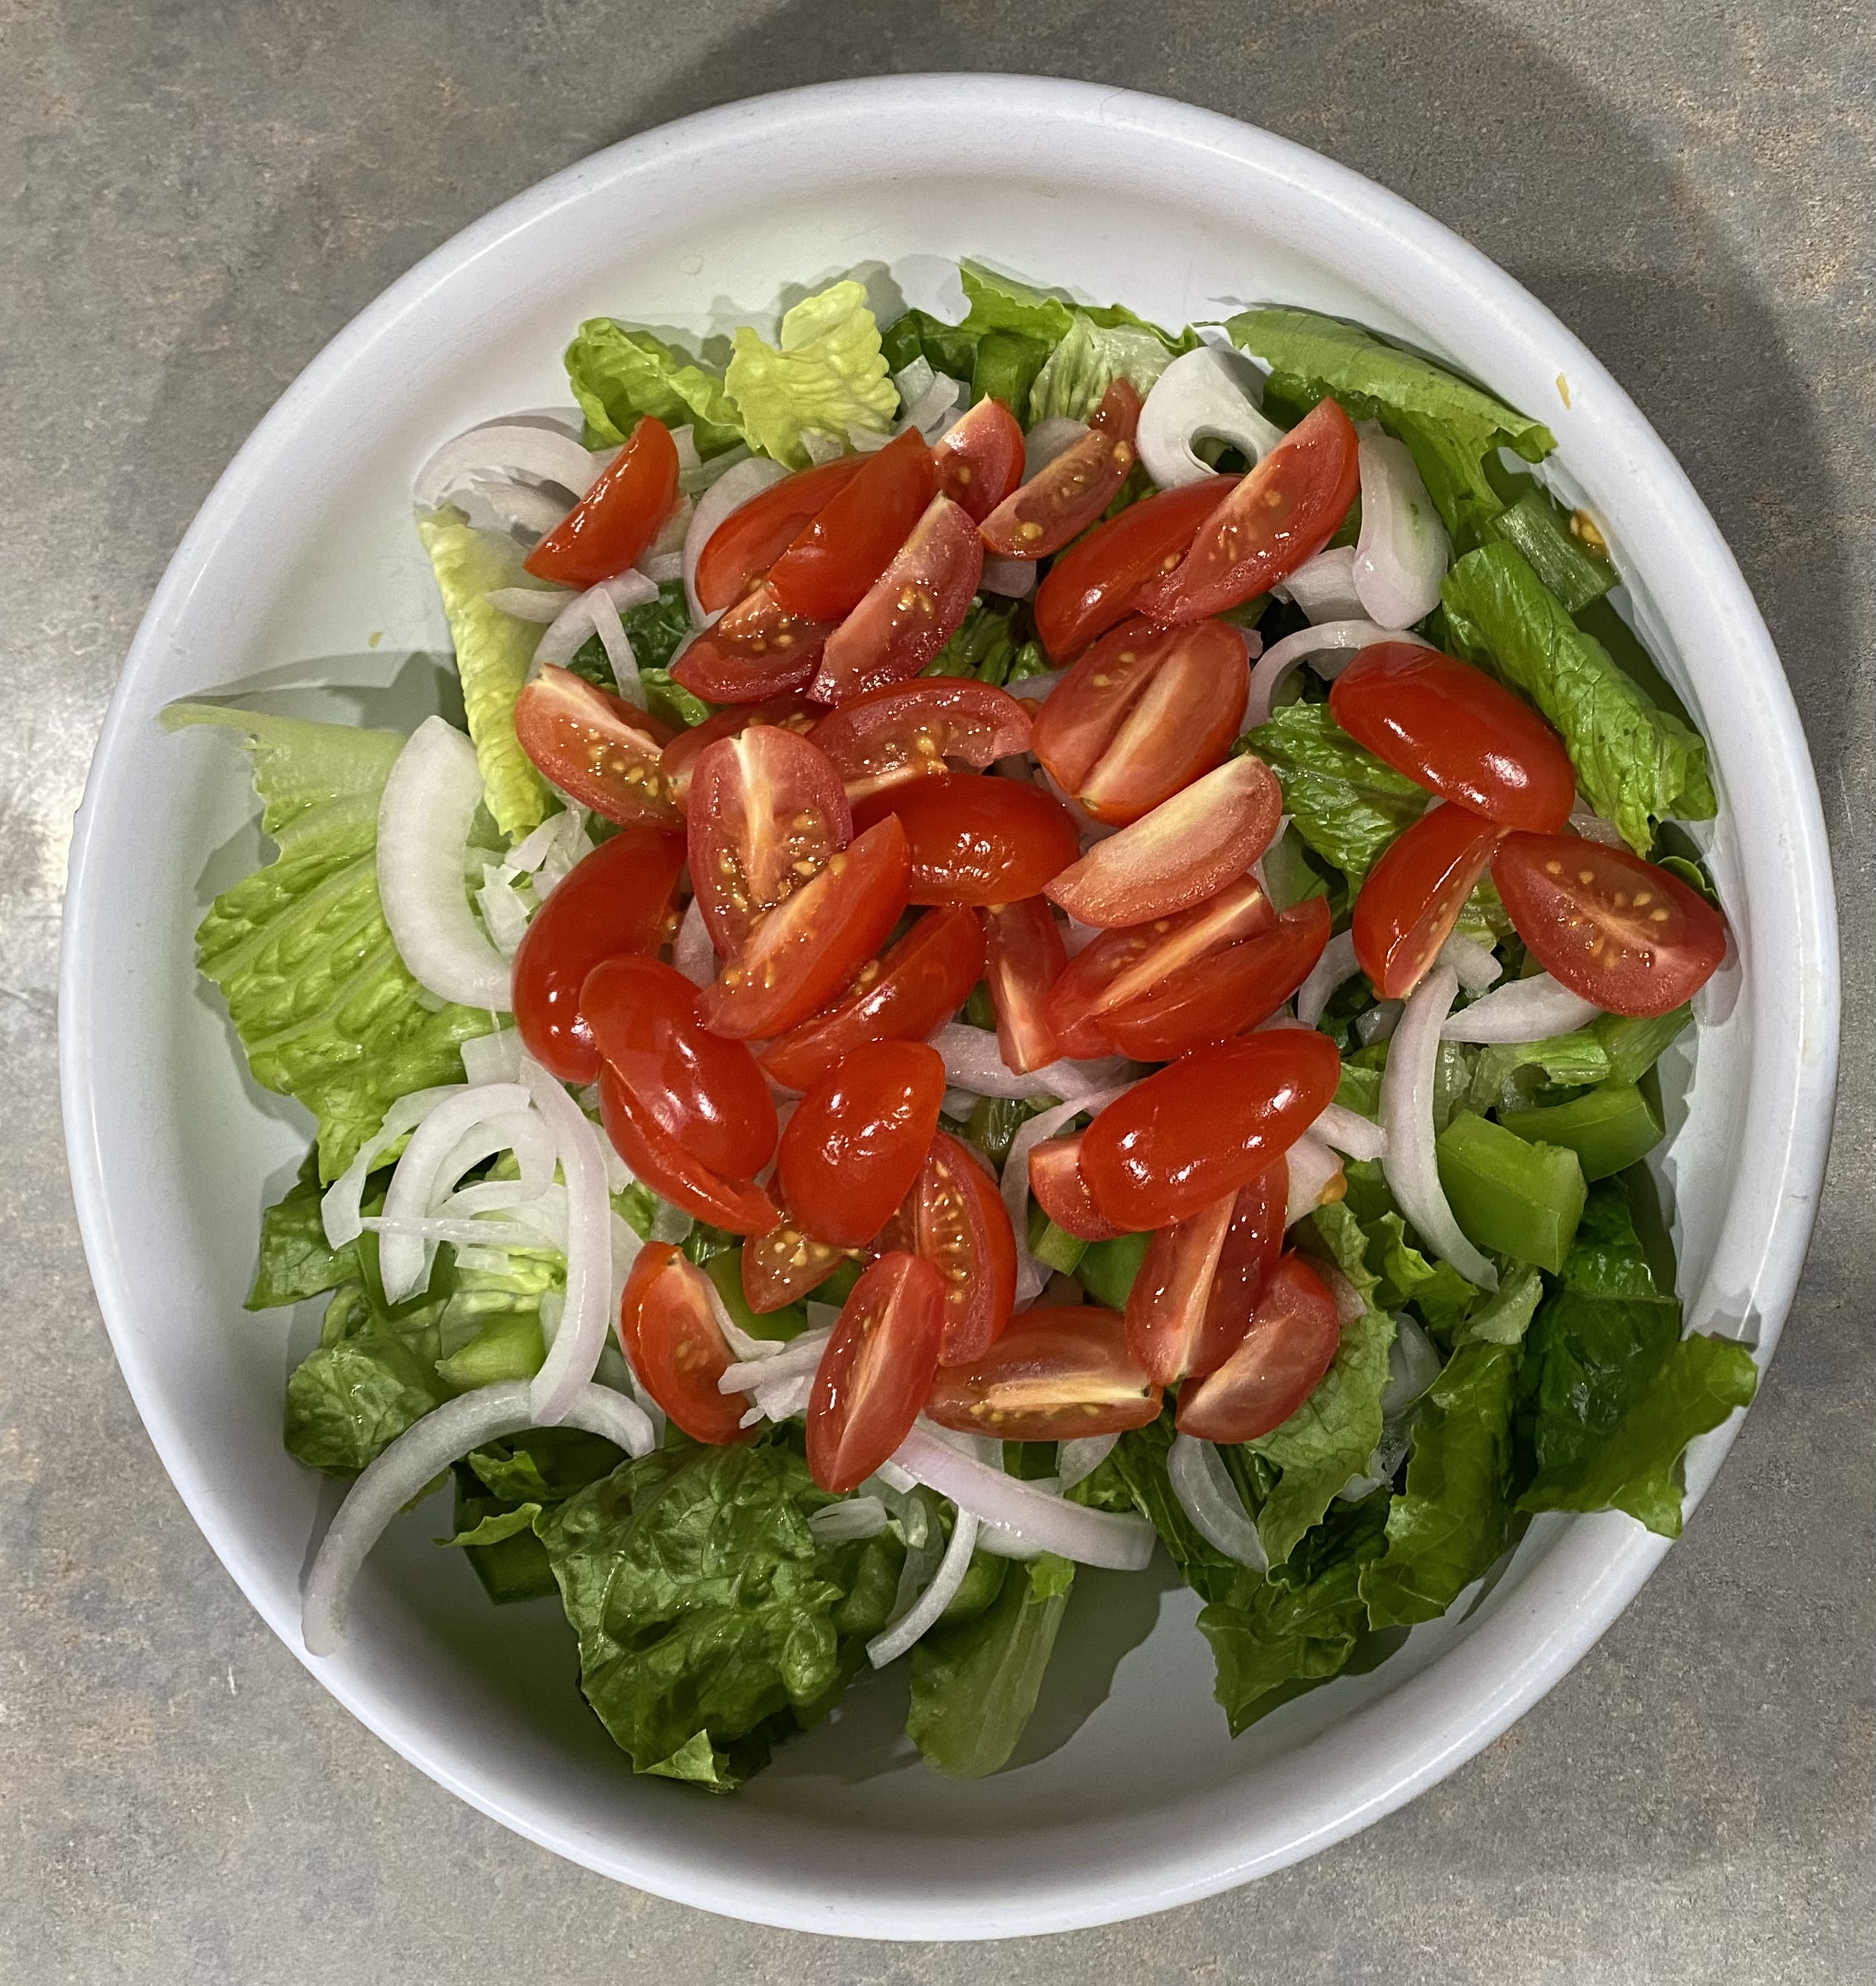
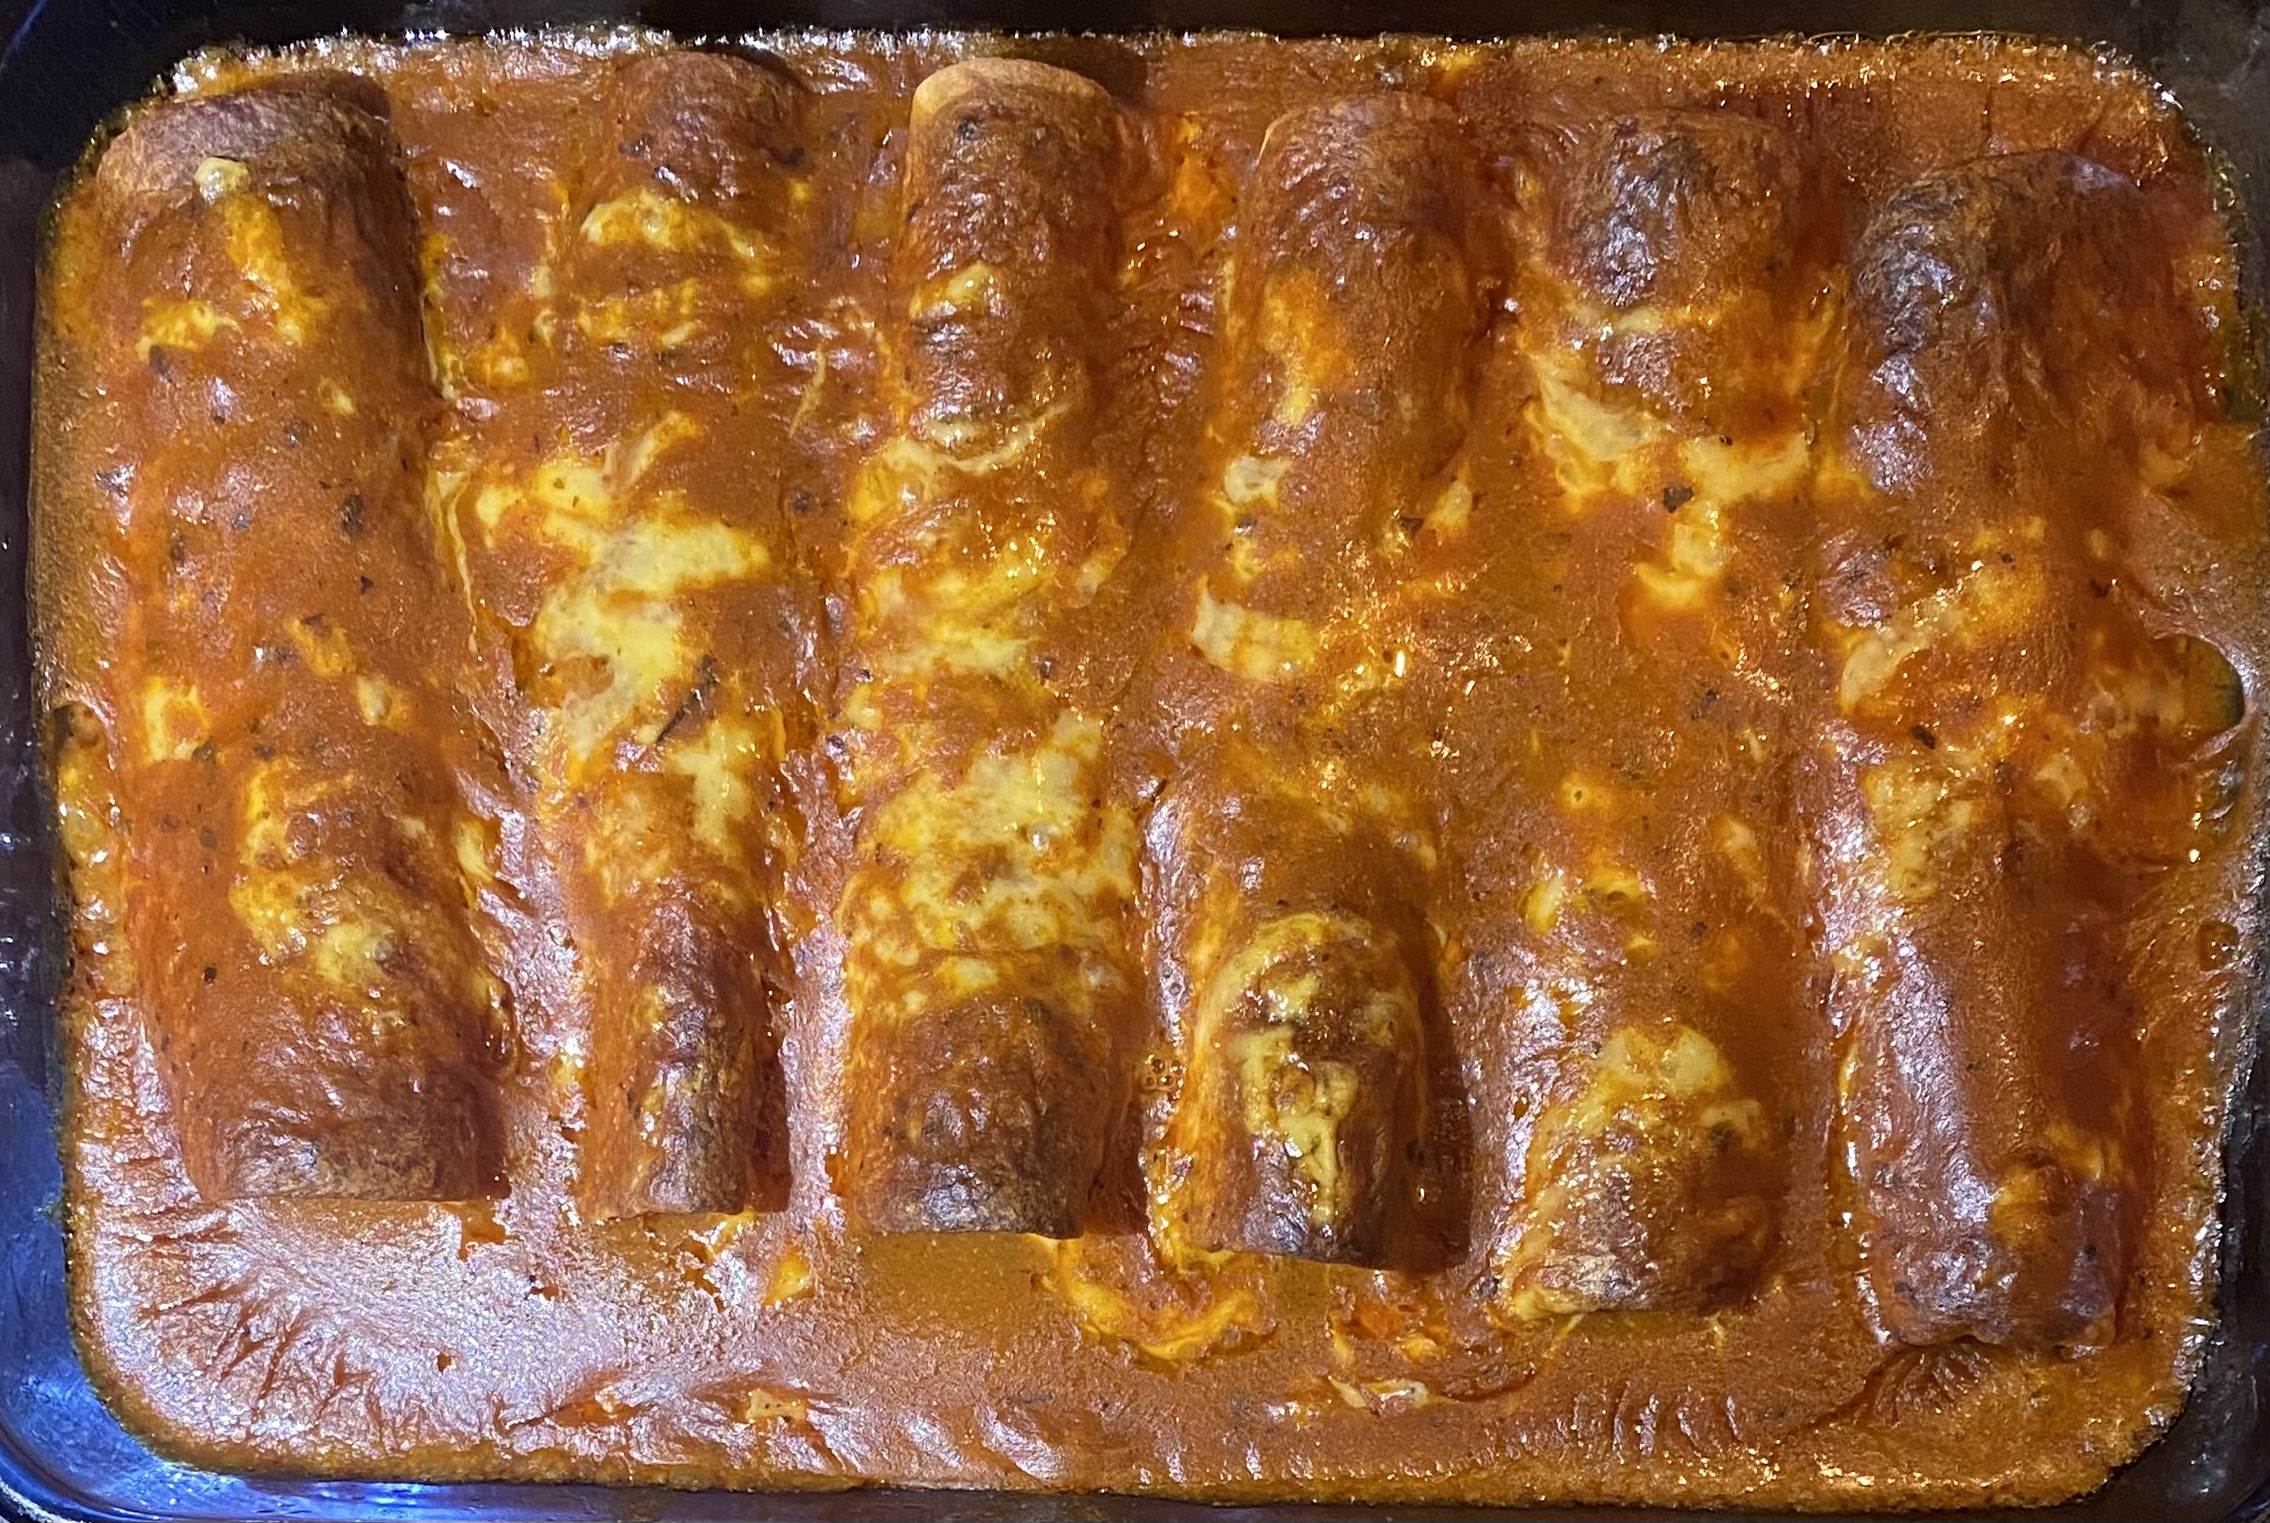
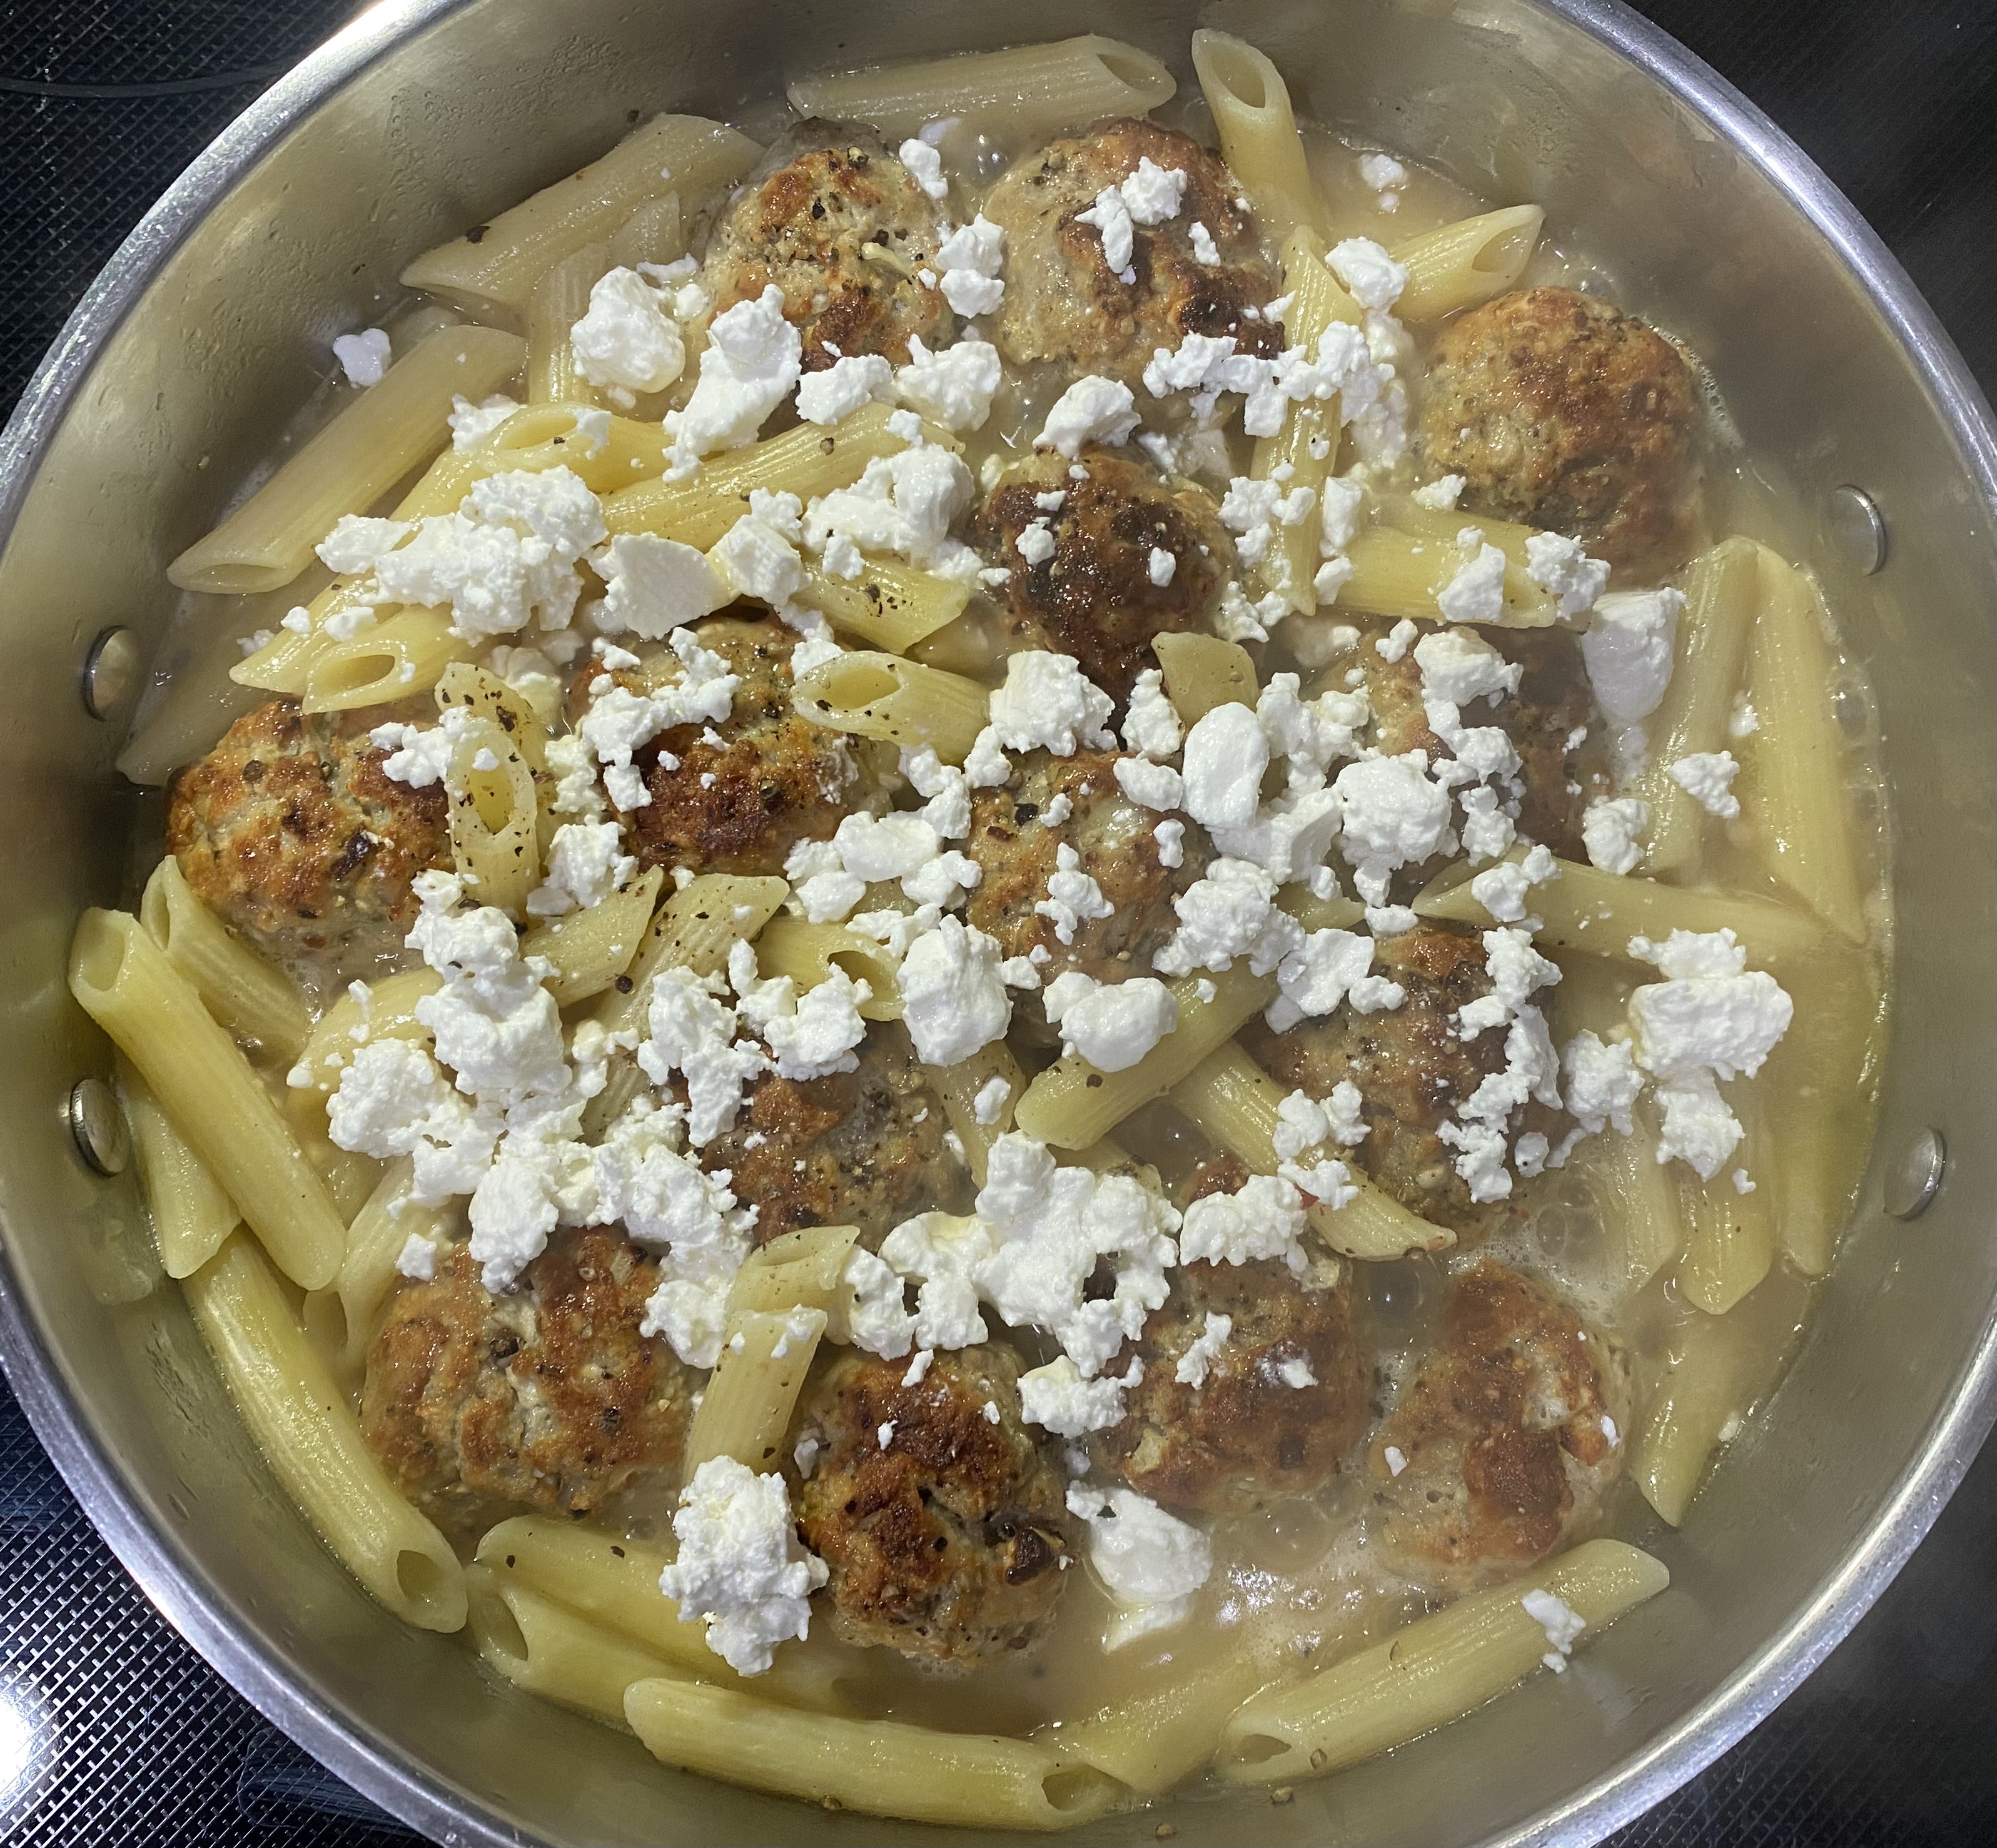
Serve with lemony Greek potatoes, rice, orzo, or other pasta, a salad loaded with tomato, peppers, and onion, and fresh Tzatziki


For the record, the mark of an exceptional meatball – not good, not great, but exceptional – is how good they taste for brunch two days later. For the record, M declared these the best meatballs she’s ever had – and she ain’t easy.

Superior Ramen at Home


Ever had fantastic ramen? If so, I’m willing to bet that, like me, you wanted to know how they did that. Fortunately, it’s entirely within our wheelhouse to make fantastic ramen at home. Let’s check out the keys to making ramen at home that will knock your socks off.

While a steaming bowl of ramen seems the essence of simplicity, the magic is in the details. There are five critical elements to a stunningly good bowl of ramen – broth, tare, noodles, toppings, and oil – so let’s dive in.


Broth is the undeniable heartbeat of a great ramen bowl. You can make it from whatever you wish – poultry, beef, pork, shellfish and fish, or veggie – In the version you’ll see images of here, I used homemade Parmigiano stock. Get into the rhythm of throwing leftovers into a stock pot and making your own on a regular basis. It’s delicious, beats the hell out of anything you can buy, and simple to do. If you want to make authentic ramen broth, dive into a browser search – you’ll find tons of recipes for everything from Chintan (clear soup) to Paitan (white soup).


Tare (Tar-eh) is the secret weapon to great ramen you might not have heard of. The literal translation is ‘dipping sauce,’ clearly indicating that you’ll find it in many places other than a ramen bowl, but therein, it’s absolutely critical. Broth is generally clean, light stuff – the essence of what it was made from, but not highly seasoned. In a great bowl of ramen, the broth stands out as something very different – bold, rich, loaded with umami – and tare is where most of that comes from. 

What tare is made from in any given great bowl is often a mystery – It’s each cooks special magic, and I t’s up to us to parse out what we‘re tasting and formulate our own. Fortunately, there are lots of clues – you’ll find ramens named for a key tare ingredient – Shoyu (soy), Miso (soybean paste), Shio (salt), or Tonkotsu (pork bone) to name just a few. A browser search will turn up a wealth of starting points for you, and of course you’re welcome to riff off mine, so long as you go on to make it your own. 

Think of tare as a chord – pick out your key or dominant note, and then add whatever else you like, (I find Dornberg and Page’s The Flavor Bible indispensable for work like this). Tares are very likely to include soy sauces, mirin, rice vinegar or rice wine, sake, or kombu. As you’ll see below, I went quite far afield in a search for a balanced tare with touches of salty, sour, sweet, and heat – and tons of umami. Tare should be the first thing added to the bowl when you’re doing final assembly – that’ll fully incorporate with the broth.


Noodles, the right noodles, are arguably critical to killer ramen. Technically, we’re talking about a Chinese-style alkaline noodle, comprised of wheat flour, water, a little salt, and Kansui, aka lye or alkaline water. It’s widely used in world cooking, and while it’s true it’s highly caustic stuff, won’t hurt ya deployed in tiny amounts for noodle making. Now, you can make ramen noodles at home, or even convert pasta to a reasonable facsimile if you’re so moved – but know that DIY for really good ones is not easy at all, and may well lead to more frustration than fun. Truth be told, most restaurants buy theirs, so go visit your local Asian grocery – there’s a ton of variety, as you can see here at Vancouver’s T&T Supermarket.


Toppings are the element that will provide you with lots of flexibility and creativity. You can go from super simple to wild as you like – it’s your ramen, so the sky’s the limit. Toppings might be anything from slow simmered chashu pork, to the sublime ajisuke tamago – marinated ramen egg. Try snappy quick-pickled veggies, bamboo shoots, water chestnuts, scallions, nori, or your fave mushrooms. Use your imagination and dress that bowl up, paying attention not only to taste, but composition as well.


Finally there’s Oil, and it’s the one secret ingredient most likely to be missed – and it absolutely, positively must not be – it’s a critical element for some very good reasons. Oil is yet another place to add a little something, usually aromatics, that’ll make your ramen special. Secondly, oil is hydrophobic – it doesn’t mix with water much at all, (and broth is basically water.) When you add a little bit of oil to the bowl, (and you’ll add that at the start of composition, with the tare), it’ll float to the top once everybody is in the pool. The oil helps extract flavor from the broth, and adds its own subtle notes – it also seals the dish somewhat, helping your ramen to stay hot.

So there ya have it – Now let’s deploy. Below is what I did in most of the images you see here – riff off of that and make one your own.


Urban Ramen

Feed 2, maybe – scale accordingly 

1 Quart Broth (preferably homemade, whatever variety you dig).

Tare – see below, and plan on 2 Tablespoons per bowl.

Ramen Noodles – Most of what we buy are around 8” long – a bundle roughly the size of a quarter per person is the minimum measure.

Toppings – Don’t be stingy – a cup of each for two people should do.

Oil – see below for a recipe that’ll last a while – Plan on 1 Tablespoon per bowl.


For the Oil

Makes a lightly flavored oil – you can load it heavier if you like.

1 Cup Avocado Oil – (Canola is fine)

2-3 fat Cloves Garlic

2 teaspoons Asian Chile flake (whatever you like)

2 finger pinch of Salt

In a small, heavy bottom sauce pan over medium heat, add the oil and garlic.

Use a kitchen thermometer to closely monitor oil temp, and reduce heat as soon as you pass 200° F – you want to stay right around 225° F, which means barely a bubble now and then – no higher, or oil and garlic will take on a nasty burned smell. Cook for 30-60 minutes until the garlic is golden brown, and check on it frequently!

Put the Chile flake in a small steel or glass mixing bowl. 

Remove oil and garlic from heat and slowly pour over the oil. I add about a tablespoon of minced, roasted garlic at this point – it adds a nice color and toasty flavor to the mix. 

You should get a nice little sizzle and foaming from the Chile as the oil hits it. Add the salt and stir to incorporate.

When the oil has cooled, you can strain off the chiles and garlic, or leave them in as you please, (personally, I’m eatin’ that garlic post haste)

Store refrigerated in an airtight glass container.


Urban Tare

Notes: The vinegar used here is incredibly complex, intense, 10 year old Chinese stuff. If you love amazing vinegar, go to http://www.themalamarket.com and buy some. Good quality, barrel aged Jerez vinegar would be a great sub.

You can make your own Shichimi Togarashi, or buy it – See below

1/2 Cup Dark Soy Sauce 

1/2 Cup Double Black Soy Sauce 

1 Cup Mirin

½ Cup Sake

1/4 Cup Honey

2 Tablespoons Baoning Vinegar (Jerez is fine)

3-4 cloves fresh Garlic

2-3 Scallions

2” piece fresh Ginger Root

1-2 Tablespoons Shichimi Togarashi spice blend (see below)

2 finger pinch Salt

End trim, smash, and peel garlic.

Peel and rough chop ginger.

End trim, peel and rough chop scallions.

In a heavy bottom saucepan over medium heat, add all of the ingredients and whisk with a fork to thoroughly incorporate. 

Bring the mix to a gentle boil, then reduce heat to a simmer. 

Cook until the sauce has reduced by half and thickened enough to nicely coat the back of a spoon, about 15 to 20 minutes.

Remove from heat and pour through a single mesh strainer into a clean glass container.

Store refrigerated and air tight.


Shichimi Togarashi Spice Blend

This stuff rocks on and in all kinds of stuff

2 Tablespoons Red Chile flakes (Use what you like – Your local Asian grocer should have plenty)

1 Tablespoon dried Orange Peel 

2 teaspoons White Sesame seeds

2 teaspoons Black Sesame seeds

1 teaspoon Sichuan peppercorns

1 teaspoon Ginger powder

1/2 teaspoon Poppy seeds

1/2 sheet toasted Nori

In a clean, dry cast iron skillet over medium low heat, add the sesame seeds, Sichuan peppercorns, and poppy seeds.

Lightly toast, attending constantly, until fragrant. 

Immediately remove from the skillet and transfer to mixing bowl to cool.

Hand crumble the Nori.

Place all of the ingredients in a spice grinder and pulse until coarsely ground – don’t overdo it, you want a coarse blend.

Transfer and store in a clean, dry, airtight glass jar.


When you’re ready to rock – 

Put your broth over medium heat, and add anything to that you feel like doing. Reduce heat to a bare simmer and let it do its thing while you build everything else.

Prep your toppings and set either as a mis en place for you to use or at table for diners to load their own.

Notice that additional proteins are not considered a critical element – That said, they are common toppings. You may do anything from firm tofu to pork, poultry, beef, or soft boiled egg.

If you’re doing a quick pickle, prep and start that before you make oil and tare.

Anything else, from kombu to shiitake, can be quickly portioned.

Prep your noodle boiling rig and colander for draining.

When you’ve got a vigorous boil, add noodles and stir in – they cook quickly, usually only 3-4 minutes, so stay with them. 

Pour noodles into colander and give them a quick rinse with fresh water to remove excess starch and alkalinity.

Put noodles back into the dry boiling vessel, add a tablespoon of your oil, and toss to coat thoroughly.

Assemble your bowls – Tare and oil go in first, then broth, then noodles, then toppings.


Serve immediately, and devour with many yum yum noises.

Painless Enchiladas with Red Chile Sauce


Ever made your own enchiladas, including the sauce? If not, it’s quite easy and a great opportunity to make something you love exactly as you love it. I made these for my Minnesota tribe and got some requests to share, so here we go.


Now, while the word ‘authentic’ gets tossed around way too much, there’s usually no tomato at all in what can arguably be called authentic enchilada sauce. The tomatoey version is a Tex-Mex thing – doesn’t mean that’s bad, just that it’s done to please the Gringo palate. Seriously though – either way is fine if that’s what you dig, but you really should try a tomato-free version if you’ve not done so yet.

That said, frying enchiladas before they’re finished in the oven is done to avoid the dreaded SES – Soggy Enchilada Syndrome – That’s a thing you don’t want in your kitchen. Happily, you can achieve the same thing in the oven and still end up with top notch enchiladas.

You’ve probably noticed that when you cut into a great enchilada at your favorite restaurant, there isn’t much of anything inside other than meat and maybe cheese – that too is done to avoid SES. When you’re building this dish, leave the vegetables in the salsa or the pico de gallo, and keep the enchiladas simple.

You can fill enchiladas with anything you want – from chicken, beef, or pork, to shrimp, fish, extra firm tofu, crunchy veggies, or fresh heirloom potatoes. Just make sure whatever you stuff with isn’t wet.

You can make the sauce with any number of dried chiles, either whole or ground. Ground chiles can make the sauce a bit grainier than whole dried, but if you give them enough time working in the roux, you’ll overcome that, and they’re much faster to prep. 

Use whatever chiles you like best – Guajillos have great flavor and not much heat, chipotles have a nice smoky note and medium heat, arbols have great flavor and plenty of punch, and anchos and negros both add nice complex flavors without too much heat. If you use whole dried, soak them in boiling water for 15-20 minutes, remove the seeds and stems, and either mince or blend as you see fit. You’ll likely want to strain the results to keep things smooth, but you can go rustic too.


Urban’s Chicken Enchiladas with Red Enchilada Sauce

For the Enchiladas

1 pound Chicken – Breasts are super easy, thighs are more flavorful.

1-2 Cups Shredded Cheese – Queso Asodero or Oaxaca for authenticity, Jack is a fine sub.

6 Flour or Corn Tortillas – 7” to 9” work best for a standard 8”x8” or 9”x9” baking pan.

For the Sauce

2 Cups Chicken or Veggie Stock

3 Tablespoons Dried Chiles  

1 Tablespoon Smoked Paprika

1 teaspoon Cumin

1 teaspoon Mexican Oregano

1/2 teaspoon granulated Garlic

2 Tablespoons AP Flour

1 Tablespoon Butter

1 Tablespoon Avocado Oil – Any neutral oil will sub fine

Salt and Pepper to taste


Portion chicken into roughly 1/2” chunks.

Grate cheese.

Combine chiles, paprika, cumin, oregano, and garlic and mix well.

In a heavy skillet over medium heat, add a tablespoon of oil and heat through. 

Add the chicken and sauté until all visible rawness is gone from the chicken, about 3-5 minutes.

Remove chicken from heat and let cool.

In a heavy pot over medium-low heat, add the oil, butter and flour and whisk with a fork to incorporate. 

Allow the roux to heat through, about 2 minutes.

Add the chile blend and whisk into the roux thoroughly. 

Let the sauce base cook for 2-3 minutes, whisking constantly, (As in, don’t walk away…)


Gradually add stock, about a quarter cup at a time, gently but thoroughly whisking each time to let the sauce stretch without breaking the roux. Things will look like real dirty mashed potatoes until you get to around 1 cup of stock – that’s what you’re after, so be patient. Allow the sauce to return to full heat before adding each additional dose of stock.


Turn heat to low and allow sauce to barely simmer for 10-15 minutes, until it has thickened a bit.

Taste and add salt and pepper as desired.

Turn the heat off and leave the sauce on the stovetop.

Preheat oven to 325° F and set a rack in the middle slot.


Set up assembly area for the enchiladas, (chicken, tortillas and baking pan), and very lightly grease your baking pan.

Eyeball the chicken and grab about 1/6 of the total. Holding a tortilla in your off-hand palm, add an even layer of chicken to the middle of the tortilla, then gently roll the long edges over each other. Place the enchilada seam side down in the baking pan. Repeat with the other five enchiladas.

Bake bare enchiladas for about 5-7 minutes, until the outsides of the tortillas are lightly browned.

Remove baking pan from oven and top the enchiladas with an even layer of grated cheese. Return the pan to the oven for about 2-3 minutes to let the cheese melt – this step helps a lot to avoid SES.

Remove pan again and top the enchiladas with sauce – you don’t need to drown them, just make sure they have a nice, even layer that coats them thoroughly.


Return to oven and bake for about 15 minutes, until the pan is bubbling nicely and the cheese has melted into the sauce.


Serve right away with rice, beans, salsa or pico and devour with abandon.

Epis – The Heartbeat of Haitian Cooking


Aromatic bases are the signatures of so many cuisines – be it mirepoix, soffritto, sofrito, or cajun holy trinity, they’re the framework upon which everything is made – and Haitian is no exception. Here, the base is Epis – the heartbeat of the majority of savory dishes we enjoy from that ethereal cuisine. 


Haitian cuisine, (aka Haitian Creole), is by definition, fusion cookery – a mashup of West African, Spanish, and French, with a pinch of Arabic influences. It’s not shy – it’s gutsy, sometimes in your face – and most of that influence hails from its West African roots.


It’s damn near impossible to define ‘classic’ epis – like so many signature bases, everybody’s version is a bit different, and they’re all the best, period. That’s not a problem at all, because what you get to do is add yours to the mix. The signature flavors of Haitian cooking – Habanero (aka Scotch Bonnet) chiles, allspice, cayenne, nutmeg, bay leaf, peppercorns, mustard seed – any or all might find their way into your mix.


Whereas many aromatic bases are used directly for cooking, epis is more oft used as a marinade. That’s a good thing, because you can whip up a batch and store it in your fridge for rapid deployment when the spirit moves you – and that contributes greatly to spontaneity and exploration. Haitian rice and bean dishes, soups, stews, and veggie curries all employ epis, as do marinades for beef, pork, chicken, goat, crab, and shrimp.

Epis stores well refrigerated – it’s got sufficient acidity to last several weeks. If that makes you nervous, it freezes extremely well – that’ll allow you to do one of my absolute favorite tricks – fill an ice cube tray with an airtight lid with epis and freeze that – you just pop out however many cubes you want and go to town. 

Here’s my go-to version – take a swing at it and make it yours – and let me know how it goes.


Urban’s Haitian Epis

2 Green Bell Peppers

1-3 Habanero Chiles

1 medium Sweet Onion

1 large bunch Cilantro (about a packed cup)

2 stalks Celery 

3 fat cloves Garlic

3 Green Onions

1 fat Lime

8-10 sprigs fresh Parsley

4-6 sprigs fresh Lemon Thyme

1/4 Cup Avocado Oil

2 Tablespoons Pineapple Vinegar

2 Tablespoons Chicken Stock

2 teaspoons Mustard Seed

8-10 twists fresh ground Pepper

1/2 teaspoon ground Allspice

Pinch of Salt


End trim and gut the bell peppers.

End trim, peel and rough chop the garlic, onion, and green onions.

Stem and rough chop the cilantro, and parsley.

Strip leaves from the lemon thyme.

Zest and juice the lime.

End trim and rough chop the celery.

End trim and rough chop the habaneros – be careful, and field strip the whitish membrane and seeds, I f you prefer a less nuclear option.

Throw everything into a blender and pulse to form a uniform sauce/paste.

Store refrigerated, in a sanitized glass jar, or freeze.

Deploy with wild abandon.

Fabulous Fusion Poke


I’ve got a social media pal who wishes to remain anonymous, but happily allowed me to post up this marvelous fusion poke recipe. And when you feast your eyes on the image below and read the recipe, you’ll know why I was excited to share it.


Poke is of Hawaiian origin. There are various stories of how it came about, but the one that rings truest to me goes something like this – sometime in the 1970s fisherman trimming their catch realized that some very tasty bits of fish were being wasted. OG Poke was made from great tuna, Hawaiian salt, seaweed, and candlenut meat – and that venerable version is very popular to this day.

All that said, poke is a dish that begs for innovation, and what you find below is innovative in the most delicious sense of the word. Take a swing at it, enjoy, and as always, share your work.

My fusion poke tuna recipe (Indonesian, Korean, Hawai’ian, Japanese)

2 sushi grade tuna steaks, about 8oz total, large dice

1/4 cup light soy sauce (Japanese)

1 tablespoon toasted sesame oil

2 teaspoons freshly grated young ginger

1 teaspoon gochugaru (Korean hot pepper flakes)

1/2 teaspoon chili garlic sauce (Indonesian)

1/2 teaspoon sambal oeleck (Indonesian — adds umami, substitute a dash of fish sauce)

1/4 cup sliced green onion tops


Tuna is most easily diced while still partially frozen.

Combine marinade, add tuna, refrigerate an hour (use within a short period of time, never more than 24 hours)

Adjust seasoning to your taste.

Serve with sushi rice and your favorite veggies and toppings

Pickled ginger

Furikake seasoning (or sub kimchi)

Sea grapes – which are seriously yummy

Unagi sauce (eel sauce)

Edamame

Masago roe

Shredded carrots

(Left to prep: mango & cucumber)

How to make Sushi rice

Real Deal Wild Rice


Rice is a delightful main, side, or primary ingredient year round, but shines best in the warm months, when cold rice-powered salads enter the fray. And if you’re going to make those, then wild rice should be your grass of choice.

Real deal wild rice is absolutely fabulous – the combination of flavor, texture, scent, and visual appeal is unrivaled – and it pairs wonderfully with many more delicious things. Wild rice, (manoomin (Mah-new-min) in Ojibwe), stems from the genus Zizania – which would be a swell band name, I think… That’s quite different from its kissing cousin Oryza, which gives us domesticated rice varieties.


Wild rice is an aquatic grass native to North America and China – the best known species is Z. palustris, the northern version that grows in lake and stream shallows across the U. S. and Canada, with a sweet spot in the Great Lakes region. There are other variants in Florida and Texas, and one in Asia (Z. latifolia). The stuff we like to eat is pretty much palustris, with some Z. aquatica along the Saint Lawrence river and the Atlantic and Gulf coasts.


While domesticated rices are certainly tasty, and can be extraordinary, (try Carolina Gold if you’ve not), they pale when compared to wild. Couple the richer palette of flavor notes and scents with a slightly al dente outer layer surrounding creamy inner grains, and you’ve got a little slice of culinary heaven. 


Now, caveat emptor, because there is ‘wild rice’ and real deal wild rice. The former is, in fact, paddy rice – it’s the right species, but grown in manmade fields and mechanically harvested. In Minnesota and Wisconsin, paddy rice has to be labeled as a commercial product, even if it’s called wild rice – and a fair share of this stuff may be GMO as well. If what you get is darn near black and takes 45 minutes to an hour to cook, it’s probably paddy rice. If it’s light brown and cooks up in 15 to 25, it’s the real deal – and yes, without a doubt, it’s worth finding. Paddy rice pales in comparison to real deal. If you don’t know someone to source from, then without fail, get some directly from the Ojibwe people here – Getting genuine wild rice from folks who know how to properly harvest and process is critical to assuring best quality, and to help protect future crops.


Real deal wild rice grows where it sows and is traditionally harvested by hand, usually in late summer. It’s generally a two person job, with one poling the canoe while the other, (the Ricer), handles the harvesting. Here’s a wonderful video that details the entire process. Proper drying/parching is as critical as harvesting – do this right, and the rice can be stored and enjoyed long term. Manoomin is a sacred, critical food source for the tribes that manage and depend on it, as they have for thousands of years. As David notes in the video, proper respect and reverence for this gift is something we all must give. This video from PBS details the environmental pressures that threaten Manoomin in Minnesota.


So, now that we know, what are we gonna make with this lovely stuff? Your first go needs to be just the rice, in all its glory. Don’t get caught up thinking this is a side dish – wild rice is a complete protein sporting nine essential amino acids. It’s lower in fat and higher in fiber than its cousins, and is a great source of potassium and zinc as well. Cook it in stock or broth and enjoy. Add fresh herbs or spices as you see fit, drizzle it with hazelnut or walnut oil. It’s a meatless meal you won’t regret.


When you do gussy it up, you’ll find affinities for citrus, poultry, scallions, really good vinegar, and cheese – especially feta. Wild rice shines in cold salads with tangy vinaigrettes and pickled vegetables, or crisp apple, crunchy celery and fennel. It makes a superlative stuffing, with shallots and rosemary. Pair it with slivers of prosciutto, or even better, game sausage, frisée or rocket (which I like to call Werewolf Lettuce – you know, Arooooogula?), and a chiffonade of fresh sage leaves. Try Greek oregano, Greek olive oil, and pine nuts. And yeah, if ya wanna do what everybody and their dogs do, you can add dried fruit and/or almonds…

Cooking wild rice can be done stove top, rice cooker or InstaPot – given how rare and precious this stuff is, I always opt for the former method – that lets me keep an eye on things throughout. No matter how you cook, you should rinse your rice first. Put it in a big mixing bowl and add plenty of cold water. Swish things around, and you’ll see the water grow cloudy. Pour that off and repeat a few times until your runoff is fairly clear – this reduces the excess starch that sticks to the outside of the grains.

Better yet, soak your wild rice prior to cooking – that’ll notably reduce cooking time. Soaking also helps remove phytic acid that can hinder nutrient absorption, and helps to break down some of the harder to digest constituents of the rice grains. Use that big mixing bowl, cover the rice with an inch or two of water, cover the bowl and allow it to sit at room temp for 1-3 hours – any longer than that and your grains will burst prior to cooking.


Rice to water ratios for cooking are as follows

Stove Top – 1:4 rice to water

Rice Cooker – 1:2 rice to water

InstaPot – 1:1.25 rice to water 

For stove top, bring water or stock to a brisk simmer, then add the rinsed/soaked rice.

Allow to return to a brisk simmer, then reduce to maintain that, uncovered.

Simmer until the outer layer of the grains is nicely al dente and the insides are creamy, and most of the water or stock is absorbed.

Drain rice, return to the cooking vessel and cover.

Allow rice to sit for 10 minutes, then serve hot, or allow to cool to room temp if making cold salads.

Here’s a simple, deceptively delicious cold salad we absolutely love, by it’s lonely or as an accompaniment.

Note: Pineapple vinegar adds a really nice touch to this, and many other things – Here’s how you can make your own.


Urban Wild Rice with Artichoke Hearts and Sun-dried Tomato

Makes 1 main dish or 4 side dishes

2 Cups cooked Wild Rice

1/2 Cup Sun-dried Tomato

1/2 Cup Marinated Artichoke Hearts

1 fresh Scallion

2 Tablespoons Pine Nuts

4 Tablespoons Avocado Oil

2 Tablespoons Pineapple Vinegar (Apple Cider Vinegar is fine)

Sea Salt and fresh ground Pepper to taste

Fresh Parsley to garnish


With a fork, portion tomatoes and artichoke hearts onto paper towels and allow to drain, then pat dry.

Rinse, end trim, and cut scallion into 1/4” rounds.

In a small skillet over medium low heat, add the pine nuts and toss, stirring steadily until fragrant and golden brown, about 3-5 minutes. Don’t ever let ‘em out of your sight – they’ll burn in a heartbeat, and they ain’t cheap.

Combine oil and vinegar, a two finger pinch of salt and 3-5 twists of pepper in a non-reactive bowl, whisk to thoroughly incorporate.

In a salad bowl, add rice, tomatoes, artichoke hearts and scallions. 

Add the dressing and toss to throughly coat.

Add pine nuts and parsley and devour.

If there’s quite a bit of time before you’re serving this salad, wait to dress – otherwise the wild rice will absorb the dressing quite greedily.