A Paean to my Knifemaker


this essay was first posted three years ago this month. I repost important stuff from time to time, and this is important stuff – so read on!

I have a Knifemaker. This does not make me elitist – it makes me happy. It’s surprisingly affordable and it provides me with the best kitchen tools I’ve ever owned. You should have a Knifemaker too, and believe me, you can.

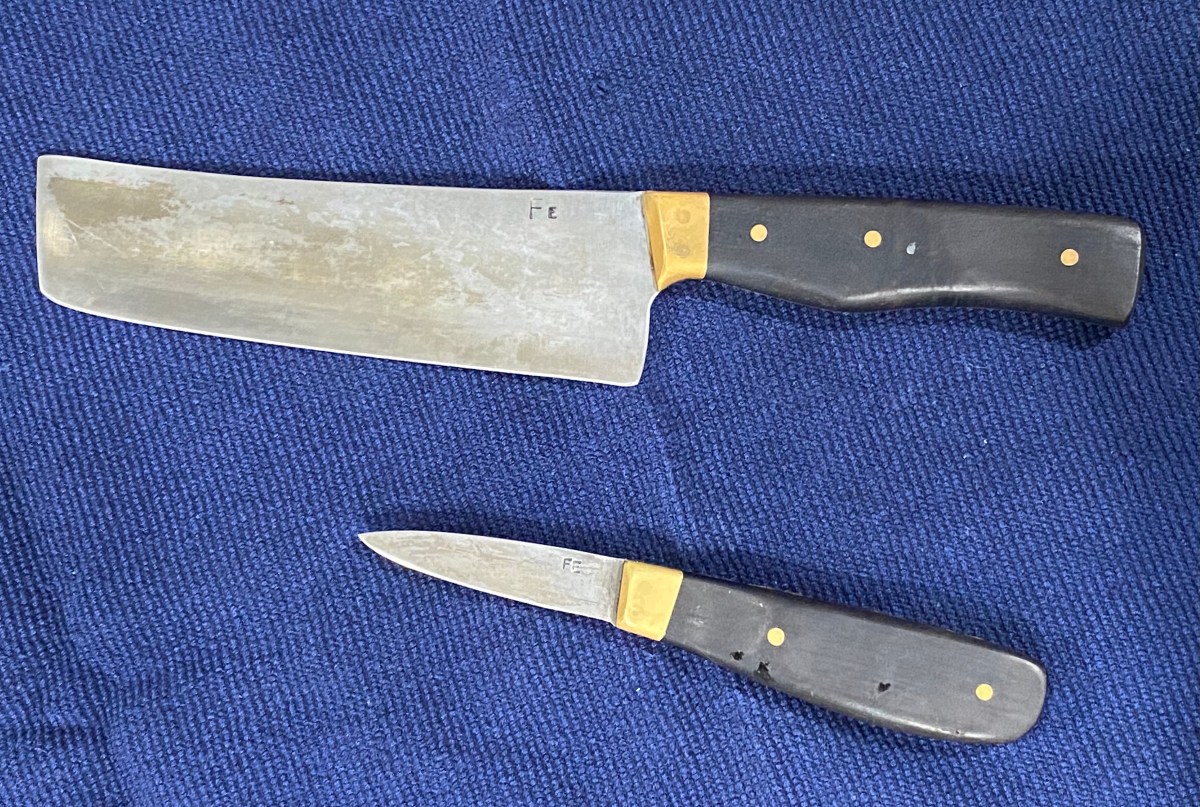
Prepping for dinner the other night prompted this post. I looked at my knife block, and was about to reach for The Thumbslayer, my pet name for the last knife my guy made for me. It’s my go to blade, and with that and my favorite parer, I can do every job that requires a knife in my kitchen.

As for why it’s called the Thumbslayer? Let’s just say that during prep, the Mariners made a great play, and… I’ll leave it at that. One of my favorite Tony Bourdain quotes is this – ‘when you cut yourself in the kitchen, half the pain you feel is the realization that you’re a dumbass.’

Then my eye drifted up a slot, and landed on the first knife Andy Gladish of Element Fe Forge made for me, and I grabbed that instead.

That blade I grabbed is the biggest one I own, an 8” Santoku, with a lovely live edge. As I prepped mire poix, I noted how this one felt like an extension of my hand, perfect balance and power, making any job a joy. When you see a Chef use one big knife for everything, even pretty fine work, it’s not showing off – it’s because a very well made knife can and will do it all, comfortably and efficiently.


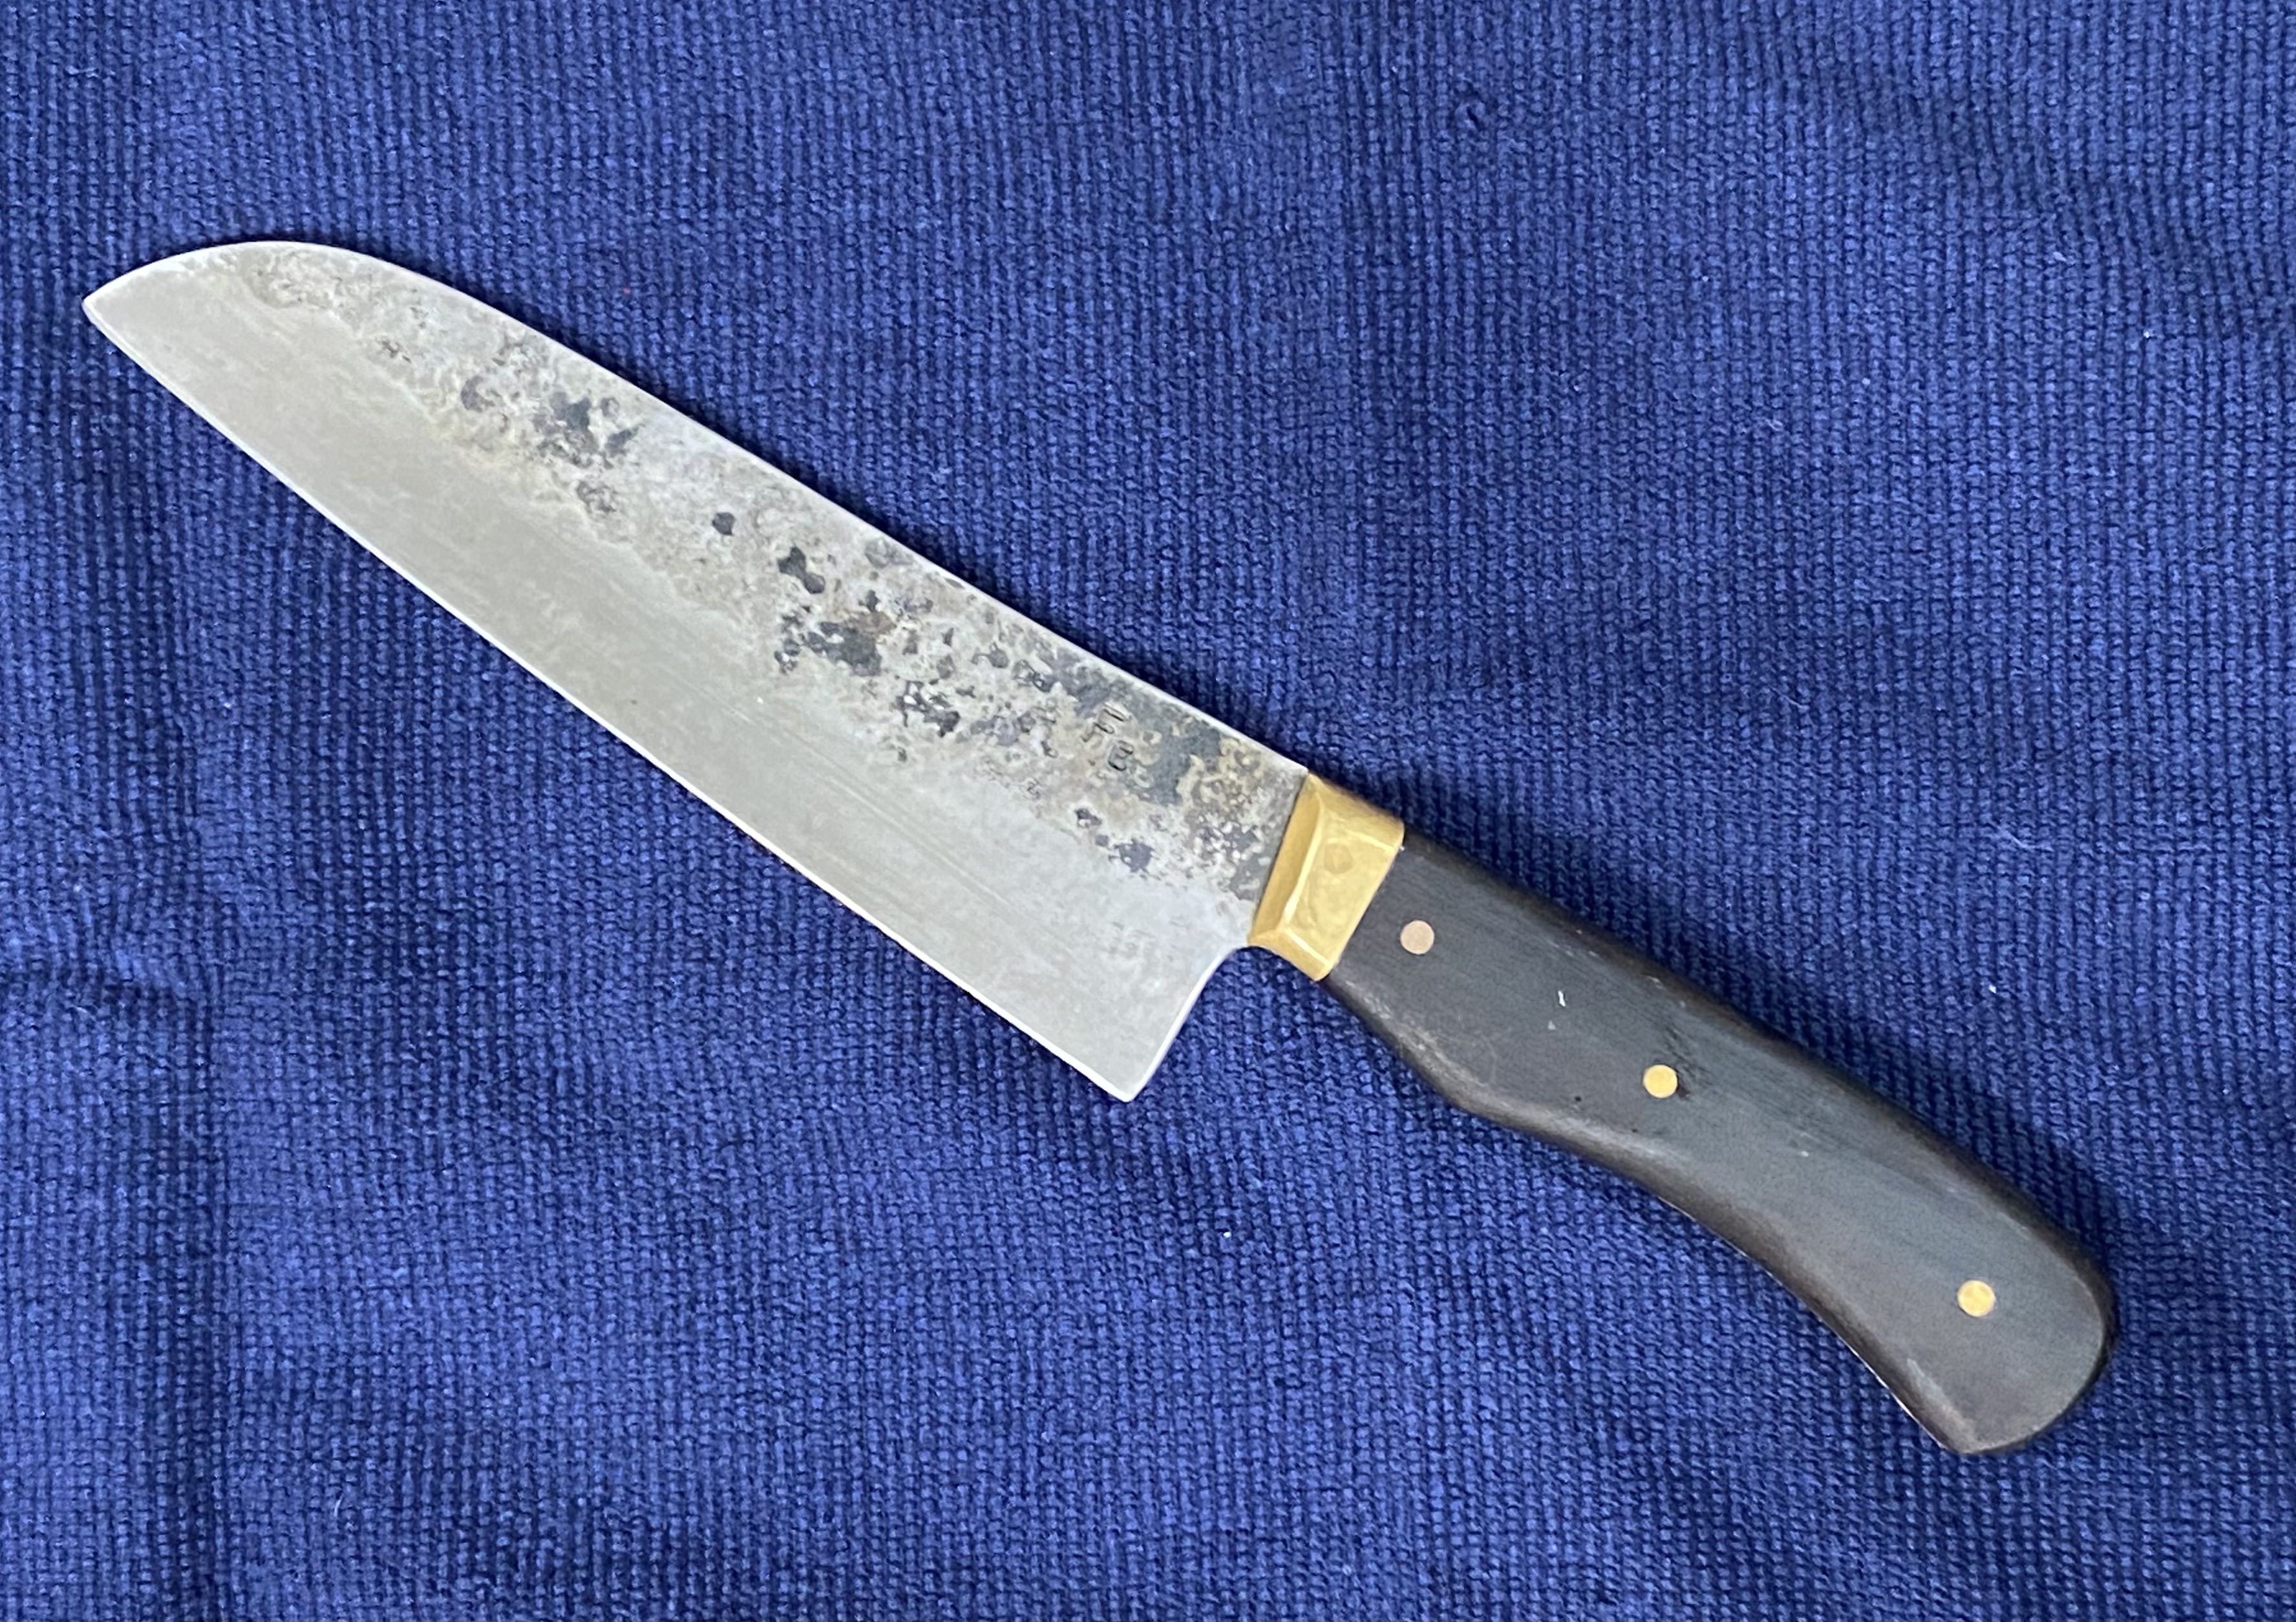
When Andy made this one for me, we had collaborated on what I wanted, but he really didn’t know me at all – and yet the blade he created ended up being perfect for me.


There were others after that one, of course – in fact, there were eight more, and as you can see, they’re the only knives I own and use every day. There’s the Thumbslayer, which is our riff on a Chinese cleaver, a boner, a carver, a serrated slicer, and four, count ‘em, four parers – a thin, flexible drop point 3”, a stiffer 3.5” spear point, a 3” hawkbill, and a 5.5” serrated – and yes, even Andy once asked, ‘haven’t I made you enough parers?!’

From the bottom – 3” flexible, 3/14” stiff, 2 3/4” bird beak, 4” serrated

The truth is that I don’t really need all those others, and you don’t either. One version of a general chef knife that floats your boat and one paring knife will do pretty much all of the work you need done in your kitchen too.

These two can and will get it all done for you

So why do I have so many? Well, ‘cause I can, and because I do stuff you might not where having a job-specific blade is important, and because I love the relationship that sees them made and then housed in my kitchen. And if you want more than two knives, you can have ‘em, too.


The differences between a great, handmade knife and even a good knife are profound – The former does everything a knife needs to do better than the latter – with less effort, greater control, and a much better feel for the work – In other words, it’s well worth it.

Having a knife made for you by Andy won’t cost you any more than a decent name brand production knife. In a world where you can easily spend several hundred bucks on a chef’s knife, (and way more than that if you really wanted to), his will cost well less than that.

If you buy something he makes a bunch of, it’ll be a hand forged knife with great balance and power, just like mine. If you discuss something specific you want, and partake in the design process, it’ll be even better.

And if he makes more than one for you, the next will be better yet. It’s probably not coincidence that the two blades I use most are the last two he’s made for me – by this point in the relationship, he knows very well what I want.

When you have Andy make your knife, you’re supporting a network of small businesses, (if you include Andy’s suppliers), and you’re getting a very high quality hand made tool in return – I guarantee that you’ll find that process infinitely more satisfying than paying a faceless mass producer.

So what do you want in a chef’s knife? You can go the western route, (think Wusthof or Henckels), or Asian, like my Santoku or Chinese cleaver inspired blades. Size is a matter of what you need versus what you can comfortably wield – my Santoku is an 8”, the thumbslayer is around 7” – I prefer the shorter length for most jobs, and anything between 6” and 9” is reasonable.

A paring knife with a blade in the 3” to 4” is all you need there. Then decide how you like that blade to perform – do you want it flexible or more rigid? Do you like a drop point, or a spear point, or something else? It’s your knife, you get to choose.

As for what to have them made from, that too is your choice. Monica likes stainless steel, while I prefer high carbon. There are pros and cons to both. Generally, stainless is harder and holds an edge longer, while high carbon sharpens easier and, to me at least, gets sharper – but it will stain, and requires a bit more upkeep. Andy can explain the options on steel better than I can, but in a nutshell, that’s it.

I’ve gifted Andy’s knives to others, and recommended them to anyone and everyone. To a person, everyone who now owns one says the same thing – love them, best I’ve ever had.

I think that Christy Hohman sums up what I’m trying to say here better than I can –

‘Since I am the happy owner of two knives made by Andy, I have to add a KnifeTale here. I have always loved to cook, but usually got by with whatever motley assortment of knives happened to be in the drawers of various places where I lived. Then I got a knife block and set of Chicago Cutlery. Wow, I was in heaven…. until Eb and Monica sent me a set of Henckels. Then the Chicago set moved to the cabin and I was in heaven again. But then Eb gave me two knives made by Andy and I’m set for life. They are never put away because I use them multiple times a day. They are always at the ready on the butcher block my bro made me. The Henckels are only used on occasion when I need a larger knife to do something like cut a winter squash. I love my knives and you deserve some too!’

If you’re in the market for a new go-to knife, you now know where to go. I’m sure there are many other reputable makers out there if you prefer to find one near you – This is simply the guy I know and love and recommend without hesitation.

Brown Butter Blondies


Ah yes, the sinful loveliness that is the Blondie! As best as I can tell, this is an American treat – they’re really just a brownie derivative of course, and it seems that the trend and the name blondie or butterscotch blondie appeared in the mid 1970s.


we don’t do a whole ton of dessert, but every now and again the spirit moves – I got thinking about these, and how using browned butter had made my go to cornbread so much better – why not do the same with blondies? They’re easy to built and don’t require a ton of prep.

I opted for white chocolate chips over butterscotch – to me, they taste a bit cleaner and less cloying, but you go where your heart leads ya.

You could do almonds, walnuts, peanuts, or pistachios instead of pecans, or no nuts at all – it’s your show.


Urban’s Brown Butter Blondies

1 1/2 sticks Butter
1 1/2 cups Brown Sugar
2 Cups Cake Flour
2/3 cup halved Pecans
2/3 Cup White Chocolate Chips
2 medium Eggs
2 teaspoons Vanilla Extract
1 teaspoon Baking Powder
1/2 teaspoon ground Cinnamon
1/2 teaspoon ground Allspice
1/4 teaspoon Salt


Have butter and eggs at room temp before you dive in.

Position a rack dead center and preheat oven to 350° F.

In a small sauce pan over medium high heat, melt butter.

Swirl steadily and stay with it once the butter melts and starts to sizzle. Cook until golden brown, about 3-4 minutes.

Remove from heat and carefully pour butter into a large mixing bowl.

Add brown sugar and whisk steadily to fully incorporate, 1-2 minutes, until the mixture is nice and glossy and the sugar is fully dissolved.

Refrigerate the mix for about 10-15 minutes, to room temperature.

Pull bowl from reefer, add the eggs and vanilla and whisk to thoroughly incorporate.

Add all remaining ingredients and whisk well. Your mix should be akin to a thick cake batter.

Send the bowl back to the fridge for about 15 – 20 minutes to let things set up and marry.


Lightly grease a 8”x8” or 9”x9” baking pan, (even if it’s nonstick)

Pour batter into pan and smooth the top with a spatula.

Bake until top is shiny and slightly cracked, about 20-25 minutes. Check with a toothpick – when stuck in and removed, it should come out clean – then you’re done.


Let cool completely before cutting into bars.

Devour with abandon.

Pickled Black Eyed Peas – A Paean to Helen Corbitt


Throughout the south, New Years Day is the one for building a lucky meal based on black eyed peas, (BEPs). Whether it’s with a ham hock and greens, or hoppin’ john, a whole lot of those perky little field peas get eaten on January first.

Field peas are grown over millions of acres worldwide. Closely related to green peas, they are an annual crop that originated in India, then migrated to Africa, and to North America some 400 years ago.

While we all pretty much have heard of the black eyes, there’s a bunch more cultivated and enjoyed here in the states – look up the Mississippi Silver, Texas Cream, and Dixie Lee varieties and you’ll get the picture. Check out Rancho Gordo, or Camellia for great dried black eyed peas, and Camellia offers several other field pea varieties.

Popular as they are, black eyed peas do present a bit of a problem for many folks – they just don’t like the taste. Field peas in general, and BEPs in particular are not bland – they’re quite bold in flavor, with an earthy, almost funky top note that many find off putting.

Perhaps the most famous hater of BEPs was Helen Corbitt, an Irish Yankee force of nature who, against her better judgement, took a job teaching catering and restaurant management at UT Austin in 1940. Her comments on that speak to her wonderful personality – she said, ‘Who the hell wants to go to Texas? Only I didn’t say ‘hell’ in those days. I learned to swear in Texas.’

When Corbitt hit the Lone Star state, its cuisine was generally abysmal. Helen Corbitt almost single handedly raised the bar of cooking in Texas – But black eyed peas remained her kryptonite, until she came up with the perfect solution, having moved on from UT to take over restaurant management at Neiman Marcus – Texas Caviar.

Texas Caviar was, under Corbitt’s skilled hand, basically quick pickled black eyed peas – BEPs with onion, garlic, oil and vinegar, a pinch of salt and twist of pepper – and my oh my, were they popular. Neiman Marcus sold a ton of it. So if you or someone you love can’t quite hack the taste of BEPs, Helen’s brilliant twist on those field peas is the answer.

Look up ‘authentic Texas Caviar recipes,’ and you’ll find a raft of them – almost all of which have everything but the kitchen sink in the mix, and almost none of which mention Corbitt or reflect her original recipe. Fact is, the specter that Helen faced when she arrived in Austin has risen again with these recipes – canned goods, evident in spades. Canned corn, tomatoes, chiles, green peas and black beans, just to name a few.

You’ll also find bell peppers, sugar, bottled salad dressing, avocados, and… yeah – you get the picture. Now, to be fair, a lot of that may be added to hide the funk of BEPs, and if so, Helen would likely approve.

Here’s my swing at a recipe based on Helen Corbitt’s original inspiration, with just a twist or two reflecting things I really like. When Helen came up with this gem, it was 1957 – she didn’t have a whole hell of a lot of choices for onion varieties, oils, or vinegars – even jalapeños would have been a bit exotic back then. Now we have choices galore, and those should be celebrated – Helen would want us to do just that.

Try it out, and then tweak it to exactly how you like it and make it yours – you can certainly do a vinegar brine without oil if you’d like to. Whatever you make, don’t even think about using canned peas – cardboard, even nicely pickled, remains cardboard at heart.

Thank You Helen Corbitt Pickled Black Eyed Peas


4 Cups cooked Black Eyed Peas

1/4 small Onion

1 Jalapeño Chile

3 fat Cloves fresh Garlic

1/2 Cup Avocado Oil

1/2 Cup Pineapple Vinegar

6-8 twists fresh Black Pepper

3 finger pinch Kosher Salt

Peel, end trim and dice onion.

End trim and dice jalapeño – Field strip the chile if you want less heat, AKA remove the white inner membrane – that’s where the heat lives in chiles, not in the seeds.

End trim, smash, peel and mince garlic.

Pour cooked beans into a clean quart mason jar.

In a small mixing bowl, combine oil, vinegar, salt, and pepper and whisk with a fork to fully emulsify.

Pour dressing over the beans, leaving about 1/2” head space.

There will likely be a bit too much of everything to get it all in the jar – Darn – guess you’ll just have to scarf that down…

Seal jar and refrigerate for at least 3-4 hours to allow the flavors to marry and the tartness to develop – and overnight is even better.

Will last about 5 days refrigerated – as if it’ll be there that long…

Great Meatballs at Home


Meatballs – they seem so simple, yet let’s be honest – how many times have you tasted or made something that, when you bit into it, just didn’t quite cut it? Me too. No worries though – like all good things, there are keys to consistently exceptional meatballs, and if we know and follow the rules, we’ll churn out delightful little balls of deliciousness every time. 


Meatballs can be made from all kinds of proteins, from tofu to beef, pork, or poultry. Any of those options can and should turn out juicy and delicious. When they don’t, there’s almost always a broken cardinal rule or three to blame. Here, for your edification, are the most common culprits and solutions.

Dry Meatballs – Too little fat is the most common cause. Proper meatball mix fat content should be around an 80%-20% ratio of protein to fat – that’ll give you consistent results. If you’re adding cheese, sour cream, Crema, crème fraîche, chèvre, whole milk yogurt, etc, don’t forget to factor that in. As such, starting with 90%-10% protein will often do the trick. 

Overcooking – this happens most often because we disregard internal temperature when we’re cooking meatballs. You should pull ‘em when they hit 160° to 165° F – They’ll easily hit ten degrees higher than that after you yank ‘em, so don’t go any higher in the oven.

Keep overcooking in mind when you reheat/cook them further in sauce – yes, braising keeps things from drying out, but if you’ve baked to proper temp, the sauce session should be monitored for heat and time – it’s still possible to overcook meatballs in sauce – it happens a lot.

Overworking – this occurs most often due to mechanical interference, AKA mixing with something other than your hands. When meatball mix is ready to form and bake, it has a feel – firm, not too wet or dry, and slightly springy. You can see all your ingredients, and know that they’re well mixed – you can’t get there unless you work it by hand – do that, and you’ll feel, smell, and see when your mix is ready to go.

Wet/Loose Meatballs – Believe it or not, this happens most often due to improper ratio of breadcrumbs/bread to meat. Yes, breadcrumbs hold moisture and are vital to the proper texture of meatballs, but add too much and you overpower your binder and end up with soggy or weak meatballs. If you really go overboard on crumbs, you’ll produce something with the texture of a matzo ball, and that’s not so good. 1/2 cup of crumbs or one slice of bread per pound of protein is the sweet spot.

Egg Problems can also lead to loose meatballs. You may think eggs are adding moisture to the mix, but that’s not their job – they’re there as a binder, and they’re critical to firm, bouncy meatballs that hold their shape. Add too much egg and you get soggy or sloppy – add too little and your balls fall apart. A ratio of one medium egg per pound of protein is the rule of thumb – if you add significant quantities of uncooked veggies to your mix, another egg is warranted.

Boring meatballs – Don’t laugh, it happens a lot. I think that folks get a mindset along the lines of ‘I don’t need to season and add herbs to my meatballs, because I’ll have all that in the sauce.’ Let’s do a quick experiment to test that theory – take a bunch of rubber balls, and cook them in your best pasta sauce… But seriously folks, the insides of a meatball have to be as great or greater than whatever they’re served on or in. Add veggies, cheese, herbs, spices, including salt and pepper in your mix, period, end of story.

Size matters – when you’re ready to form, use a disher or an ice cream scoop if you’ve got one. If not and you’re rolling your own, thoroughly clean and dry your paws, then oil them lightly – that’ll keep the mix from stickin’ to ya. In essence, size should based on what you plan to do with ‘em – if you’re not sure/gonna do different things, a 2 oz. ball should work great. If it’s something like Italian wedding soup, 1 oz. is better. If it’s something where you really want them to stand out, and will serve maybe 2 or 3 per person, a 3 oz. ball is fine. 

Enough about problems – let’s flesh out ratios, so we can build our own recipes with whatever we want.

Cheese – You can use dang near anything you like, but consider properties when you do – A cheese that melts really well will want to leak out of meatballs – harder cheeses, not so much. 1/4 to 1/2 cup per pound of protein is the sweet spot. If you use something really soft like ricotta or chèvre, you may want to deploy that second egg in order to keep everything tight.

Veggies – you can add up to 1 cup per pound of protein with few worries, but there are caveats – if you’re adding something really wet like fresh tomato, consider gutting them prior to deployment. Onions, shallot, garlic, fennel, carrot, and celery will all be fine, just make sure to prep them to a fairly uniform fine dice and watch the ratios – too much of a good thing will overpower your binder and lead to loose or soggy meatballs.

Herbs – fresh or dried is fine. I like to plan on a ratio of about 1 1/2 to 2 tablespoons of herbs per pound of protein – again, boring sucks, so make ‘em speak. I’ll generally go heavier on dominant notes and lighter on minors.

Seasoning – Salt and pepper are musts, period. A teaspoon of salt per pound of protein is about right, but don’t forget to factor in other ingredients – for instance, the feta I used in the recipe below is brined, so it’s definitely gonna add some salt to the mix, and hard cheese like Parmigiano and Pecorino carry a pretty good salt load too, so adjust accordingly. A teaspoon of pepper per pound of protein is about right for most tastes.

Liquids – Keep citrus juice, etc olive oil, to a teaspoon or two each and you’ll be fine. The liquid dairy stuff, if full fat, can be treated like cheese, but again, keep an eye on your binder ratio if you use them.


Enough about that, let’s make something. I told M I wanted to make turkey meatballs – her response was perfect – ‘why?!’ Ground turkey is not a fave for a lot of folks – I’ve heard it described as dry, tasteless, and downright gross. That’s exactly the challenge I was looking for to work up a perfect meatball. When I told her I was thinking about feta, fennel, and sage as major notes she allowed, ‘that might not be too bad.’ So off I went. 

Ground Turkey isn’t gross, and done right, it’s neither dry nor tasteless. It can easily be found or ground in the 10% to 15% fat range, and as long as it’s fresh, it’ll have a great texture as well, but it does not pack a whole ton of flavor. As such, I was loosely thinking of Keftedes, the signature Greek meatball – something with some serious zing to it. What I took from that was dominant notes of garlic and lemon, with a robust herb punch. Try these in your kitchen just as I detail below, then make them yours. If you wanted to go further down the Greek theme, you could add curly leaf parsley, mint, cumin, or warm spices like cinnamon and nutmeg.


Urban’s Perfect Turkey, Feta & Fennel Meatballs

1 Pound 90%-10% Ground Turkey

1/2 Cup Feta Cheese

1/2 Cup Onion

1/2 Cup Fennel Bulb

1 slice Sourdough Bread

3 fat cloves Garlic

2 medium fresh Eggs

Zest & Juice of 1/2 Lemon

1 Tablespoon Greek Olive Oil

3-4 fresh leaves Sage (or 1 teaspoon dried)

2 teaspoons dried Greek Oregano

1 teaspoon fine Kosher Salt

1 teaspoon ground Black Pepper


Set an oven rack in your upper middle slot and preheat to 400° F.

End trim, peel and slice onion roughly 1/8” thick – fine dice 1 cup and toss into a large mixing bowl.

End trim, smash and peel the garlic, then mince and add to the onion.

End trim, thinly slice, then mince the fennel.

Chiffenade, then mince the sage leaves, if using.

Zest and juice the 1/2 lemon – reserve both for now.

In a small mixing bowl, vigorously beat the eggs.

Portion feta, and olive oil.

Portion and combine oregano, salt, and pepper.

Toast the bread until lightly browned. Transfer to a shallow bowl and cover with warm water. 

Let soak for about 5 minutes, then pour off the water and squeeze the bread dry. Crumble that into the mixing bowl. NOTE: You can sub 1/2 cup of plain bread crumbs if you prefer.

Add turkey, and all remaining ingredients. Mix well by hand to thoroughly incorporate, but don’t smash and mash – a firm but gentle massage is what you’re after.

Line a rimmed baking sheet with parchment. 

Use a 2 oz. disher, scoop, or 2 tablespoon measuring spoon to portion and form meatballs – place them on the lined baking sheet with a bit of space between each.

Bake at 400° F for about 20 minutes, then check internal temperature – you’re looking for 165° F.

Set oven to broil, move baking sheet to upper rack and broil for 2-3 minutes until lightly browned. You can roll ‘em over and do the other side, or call it good as you see fit.


Serve with lemony Greek potatoes, rice, orzo, or other pasta, a salad loaded with tomato, peppers, and onion, and fresh Tzatziki


For the record, the mark of an exceptional meatball – not good, not great, but exceptional – is how good they taste for brunch two days later. For the record, M declared these the best meatballs she’s ever had – and she ain’t easy.

Superior Ramen at Home


Ever had fantastic ramen? If so, I’m willing to bet that, like me, you wanted to know how they did that. Fortunately, it’s entirely within our wheelhouse to make fantastic ramen at home. Let’s check out the keys to making ramen at home that will knock your socks off.

While a steaming bowl of ramen seems the essence of simplicity, the magic is in the details. There are five critical elements to a stunningly good bowl of ramen – broth, tare, noodles, toppings, and oil – so let’s dive in.


Broth is the undeniable heartbeat of a great ramen bowl. You can make it from whatever you wish – poultry, beef, pork, shellfish and fish, or veggie – In the version you’ll see images of here, I used homemade Parmigiano stock. Get into the rhythm of throwing leftovers into a stock pot and making your own on a regular basis. It’s delicious, beats the hell out of anything you can buy, and simple to do. If you want to make authentic ramen broth, dive into a browser search – you’ll find tons of recipes for everything from Chintan (clear soup) to Paitan (white soup).


Tare (Tar-eh) is the secret weapon to great ramen you might not have heard of. The literal translation is ‘dipping sauce,’ clearly indicating that you’ll find it in many places other than a ramen bowl, but therein, it’s absolutely critical. Broth is generally clean, light stuff – the essence of what it was made from, but not highly seasoned. In a great bowl of ramen, the broth stands out as something very different – bold, rich, loaded with umami – and tare is where most of that comes from. 

What tare is made from in any given great bowl is often a mystery – It’s each cooks special magic, and I t’s up to us to parse out what we‘re tasting and formulate our own. Fortunately, there are lots of clues – you’ll find ramens named for a key tare ingredient – Shoyu (soy), Miso (soybean paste), Shio (salt), or Tonkotsu (pork bone) to name just a few. A browser search will turn up a wealth of starting points for you, and of course you’re welcome to riff off mine, so long as you go on to make it your own. 

Think of tare as a chord – pick out your key or dominant note, and then add whatever else you like, (I find Dornberg and Page’s The Flavor Bible indispensable for work like this). Tares are very likely to include soy sauces, mirin, rice vinegar or rice wine, sake, or kombu. As you’ll see below, I went quite far afield in a search for a balanced tare with touches of salty, sour, sweet, and heat – and tons of umami. Tare should be the first thing added to the bowl when you’re doing final assembly – that’ll fully incorporate with the broth.


Noodles, the right noodles, are arguably critical to killer ramen. Technically, we’re talking about a Chinese-style alkaline noodle, comprised of wheat flour, water, a little salt, and Kansui, aka lye or alkaline water. It’s widely used in world cooking, and while it’s true it’s highly caustic stuff, won’t hurt ya deployed in tiny amounts for noodle making. Now, you can make ramen noodles at home, or even convert pasta to a reasonable facsimile if you’re so moved – but know that DIY for really good ones is not easy at all, and may well lead to more frustration than fun. Truth be told, most restaurants buy theirs, so go visit your local Asian grocery – there’s a ton of variety, as you can see here at Vancouver’s T&T Supermarket.


Toppings are the element that will provide you with lots of flexibility and creativity. You can go from super simple to wild as you like – it’s your ramen, so the sky’s the limit. Toppings might be anything from slow simmered chashu pork, to the sublime ajisuke tamago – marinated ramen egg. Try snappy quick-pickled veggies, bamboo shoots, water chestnuts, scallions, nori, or your fave mushrooms. Use your imagination and dress that bowl up, paying attention not only to taste, but composition as well.


Finally there’s Oil, and it’s the one secret ingredient most likely to be missed – and it absolutely, positively must not be – it’s a critical element for some very good reasons. Oil is yet another place to add a little something, usually aromatics, that’ll make your ramen special. Secondly, oil is hydrophobic – it doesn’t mix with water much at all, (and broth is basically water.) When you add a little bit of oil to the bowl, (and you’ll add that at the start of composition, with the tare), it’ll float to the top once everybody is in the pool. The oil helps extract flavor from the broth, and adds its own subtle notes – it also seals the dish somewhat, helping your ramen to stay hot.

So there ya have it – Now let’s deploy. Below is what I did in most of the images you see here – riff off of that and make one your own.


Urban Ramen

Feed 2, maybe – scale accordingly 

1 Quart Broth (preferably homemade, whatever variety you dig).

Tare – see below, and plan on 2 Tablespoons per bowl.

Ramen Noodles – Most of what we buy are around 8” long – a bundle roughly the size of a quarter per person is the minimum measure.

Toppings – Don’t be stingy – a cup of each for two people should do.

Oil – see below for a recipe that’ll last a while – Plan on 1 Tablespoon per bowl.


For the Oil

Makes a lightly flavored oil – you can load it heavier if you like.

1 Cup Avocado Oil – (Canola is fine)

2-3 fat Cloves Garlic

2 teaspoons Asian Chile flake (whatever you like)

2 finger pinch of Salt

In a small, heavy bottom sauce pan over medium heat, add the oil and garlic.

Use a kitchen thermometer to closely monitor oil temp, and reduce heat as soon as you pass 200° F – you want to stay right around 225° F, which means barely a bubble now and then – no higher, or oil and garlic will take on a nasty burned smell. Cook for 30-60 minutes until the garlic is golden brown, and check on it frequently!

Put the Chile flake in a small steel or glass mixing bowl. 

Remove oil and garlic from heat and slowly pour over the oil. I add about a tablespoon of minced, roasted garlic at this point – it adds a nice color and toasty flavor to the mix. 

You should get a nice little sizzle and foaming from the Chile as the oil hits it. Add the salt and stir to incorporate.

When the oil has cooled, you can strain off the chiles and garlic, or leave them in as you please, (personally, I’m eatin’ that garlic post haste)

Store refrigerated in an airtight glass container.


Urban Tare

Notes: The vinegar used here is incredibly complex, intense, 10 year old Chinese stuff. If you love amazing vinegar, go to http://www.themalamarket.com and buy some. Good quality, barrel aged Jerez vinegar would be a great sub.

You can make your own Shichimi Togarashi, or buy it – See below

1/2 Cup Dark Soy Sauce 

1/2 Cup Double Black Soy Sauce 

1 Cup Mirin

½ Cup Sake

1/4 Cup Honey

2 Tablespoons Baoning Vinegar (Jerez is fine)

3-4 cloves fresh Garlic

2-3 Scallions

2” piece fresh Ginger Root

1-2 Tablespoons Shichimi Togarashi spice blend (see below)

2 finger pinch Salt

End trim, smash, and peel garlic.

Peel and rough chop ginger.

End trim, peel and rough chop scallions.

In a heavy bottom saucepan over medium heat, add all of the ingredients and whisk with a fork to thoroughly incorporate. 

Bring the mix to a gentle boil, then reduce heat to a simmer. 

Cook until the sauce has reduced by half and thickened enough to nicely coat the back of a spoon, about 15 to 20 minutes.

Remove from heat and pour through a single mesh strainer into a clean glass container.

Store refrigerated and air tight.


Shichimi Togarashi Spice Blend

This stuff rocks on and in all kinds of stuff

2 Tablespoons Red Chile flakes (Use what you like – Your local Asian grocer should have plenty)

1 Tablespoon dried Orange Peel 

2 teaspoons White Sesame seeds

2 teaspoons Black Sesame seeds

1 teaspoon Sichuan peppercorns

1 teaspoon Ginger powder

1/2 teaspoon Poppy seeds

1/2 sheet toasted Nori

In a clean, dry cast iron skillet over medium low heat, add the sesame seeds, Sichuan peppercorns, and poppy seeds.

Lightly toast, attending constantly, until fragrant. 

Immediately remove from the skillet and transfer to mixing bowl to cool.

Hand crumble the Nori.

Place all of the ingredients in a spice grinder and pulse until coarsely ground – don’t overdo it, you want a coarse blend.

Transfer and store in a clean, dry, airtight glass jar.


When you’re ready to rock – 

Put your broth over medium heat, and add anything to that you feel like doing. Reduce heat to a bare simmer and let it do its thing while you build everything else.

Prep your toppings and set either as a mis en place for you to use or at table for diners to load their own.

Notice that additional proteins are not considered a critical element – That said, they are common toppings. You may do anything from firm tofu to pork, poultry, beef, or soft boiled egg.

If you’re doing a quick pickle, prep and start that before you make oil and tare.

Anything else, from kombu to shiitake, can be quickly portioned.

Prep your noodle boiling rig and colander for draining.

When you’ve got a vigorous boil, add noodles and stir in – they cook quickly, usually only 3-4 minutes, so stay with them. 

Pour noodles into colander and give them a quick rinse with fresh water to remove excess starch and alkalinity.

Put noodles back into the dry boiling vessel, add a tablespoon of your oil, and toss to coat thoroughly.

Assemble your bowls – Tare and oil go in first, then broth, then noodles, then toppings.


Serve immediately, and devour with many yum yum noises.

Roasted Brussels Sprouts To Die For


M and I have transitioned from hosting major holidays to a supporting role. I can’t say as we’re particularly bummed about that either…  Anywho, we do bring dishes with us of course, so when M said she needed ‘about 50 Brussels sprouts’ for Thanksgiving, I raised an eyebrow and did as I was told. Sure as shootin’ we ended up with a bunch we didn’t bring to the big shindig – And there you have it, another leftover that could use a little help. What I came up with to make proper use of them sprouts was absolutely delicious – in the immortal words of Jackie Chan, ‘no bullshit.’


Brussels sprouts are a cabbage family member, Brassica oleracae. Native to the Mediterranean, they hit Europe in the 5th century and became wildly popular in Belgium, specifically around Brussels, (and they still are). They’re a slow growing crop that likes cooler, moister weather – planted in spring, they get harvested in late fall. Just south of us in the Skagit river valley, farmers grow thousands of acres of these little gems. You’ll see them on the west side of I-5 when you motor along down there.


Sprouts get a bad rap as boring or down right gross – and that’s wildly unfair. If you like the cabbage family, you should love Brussels sprouts. If you don’t it’s probably for one of two reasons – either you got fed less-than-fresh sprouts, or the recipe really was boring. 


Besides being delicious, sprouts are packed with vitamins and minerals, and low in calories and carbs to boot. How do we pick nice fresh ones? Opt for ‘em on the stalk if they’re offered. Look for nice, tightly packed, bright green ones, and avoid stuff with yellowed or browned leaves. Fresh sprouts should feel heavier than you’d expect them to be, and size-wise, smaller means sweeter.

There’s a bunch of great options for enjoying these little apprentice cabbages, but I won’t recommend boiling them. More often than not, that’s gonna yield soggy, mushy sprouts. While you might not relish chawing on a whole raw sprout, they’re wonderful thinly sliced in salads. They’re great in soups or stews. If you dig sauerkraut, pickled sprouts are gonna float your boat for sure. Thinly sliced quick-pickled raw sprouts are fabulous on tacos. 

After a simple, quick presentation? Gently steam sprouts for 5 to 7 minutes, and test with a fork – they should be firm, not overly soft. They’ll continue to cook a bit after you remove them from the heat – add herbs, oil, etc as you like at that point. You can also sauté halved sprouts with great results – again, test with a fork to make sure you don’t overdo it.

For M2¢W, roasting the little buggers is the way to go. That’s what I did last night, paired with chicken cordon bleu and Yukon gold spuds. Many roasted recipes you’ll find add a lot of other stuff  – cranberries, nuts, sweet potatoes, and such. All of that is yummy, but for my mind, we should honor sprouts, not hide them. My recipe keeps it super simple, with ingredients picked solely to make the sprouts the star of the show. M declared them ‘the best ever’ and I agree – we’ll be keeping this one in our quiver for sure.


Urban’s Roasted Brussels sprouts

This recipe was for two folks – you can scale up or down as needed

16 small, fresh Brussels Sprouts 

2 Tablespoons Avocado Oil (Olive is fine too)

1 fat clove fresh Garlic

1/2 small fresh Lemon

1 teaspoon Pineapple Vinegar (apple cider is fine)

1 teaspoon Greek Oregano

4-5 twists fresh Pepper

2 finger pinch Kosher Salt


Rinse and end trim sprouts, then cut in half lengthwise, (from top through base). Usually, you’d remove the exterior leaves at this point, but leave ‘em on here – they’re gonna make delightfully little crunchy wrappers for you.

End trim, smash, peel and mince garlic.

Zest and juice the half lemon.

In a small non-reactive mixing bowl, combine all ingredients and toss with a soup spoon to incorporate and coat the sprouts.

Let everything sit and marry for about 15 minutes. If you pair these with potatoes, now’s the time to pop the spuds in the oven – they’ll need about 15 minutes more than the sprouts.

Preheat oven to Roast 375° F – If your oven doesn’t have a roast setting, crank it up to 400° F and position a rack one slot above center.

In a small cast iron or heavy skillet, add all ingredients and give a couple more stirs with the spoon to re-coat everything. 

Roast for 25-30 minutes. At 25 minutes, check your sprouts, they should be firm but tender, and look fantastic as you see here.


Remove from oven and serve right away – just put a kitchen towel around the grip of that skillet, a hot pad beneath, and dig right in.