Tip Top Tri Tip


Ahhhh, yes, the noble Tri Tip cut!

Until Gundy told me, I’d didn’t know this was a west coast cut, I thought everybody was in on the fun! The tri-tip is a small triangular cut from down by the sirloin, usually about a pound to maybe three in size. It’s a very flavorful, lean and relatively cheap cut that deserves your attention. If its not readily available, approach your local butcher and ask them to cut you a couple.

Tri tip was relegated to mostly becoming burger or maybe cut into steaks when a California butcher decided to share the love with his customers. Lightly rubbed and grilled low and slow, sometimes on a rotisserie, the meat is slices thin across the grain and served nice and hot.

The real beauty of this cut is its versatility though; it’s a great choice for a grill night followed by a couple wonderful leftover meals.

Throw our basic beef rub on about thirty minutes before grilling for starters:
2 Tablespoons Sea Salt
2 Tablespoons Pepper Blend
1 teaspoon Onion powder
1 teaspoon granulated Garlic

Toss the tip onto the grill and go low and slow. Shoot for a 225 F to 250 F grill temp, and cook the roast with a single flip until you reach an internal temp of 145 F to 150 F; an internal probe thermometer such as you’ve seen us use here a bunch will be a big help.

Remove from the grill and allow to rest a full five minutes, then cut about 1/2″ slices across the grain and serve it up. You can do the traditional fare with this, but one of the best treatments I know is to provide everybody a nice, fresh crusty roll, and set out lettuce, onion, tomato, cilantro, sweet peppers, pickles, mustard, mayo and horseradish and let everyone make a big, hot, sloppy sandwich – Heaven!

And here’s the best part; the next day, the sky is the limit on great follow up fair. Cube up the remainder, toss it in a medium sauté pan and heat through with lime juice, garlic, cilantro and a little beer and you’ve got killer taco meat, or maybe go whole hog and make chili; it’s incredible!

Tri tip will soak up marinades like nobody’s business, so try something new for the next round.
Pop over to this Al Carbon recipe and do that up – your dinner crowd will give you a standing O.

Enjoy!

Homemade 4th


What American comfort food is rootsier than a burger? And what holiday is more deserving of a great burger than July 4th? I rest my case…

Of course a great burger needs great sides, so I suggest you head out and source some local corn on the cob and second, build a nice, fresh spud salad with olive oil, fresh citrus and vinegar, for a lighter take on potato salad that we’ll amp up with some fresh herbs.

If you’ve ever had a truly amazing burger at a local joint, I’ll bet you 10 to 1 that they either grind their own beef, or have their regular supplier do that for them: Custom ground and seasoned burger, done fresh, is what separates Holy Crud from Ho Hum in Burgerland.

At the market I found nice chuck steaks for $4 a pound, (They were marked ‘For marinating’); that’ll be the heart and soul of our burgers. The relatively high fat content coupled with nice big chunks of meat is gonna be great, but it does need a little help to put it over the top; I went with aged, Choice Tenderloin, which I found for $9 and change a pound, which ain’t bad, (And we’re only buying a half pound so…). I ended up with a mix of roughly 2:1 Chuck to Tenderloin.

I found a really nice medley of red, white, and blue baby potatoes that’ve not only pretty but real tasty.

Back home, I stuck the beef into the freezer for a little bit. Any time you’re grinding meat, making sausage, etc, you want your protein as cold as you can get it; this will help keep the fat in a proper matrix while you work with and, more importantly, cold keeps your food out of the temperature danger zone, thereby avoiding making you and your loved ones sick; always a plus, that, eh?

I set up the grinder attachment on the ol’ KitchenAid, cut the beef up into strips manageable for the hopper and got to seasoning. As with sausage making, you can season ground meat before or after you grind it; I prefer doing so before, because you get a more even distribution of spice as the meat is grinding. For these burgers, I went with Hawaiian flaked salt, fresh ground pepper blend, (Black, red, white, green; our go-to mix), onion powder, celery seed, granulated garlic, smoked paprika, and a dash of Worcestershire. I seasoned with a fairly light hand, because we just want to accent the meat’s great flavor, not blow it out of the water… So into the grinder she goes, using the coarser of the two plates I have available. I gave the freshly ground burger a few tosses to make sure everything was well blended, then covered it and stuck it in the fridge to think about things for a while.

While the burger was incorporating all those flavors, I put the spuds on to boil. Just a note on water; it’s sad to say that not all tap water is created equally these days, (Especially coming from a kid who grew up drinking from streams and lakes and even garden hoses!) My bottom line on cooking with stuff is simple; if it does not look, taste, feel and smell right, do not cook with it! The concept of taking, say, a nasty bottle of wine and cooking with it because it wasn’t good enough to drink also applies to a thing as elemental as water. If yours doesn’t taste good to drink, do what we did and get a decent filter for your kitchen tap; from home brewed coffee to things you boil for dinner, everything will taste better.

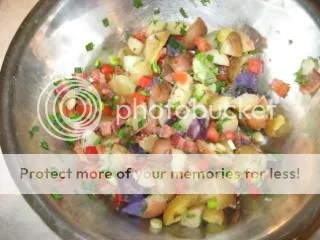
A trip out to the herb garden offered Garlic Chives and Cilantro, to which I added fine diced green onion, red bell pepper, and fresh tomato: All that, plus a few pieces of local Apple smoked bacon will go into our spud salad.

For the salad dressing, I squeezed the juice from one lime and one lemon, and then added a couple tablespoons of grapefruit juice; I whisked some nice extra virgin olive oil into that at a roughly 2:1 ratio, added a dash of sal de mere, fresh ground pepper, and celery seed, and there you have it. I quartered the spuds, put everything into a stainless bowl to mix and then into a ceramic bowl, covered in the fridge, for a good hour to allow everything to blend: As M rightly points out, stuff like this salad are gonna be great tonight but much better tomorrow; like good soup or stew, salads marrying a bunch of wonderful flavors are gonna be at their prime about 24 hours later…

For the burgers, I formed thin, wide patties, then cut up some of my stash of 2 year old WSU Creamery White Gold Cheddar and placed a nice layer of that in the middle of one patty, (use whatever cheese most floats your boat.) Then we assemble; a layer of burger, then cheese, then burger, seal and plump up the edges of each so we have a nice round patty of uniform thickness throughout. I let them hang in the fridge for 30 minutes or so to marry flavors further.

The burgers hit the grill over nicely glowing coals for about 4 minutes each side, with the cover on and vents wide open. I put the buns in a warm oven with a little dish of water to get nice, moist heat going. Finally, I sliced onion, tomato and pulled some lettuce leaves. M got condiments out and we were good to go.

At the point that she turned to me, burger in hand, with that serious knit-brow look and said, “This is, without a doubt, the best burger you’ve ever made; seriously…” I considered my mission a success… pair yours up with great local beer, and a Happy 4th to one and all!

BONUS: Here’s a link to another variation on the home ground burger, as well as our recipe fore house made buns!

Pesto über alles


Pesto – Say it and you get a love it or hate it reaction not dissimilar to oysters. The naysayers assumptions are that pesto is overbearing and hard to make, neither of which is true. Fact is, pesto is much more than you think it is and ridiculously simple to make. Let’s dig in.

OK, so classic pesto, the basil driven version, is in fact a delight and super simple to make. The potential variety is as broad as the options for the basil you grow. From Genovese to Holy, blue to Thai, the variety is broad indeed – African Blue, Purple, Red Rubin, Spicy Globe, Lemon, Lime, and Cinnamon all are readily available and truly speak to their names in taste and appearance. If you make identical batches changing just the variety of basil, each one will be completely distinct, and that’s just messing with the basil.

Toast the pine nuts, or don’t. Switch pine nuts for sunflower seeds, almonds, peanuts, Spanish peanuts, cashews, or brazil nuts and again, each and every one is completely unique.

Change garlic for sweet onion, red onion, shallot, or chive – Same deal.

Switch Romano to Parmiagano Regianno, Asiago, or Mizithra and again, totally new worlds.

So, here’s the basic:

Classic Pesto
1 Cup fresh basil leaves
1/4 cup freshly grated Pecorino Romano cheese
1-2 cloves garlic
2 Tablespoons pine nuts
1/3 cup extra-virgin olive oil
Sea salt and freshly ground pepper to taste

Combine basil, garlic, and pine nuts in a food processor or blender and pulse until coarsely chopped.

Now, with the processor or blender running, add a thin, steady stream of oil to the mix and continue until you reach the consistency you like – ‘Pesto’ is paste, so you can go from runny to stiff, as you see fit. Finally, add salt and pepper sparingly, to taste.

If you’re eating it now, chuck everything into a mixing bowl, add the cheese and combine thoroughly by hand.

If you want to freeze your stuff to use later, which you sure can do, then leave the cheese out, put the pesto into an air tight container, drizzle a bit more oil onto the top and you’re good to go for at least a couple months. Just thaw, add the cheese and you’re there. Consider putting pesto into ice cube trays for the freeze; just pop out however many you need and off you go.

What to do if, regardless of variety, basil just don’t float yer boat? No worries; again, ‘pesto’ is just a paste, and you can make it with a bunch of alternatives – Here’s a few to getcha started.

Use parsley instead of basil, (Preferably home grown!) and walnuts instead of pine nuts, (Cheaper if nothing else) and you’ve got yet another new world to explore.

This is one of our personal faves; sub Cilantro for basil, pistachios for the pine nuts, and Queso Fresco for the Pecorino. Try it, you’ll like it.

Wanna try the Greek version? Sub Myzithra for the cheese and walnuts for pine.

Got the idea? I knew ya would – Here’s a raft of others for you to explore. All the procedures are the same as for the basic recipe.

Sub spinach for the basil, with any nut and cheese combo you like.

For a Great Northwet variation, try this.
1/2 cup fresh sage leaves
1 1/2 cups fresh parsley leaves
1/2 cup Hazelnuts
1/2 cup Parmiagano Regianno
1/2 cup Extra Virgin Olive Oil
2-3 Cloves Garlic
Sea salt and freshly ground pepper to taste

Finally, here’s a great Thyme variant.
2/3 cups parsley, chopped
1 tablespoon fresh lemon or lime thyme
1/4 cup pine nuts
1/4 to 1/3 Cup Extra Virgin Olive Oil
1 Tablespoon grated lemon peel
1 Tablespoon lemon juice
Sea Salt and Fresh Ground Pepper to taste

There’s enough to get y’all started; beyond that, you’re on your own, but share the good ones, OK?

¡Homemade Tortillas!


“Hey guys; you’ve written a couple times that we can find homemade tortilla recipes right here on your blog; I’ve looked and can’t find any – Where are they at?”

Ummm, well this is embarrassing… that’s a really good question; I coulda sworn they were here somewhere… Alright, I admit defeat, so here they are!

Unless you live near a source of fresh tortillas made daily, you owe it to yourself to build your own. The difference between store bought and fresh is night and day.

Ingredients are super simple and so is the process, although it certainly takes a good few reps to be able to turn out tortillas that look as good as what you buy; (Monica is our go-to roller for that very reason). As with all things cooking, the quality of what you use profoundly affects the finished product, so chose carefully.

Equipment needs are minimal; you can get by with just a rolling pin and a nice heavy frying pan. If you make corn tortillas with any frequency, you’ll want to consider buying a press. They come in really handy, are fun to use and a very cool tool to boot. Flour tortillas must be rolled, not pressed, so a good pin helps immensely; the thin, wooden kind that tapers towards the ends is best as far as we’re concerned. Finally, a comal, the traditional, sideless cast iron cooking surface will do a great job; they’re cheap and easy to find.
Here are our favorite recipes and methods.


Flour Tortillas
3 Cups unbleached, white flour
4 Ounces Unsalted Butter
1 Teaspoon Sea Salt
1/2 Teaspoon Baking Powder
1 Cup Hot Water

You can substitute either lard or canola oil for the butter if you prefer; each will impart a subtle taste difference, so try them all and pick your fave.

In a mixing bowl, combine the flour, salt and baking powder thoroughly.

Melt the butter and add to the dry mix. Use your fingers to massage the butter into the mix until thoroughly incorporated.

Add water and mix by hand until the dough forms a ball.

Cover the dough with plastic wrap and allow to rest for at least a half hour; you can refrigerate the dough for up to a day if need be.

Divide the dough and roll it into 12 equal balls. On a lightly floured surface, roll each ball out until it forms a nice circle roughly 6″ to 8″ across, depedning on how thick you like your tortillas.

In your pan or comal over medium high heat, cook the tortillas until you see that nice brown blistering form on each side. Stack your finished wrapped tortillas in aluminum foil to keep them warm.

Corn Tortillas
2 Cups Masa Harina
1.25 to 1.50 Cups hot Water

In a mixing bowl, combine the Masa and water by hand and blend until you get a nice, consistent dough that does not stick to your hands. You don’t want the dough too dry, either; shoot for a dough that holds together, isn’t sticky, but feels moist to the hand.

Roll the dough into 12 equal balls and allow to sit for about 10 minutes.

Whether you use a pin or a press, cut a gallon plastic storage bag into two equal sheets and place a ball of dough between them, then press or roll to roughly 6″ around.

Cooking process is exactly the same as for flour. Each side will get 30 to 60 seconds of cooking time.

Enjoy!

E & M