Blog

Waffles 101


Along with stand mixers and fondue sets, waffle irons are more than likely collecting dust in a corner of many of our pantries. Waffles get a bad rap as 'food that's not good for you,' and 'a pain to make'; nothing could be further from the truth. Sure, a store bought, frozen waffle is an abomination, along with generic table syrup, and both are to be avoided like the plague. A homemade waffle, on the other hand, topped with delicious things is a delight in every way.


Batter or dough has been cooked between two hot plates for hundreds of years. The earliest recipe written in English that I'm aware of appeared in the 1600s, and paid proper homage to the Dutch 'wafel', that from the Frankish 'wafla', which harken back as far as the 1100s and meant honeycomb or cake. Waffles started out life as derivations of the communion wafer, thin, crisp cakes not unlike the modern pizzelle, still quite popular in Italy. These earliest versions were almost always round and made of grain flour and water, just as communion wafers were and are. As such, they weren't particularly big on taste, so flavorings like honey or florally infused water were introduced, such as rose and orange blossom. It wasn't until the 1300s that a recipe included eggs, wine, flour, and salt, but did not contain leavening of any note. Another hundred years would pass before irons notably different in pattern from the communion wafer, or oublie, would appear. These new versions, the French fer à oublie and the Belgian wafelijzer, were square or rectangular, and set with an even grid pattern; the space between these early irons was still rather thin, leading to a finished product likely akin to the modern Brussels waffle. Another couple of centuries would pass before recipes routinely included yeast, sweeteners, and spices added directly to the batter. Leavening was the innovation that allowed waffles to become the thicker, more appealing treat we enjoy to this day.

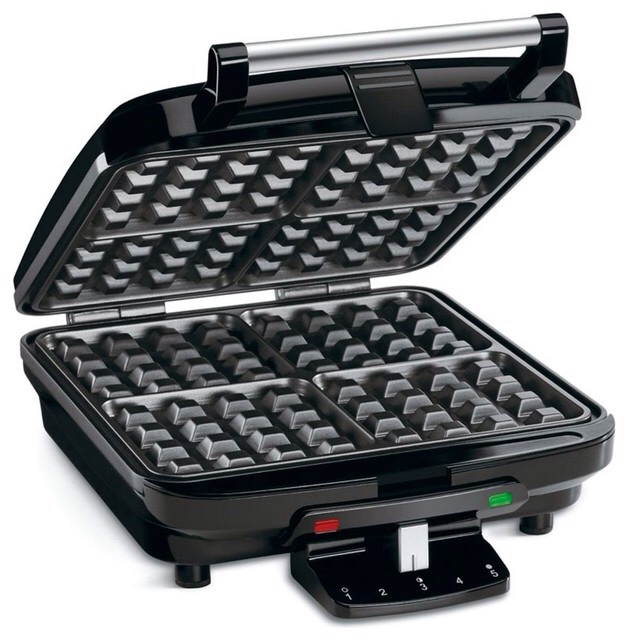
Waffle makers have advanced leaps and bounds from the versions we had as kids. There are makers that'll do anywhere from 2 to 8 at a pop; some are deeper and rotate, to specialize in the thicker Belgian version. There are timers and dark-to-light controls as well. I opted for a simple maker with a light to indicate ready status, and no other bells and whistles. If you keep an eye on your maker while it's working, it's a safe bet that somewhere around 6 to 8 minutes in, when the steam output has diminished and you're smelling nice, toasty cereal notes, your waffle will be done. After you're used to yours for a while, it'll be second nature that requires little conscious thought. Non stick is nice, and can now be found in non-toxic, environmentally friendly versions; it's great to have, but does not mean you don't still need a little something sprayed or wiped on before you cook.

Here are a few variants to spark your creative juices. Any of these recipes can be made savory if you wish. Thinly sliced green onions, chive, or other herbs can be added to the batter, or incorporated into toppings made with sour cream, cremé fraîche, crema, or Greek yoghurt. Chutney, salsa, mostarda, or sauteéd vegetables are equally delicious, as is a waffle topped with an over easy egg, crumbled bacon, and melted cheese. If you add veggies or fruit directly to a batter, consider sweating them in a sauté pan first, to reduce the amount of moisture and keep your waffles from getting soggy or falling apart.

For topping sweet waffles, it's awfully hard to beat real maple syrup and butter.

You can substitute whole wheat pastry, or whole grain white flour, one to one for any recipe calling for all purpose. Subbing 2% milk for whole works, and almond or soy milks make fine alternatives as well. Coconut oil makes a great sub for butter, as will olive, avocado, or grapeseed oils for savory waffle recipes. Honey, agave nectar, or less refined sugars are also fine alternatives. Fresh fruit is always a delightful topping for any variant.

With modern waffle makers, it's best to pour a ladle or two of batter into the middle of the iron, enough spread to within a couple inches so of the edge; gently closing the lid will finish the job.

Each recipe will make 6-8 waffles. They will store well short term, and are delicious toasted the next day.


Belgian Waffles

2 Cups all purpose Flour

2 large Eggs

2 Cups Whole Milk

1/2 Cup unsalted Butter

1/2 Cup Sugar

3-1/2 teaspoons Baking Powder

1 teaspoon Vanilla Extract

1 Cup fresh Strawberries


Preheat waffle iron.

Rinse and slice strawberries.

Separate eggs into two small dishes.

Melt butter.

In a large mixing bowl, combine flour, sugar and baking powder.

In a second mixing bowl, lightly beat egg yolks until frothy. Add milk, melted butter, and vanilla, and whisk thoroughly to incorporate.

Add wet to dry mix and whisk gently until just combined.

Whisk egg whites until stiff peaks form; fold gently into the batter.

Cook in a preheated waffle iron according to manufacturer's directions until golden brown.

Serve topped with strawberries.


Buttermilk Waffles

2 cups all purpose Flour

2 Cups Buttermilk

2 large Eggs

1/3 Cup unsalted Butter

2 Tablespoons Sugar

2 teaspoons Baking Powder

1 teaspoon Baking Soda

1 teaspoon Vanilla Extract

Pinch Sea Salt


Preheat waffle iron.

Melt butter.

In a large mixing bowl, combine flour, sugar, baking powder, baking soda, and salt, and whisk to incorporate. In a separate bowl, whisk and combine thoroughly buttermilk and butter; add the eggs and vanilla, and whisk again.

Add wet mix to dry and whisk gently until just combined; batter will be slightly lumpy.

Cook until golden brown, according to manufacturer's instructions.


Buckwheat Waffles

2 Cups Buckwheat Flour

2 Large Eggs

1 1/2 Cups whole Milk

1/2 Cup Greek Yoghurt

1/2 Cup unsalted Butter

2 Tablespoons Bob's Vital Wheat Gluten

2 Tablespoons Honey

2 teaspoons Baking Powder

1 teaspoon Baking Soda

Pinch of Cinnamon

Pinch of Sea Salt


Preheat waffle iron.

Melt butter.

In a large bowl, add buckwheat flour, vital wheat gluten, baking powder, baking soda, salt, and cinnamon, and combine.

Separate eggs into two small dishes.

Add yolks to a second mixing bowl, and whisk until frothy. Add the sugar, butter, milk, and yogurt and combine thoroughly.

Whisk egg whites until they raise to soft peaks.

Add wet mix to dry and whisk gently until just combined.

Add one half of the egg white and fold them gently into the batter; do the same with the second half.

Cook until golden brown, according to manufacturer's instructions.


Whole Grain Waffles

2 Cups Whole Wheat Pastry Flour

2 large Eggs

1 1/2 Cups whole Milk

1/2 Cup Sour Cream

1/4 Cup Butter

2 tablespoons Honey or Agave Nectar

2 teaspoons BakingPowder

1 teaspoon Baking Soda

1 teaspoon Vanilla extract

Pinch Sea Salt


Preheat waffle iron.

Melt butter.

In a large mixing bowl, combine flour, sugar, baking powder, baking soda, and salt, and whisk to incorporate.

In a separate bowl, whisk and combine thoroughly buttermilk and butter; add the eggs and vanilla, and whisk again.

Add wet mix to dry and whisk gently until just combined; batter will be slightly lumpy.

Cook until golden brown, according to manufacturer's instructions.


Ginger Ale II


If you missed our original home ginger recipe, I can tell you it was a huge hit. That said, there's Alaways room for improvement. Specifically, while the ginger taste was front and center, we found that honey not only added a fairly dominant taste note, but was rather expensive. Replaced with cane sugar, we found the recipe still good, but the sugar tended to bring the heat of the ginger out even more. We thought bake to that Reed's we liked so much and decided to try pineapple. The results were spectacular; you get a delightful pineapple note on the front end, with a well-tempered ginger finish, a more natural sweetener, and with pineapples at 2 for $5, a genuine bargain. We also increased the citrus, and added lemongrass And vanilla for some really lovely background notes.

We have a fabulous juicer that we used to extract the pineapple, but you could effectively employ a blender or processor as well.

1 Pound fresh Ginger Root

6 Cups Water

1 Pineapple

2 small Limes

1 small Lemon

Roughly 12″ Lemongrass

8-10 Kaffir Lime Leaves

1 teaspoon Vanilla extract

Pinch Sea Salt

Rinse, peel, and dice ginger root.

Wash, rinse, zest and juice lemon and one lime. Cut second lime into quarters. Rough chop lemongrass into 1/2″ chunks.

In a large sauce pan over medium high heat, bring water to a simmer. Add ginger, quartered lime, citrus zest, lemongrass, and kaffir leaves.

When water begins to bubble, reduce heat to low and simmer, covered, for 45 minutes.

Remove pan from heat and let the mixture steep, covered, for 30 minutes.

Rinse and trim pineapple. Blend, process, or press flesh to extract all the juice.

Run the steeped mixture through a single mesh strainer, then discard the root.

Return strained liquid to the pan over medium-low heat. Add pineapple juice, citrus juice, Vanilla, and pinch of salt.

Stir gently and allow to fully incorporate and heat through. Taste and adjust sweet balance with a little honey or sugar if needed, (you probably won't, but you do want to taste hefty ginger and distinct sweet – This is your concentrate, so it should taste fairly over the top).

Remove from heat and allow syrup to cool. Transfer to a glass bottle or jar and refrigerate for at least 4 hours.

Mix drinks in a tall glass with plenty of ice. Start with 1/4 cup syrup to 1 cup club soda; stir, taste and adjust blend to your liking. A fresh squeezed wedge of lime goes very nicely.

Refrigerated and sealed air tight, the syrup will last for a good two weeks, though it's not likely to survive that long.

NOTE: Some folks prefer to mix fresh citrus in to the final blend, rather than incorporating it into the syrup.


Real Deal Alfredo


Alert reader Ian asks;

‘What’s the trick to making great Alfredo sauce? It never seems to come out nice and thick and creamy when I try to make it.”

It’s a great question, because as simple as great Alfredo is, making it isn’t as straightforward as it may seem. Let’s see why.

First off, let’s agree that the vast majority of the crap sold in restaurants and the grocery store called ‘Alfredo’ isn’t remotely authentic. Heavy sauces, often made with a generous dose of thickeners, have no business being called Alfredo. The real deal was named after the guy who invented it. He passed on decades ago, but his place still exists; it’s Ristorante Alfredo alla Scrofa, in Roma, where to this day you can dig into the original.

Now, here’s your first shocker; that dish contains no cream or milk. The dairy comes solely from butter and cheese. It’s that simple, and here’s the trick; it’s made with the best ingredients possible. That’s the secret; to make it at home, you need to use the absolutely highest quality, freshest ingredients you can find.


Real Deal Alfredo

1/2 Pound Fresh Fettuccini; homemade is best, but locally made is just fine.

1⁄2 Cup fresh, local Unsalted Butter

1/4 Pound genuine Parmegiano Reggiano


Preheat oven to warm, and thoroughly heat dinner plates and a large bowl or platter

Bring 4 quarts of well salted water to a boil. Add the Fettucini and cook for 2-3 minutes.

Fine grate the Parmegiano, cut butter into roughly 1/4″ cubes.

Drain pasta, and reserve 1 cup of the pasta water.

Transfer pasta to the heated bowl, and add the butter, cheese, and 1/2 cup of pasta water.

Using a serving fork and spoon, toss the pasta, carefully incorporating all ingredients.

Add more water, a tablespoon at a time, to achieve a uniform, smooth sauce. Baste any excess butter and cheese back onto the pasta until they’re fully melted and pasta is evenly coated; this will take you about two or three minutes of tossing.

Serve immediately on the warmed plates, with crusty bread and a nice, crisp heart of romaine salad.


Now, if you’d like to make a cream based version the right way, we can do that too. And here’s why it so often fails for home chefs; it fails because cooks think of it as a cheese sauce, instead of as a cream sauce thickened with some cheese. Good cream, standing on its own merits, only has so much ability to incorporate additional fats; load too much cheese into it, and you’re bound to suffer separation anxiety. That said, you certainly can apply the most common cheat and add flour, which will allow you to pile on more cheese, but what you end up with is more Mac and cheesy than Alfredo, frankly; you lose the magic. As with the original, cream-based Alfredo is simple, and made with the best local, fresh heavy cream you can get. Milk, in any form, ain’t gonna cut it, and neither will that mass produced, ultra pasteurized crap.

Creamy Alfredo

1/2 Pound fresh Fettuccini

2 Cups fresh heavy Cream

4 ounces fresh, unsalted Butter

1/2 Cup Parmegiano Reggiano

Grating of fresh, whole Nutmeg

Pinch of Sea Salt, couple twists of fresh ground pepper


Preheat oven to warm, and thoroughly heat dinner plates.

Fine grate the Parmegiano.

In a large sauté pan over medium low heat, melt the butter; do not let it simmer and separate, you want the milk solids to remain incorporated for this sauce.

Add 1/2 cup of cream and increase the heat to medium, whisking gently but constantly. Once the sauce starts to simmer, continue slowly but steadily adding cream, allowing the sauce to begin to simmer before you add a little more, whisking constantly. The sauce will thicken slightly throughout this process.

Boil 4 quarts of well salted water, add the fettuccini and cook for 2-3 minutes. Remove from the water into a colander, reserving 1/2 cup of pasta water.

Remove the sauté pane from heat, then add the Parmegiano to the cream sauce, about a tablespoon at a time, whisking steadily. Stop when you hit the thickness you like.

Add the pasta to the sauce and toss to incorporate. Add a tablespoon of pasta water, which will help smooth out the sauce.

Grate a pinch of nutmeg, season with salt and pepper to taste, and toss to incorporate.

Serve immediately on heated plates.


Real Deal Alfredo


Alert reader Ian asks;

‘What’s the trick to making great Alfredo sauce? It never seems to come out nice and thick and creamy when I try to make it.”

It’s a great question, because as simple as great Alfredo is, making it isn’t as straightforward as it may seem. Let’s see why.

First off, let’s agree that the vast majority of the crap sold in restaurants and the grocery store called ‘Alfredo’ isn’t remotely authentic. Heavy sauces, often made with a generous dose of thickeners, have no business being called Alfredo. The real deal was named after the guy who invented it. He passed on decades ago, but his place still exists; it’s Ristorante Alfredo alla Scrofa, in Roma, where to this day you can dig into the original.

Now, here’s your first shocker; that dish contains no cream or milk. The dairy comes solely from butter and cheese. It’s that simple, and here’s the trick; it’s made with the best ingredients possible. That’s the secret; to make it at home, you need to use the absolutely highest quality, freshest ingredients you can find.


Real Deal Alfredo

1/2 Pound Fresh Fettuccini; homemade is best, but locally made is just fine.

1⁄2 Cup fresh, local Unsalted Butter

1/4 Pound genuine Parmegiano Reggiano


Preheat oven to warm, and thoroughly heat dinner plates and a large bowl or platter

Bring 4 quarts of well salted water to a boil. Add the Fettucini and cook for 2-3 minutes.

Fine grate the Parmegiano, cut butter into roughly 1/4″ cubes.

Drain pasta, and reserve 1 cup of the pasta water.

Transfer pasta to the heated bowl, and add the butter, cheese, and 1/2 cup of pasta water.

Using a serving fork and spoon, toss the pasta, carefully incorporating all ingredients.

Add more water, a tablespoon at a time, to achieve a uniform, smooth sauce. Baste any excess butter and cheese back onto the pasta until they’re fully melted and pasta is evenly coated; this will take you about two or three minutes of tossing.

Serve immediately on the warmed plates, with crusty bread and a nice, crisp heart of romaine salad.


Now, if you’d like to make a cream based version the right way, we can do that too. And here’s why it so often fails for home chefs; it fails because cooks think of it as a cheese sauce, instead of as a cream sauce thickened with some cheese. Good cream, standing on its own merits, only has so much ability to incorporate additional fats; load too much cheese into it, and you’re bound to suffer separation anxiety. That said, you certainly can apply the most common cheat and add flour, which will allow you to pile on more cheese, but what you end up with is more Mac and cheesy than Alfredo, frankly; you lose the magic. As with the original, cream-based Alfredo is simple, and made with the best local, fresh heavy cream you can get. Milk, in any form, ain’t gonna cut it, and neither will that mass produced, ultra pasteurized crap.

Creamy Alfredo

1/2 Pound fresh Fettuccini

2 Cups fresh heavy Cream

4 ounces fresh, unsalted Butter

1/2 Cup Parmegiano Reggiano

Grating of fresh, whole Nutmeg

Pinch of Sea Salt, couple twists of fresh ground pepper


Preheat oven to warm, and thoroughly heat dinner plates.

Fine grate the Parmegiano.

In a large sauté pan over medium low heat, melt the butter; do not let it simmer and separate, you want the milk solids to remain incorporated for this sauce.

Add 1/2 cup of cream and increase the heat to medium, whisking gently but constantly. Once the sauce starts to simmer, continue slowly but steadily adding cream, allowing the sauce to begin to simmer before you add a little more, whisking constantly. The sauce will thicken slightly throughout this process.

Boil 4 quarts of well salted water, add the fettuccini and cook for 2-3 minutes. Remove from the water into a colander, reserving 1/2 cup of pasta water.

Remove the sauté pane from heat, then add the Parmegiano to the cream sauce, about a tablespoon at a time, whisking steadily. Stop when you hit the thickness you like.

Add the pasta to the sauce and toss to incorporate. Add a tablespoon of pasta water, which will help smooth out the sauce.

Grate a pinch of nutmeg, season with salt and pepper to taste, and toss to incorporate.

Serve immediately on heated plates.


More than spring cleaning


Welcome to the redesigned UrbanMonique! 

We’ve grown immensely in the last couple of years, and as such, we needed more control over our site, and the ability to expand our activities to better serve you. This new site does all that. We hope you like it as much as we do. In addition to a fresher, less cluttered look, it’s a better platform for mobile devices, has no ads, offers video capability, and provides me with enhanced ability for custom programming.

I’ve been working on this for several weeks before letting it go live, but there’s bound to be stuff I’ve missed, or that just doesn’t float your boat – Feel free to let me know what you think, and if you see something that just doesn’t look or work right.