Cole Slaw, the right way.


For those of you who don’t know, I’m an unabashed Yankee; I was born and raised about 18 miles north of Boston, in Concord, Mass. In that neck of the woods, a Saturday Night Suppah more often than. Or included baked beans, brown bread and freshly made cole slaw. Cabbage is much maligned, methinks, and shouldn’t be. New England is a place where it is celebrated in many dishes, and I carry that tradition to this day.

Slaw can be as simple or as complex as you like, but it general, a few truly fresh ingredients do the trick best. Cole slaw dressing from the store, with very, very few exceptions, is utter crap, filled with nasty fats, sweeteners, thickeners and preservatives you really and truly want no part of. House made is always best, period: Here’s how I do my favorite version.

For the veggie mix,
Green or Red Cabbage
Sweet Onion
1 small Carrot
Small handful Celery Leaves
1 Clove fresh Garlic
Sea Salt
Fresh ground Pepper

Rinse and slice roughly 1/8 head of cabbage very thinly (about 1/8″), across the grain. Cut into more or less bite size pieces.

Cut 2 or 3 slices of sweet onion the same way.

Rinse and use a peeler to shave the carrot into very thin strips, then cut down to bite size as above.

Chiffonade the celery leaves, and mince the garlic.

Combine all in a non-reactive mixing bowl, season liberally with salt and pepper and toss to blend.

For the dressing,
1 Cup real Mayonnaise, (Homemade is always best)
1 Tablespoon Agave Nectar
1 teaspoon Malt Vinegar
Sea Salt
Fresh ground Pepper

Combine mayo, agave and vinegar and whisk to blend. Season lightly with salt and pepper to taste.

Combine dressing nod veggie mix and blend thoroughly. Place slaw in an airtight container and refrigerate for at least 2 hours, (and up to overnight), before serving, to allow flavors to marry and develop.

Hot Dogs


I love hotdogs, I surely do, buuuuuuuut… My Sis worked in a hotdog factory once; I don’t think she’s eaten one since. If you think pink slime is bad… And anyway, have you checked the prices on these pies lately? Nasty ones are going $4 to $5, and quality almost double that. Time to get busy then; you make ’em, you know what’s in ’em, and they’re way better than anything you can buy.

This is a take on the snappy, lightly smoked, garlic and paprika-flavored all-beef dogs served at Gray’s Papaya and Papaya King in New York City. Made with good local beef, these hot dogs are just about the juiciest, most flavorful you’ll ever enjoy. My version was adapted from Ryan Farr’s original recipe. Mine has some changes for flavor and to save you some time and effort; I’ve converted original weights to measures for almost all the ingredients, tweaked the process a bit for home cooks, and altered the spices; I also used powdered smoke from Butcher & Packer, which saves you a bunch of work smoking the dogs, (If you own a smoker and enjoy that process, by all means do that; the smoking/internal temps and times are the same, either way.) Here’s how you make them.

Preparing the Casings.

Casings can be found as both natural and collagen style; I really have not had very good luck with fake casings. They taste fine, but are much less forgiving than natural when it comes to stuffing. For hot dogs and franks, you need a roughly 24mm or 1″ casing. They generally are sold in pretty large volumes that are more than a casual user will need. This offer through Amazon is the best priced, moderately sized I’ve found.

Snip off about five feet of casing. (Better too much than too little; any extra can be repacked in salt and used later.) 

Rinse the casing under cool running water to remove any salt clinging to it. Place it in a bowl of cool water and let it soak for about half an hour. 

After soaking, rinse the casing under cool running water, (Under 70° F). Slip one end of the casing over the faucet nozzle. Hold the casing firmly on the nozzle, and then turn on the cold water, gently at first, and then more forcefully. This procedure will flush out any salt in the casing and pinpoint any breaks. Should you find a break, just snip out a small section of the casing with kitchen shears.

Place the casing in a bowl of enough water to thoroughly cover the casings. Add 1 tablespoon of vinegar per cup of water; this will soften the casing a bit, which makes it a bit more forgiving for us amateur stuffers. Leave the casing in the water/vinegar solution until you are ready to use it. 

Rinse casings thoroughly before stuffing. 


NOTE ON MEAT: If you can’t find the neck, plate, or shank cuts, you can substitute chuck for all of the meat and fat called for; they’ll still be spectacular dogs.  

2 Pounds boneless lean Beef, (Such as neck, plate, or shank), cut into 1-inch cubes

5 Ounces Beef Fat, cut into 1-inch cubes

2 teaspoons Murray River Flaked Salt

1 teaspoon Sweet Smoked Paprika

1/2 teaspoon Granulated Garlic

1 teaspoon coarsely ground Smoked Pepper

1/2 teaspoon Onion Powder

1/4 teaspoon Celery Seed

1 Gram Pink Curing Salt, (Weigh this, don’t try to convert to a volume!)

1/2 teaspoon Hickory or Mesquite Smoke Powder

8 Ounces crushed Ice

10 feet of rinsed sheep Casings


NOTE: 

The ice above if for the actual recipe, not for bowl chilling. Just want to be sure we’re all on the same page with that… 

Place the meat and fat on a rimmed baking sheet, transfer to the freezer, and chill until crunchy on the exterior but not frozen solid. 

In a small bowl, add the salt, paprika, garlic, pepper, onion powder, and pink salt; stir to combine. 

Nest a large mixing bowl in a bowl filled with ice.  

Grind the meat and fat through the small die of the grinder into the bowl set in ice. 

Add the spice mixture to the meat and stir with your hands until well incorporated; the mixture will look homogenous and will begin sticking to the bowl. 

Transfer the meat to the bowl of a food processor, add half the crushed ice and process until all of the ice has dissolved, 1 to 2 minutes. 

Add the remaining crushed ice and continue processing until the mixture is completely smooth, 4 to 5 minutes more. Note: The temperature of your meat during this mixing step is critically important. Temperature must never rise about 40°F. Work efficiently during this step of the process. This is as important for food safety as it is for a homogeneous blend. And yes, it looks kinda nasty raw; welcome to force meat…


Spoon 2 tablespoons of the meat mixture into a nonstick frying pan and spread into a thin patty. Cook the test patty over low heat until cooked through but not browned. Taste the sausage for seasoning and adjust as necessary.

Press a sheet of parchment paper or plastic wrap directly on the surface of the meat to prevent oxidation, then cover the bowl tightly with plastic wrap and refrigerate overnight, (If you own a vacuum sealer, use that instead.)

Stuff the sausage into the sheep casings and twist into links about 5″ to 7″ long.


Preheat your oven to 175° F. Spread the links out on a baking sheet and slow cook them until the internal temperature of the sausages reaches 145°F, about 45 to 60 minutes. 

Remove the sausages from the oven, and transfer them to a bowl of ice water; shock for about 30 seconds, then set to cool on a wire rack for about 10 minutes. Refrigerate uncovered, overnight. Your dogs are now fully cooked and ready to be vacuum sealed, refrigerated or frozen. To prepare for eating just heat through on a grill or in a steamer.

Since you went to all the trouble, don’t you think homemade buns are in order too?


Ribs R Us


Noticed the other day that ribs are big in the stores, now that summer has officially begun. Seems like a good time to offer a fave take on those bad boys. Now first off, I admit here and now that M does ribs better than I do in terms of process, so I’ll just synthesize her method and my seasoning.

So why are ribs so dang tasty; there’s not much there, so what’s the secret? In a word, bones; bones and some marrow influence, too. Little cuts of meat attached to the stuff that we use to make amazing stocks, soups, stews, and reductions from, that’s the ticket. When cooked low and slow, the influence of the bones and marrow make their presence known in a way nothing else can really emulate.

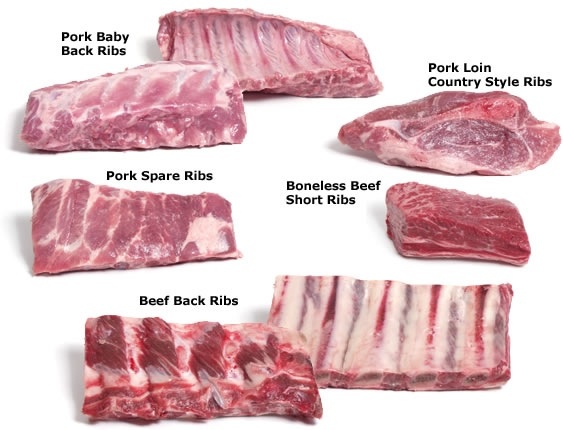
Do you know your ribs? All of ’em? Here’s a quick run down on the variations you’ll find out there.

Spareribs
Or spare ribs, either spelling works, and either way, it always means pork, period. Spareribs are cut from the side or belly. Nowadays, they’re usually sold trimmed and ready to go, but you still may find them offered with the brisket bone attached; if you get them that way, just cut the bone out and save it along with the rest for making stock. Spareribs may or may not have the skirt attached, (a thin flap of meat that runs along the meaty side). If the skirt is there, you’ve got St. Louis style ribs, and if it’s trimmed off, you’ve got Kansas City style. If you ever wondered what those two terms were all about but were afraid to ask, you may now consider yourself enlightened. If you’re serving spareribs as an appetizer, two ribs per person will do the trick; a half rack, (six ribs), is a decent entrée portion.

Baby Back Ribs
Arguably the most popular pork rib variety, baby backs are less meaty than many other styles, but tend to be leaner than their bigger cousins as well. Baby backs are, in fact, cut from the back of the rib cage. They tend to include a high proportion of loin meat, which explains their lean and tender nature. Reasonable portions for baby backs are 3 ribs per as an appetizer, or a half slab entrée.

Country Style Ribs
This cut is a bit of a misnomer. Cut from the sirloin or rib end of the pork loin, this meatiest variant of the rib family doesn’t really include ribs at all. You can often find this cut in single portion packages, as well the equivalent of a half or full slab; they’re perfect for those who want to use a knife and fork instead of getting all handsy with their meal. Country ribs can be pretty fatty and may need some trimming prior to cooking. Portion sizes are one apiece for appetizer, two as an entrée.

Beef Back Ribs
These big ribs come from the back of the loin; they’re the beef version of baby backs. Meatier than pork ribs, they contain five or six bones per slab. That said, while the bones are big, they’re not super meaty. They will, however, be plenty tasty if given a good rub and lightly smoked. Portions are two per as an appetizer and five or six as an entrée.

Beef Short Ribs
This cut used to be a tremendous bargain, until every chef in the world decided to make them popular. Now, they can often be pricier than they’re worth – If you see other cuts for much less, buy those. Short ribs come from the bottom end of the rib cage, or plate cut. Short ribs are not a tender cut and really shouldn’t be grilled or barbecued; they need low and slow braising or smoking to really shine. The cut can be fatty, so trim as needed before you cook. A quarter pound appetizer and half pound entrée will do the trick.

Lamb Ribs
A full rack of lamb contains eight ribs. The ribs themselves are really quite skimpy, so the chop is typically left attached;you’ll find them offered as rib chops or as a whole rack. The racks are a fairly famous cut and make a great roast. Fancy stuff has been done with these for many moons, like cutting the rack into 3-3-2 and tying them tips up as a crown roast, or trimming the meat at the tips of the chops back to the bone, which is the famous French chop or rack. A double French rack is two racks tied tips up back to back. If you’re not familiar working with the lamb rack cut, make sure to ask if the chine, (backbone), between the ribs has been cut, so that the roast is easy to carve. If you’ve not cooked a lot of lamb before, be aware that it’s usually quite a bit gamier than beef and pork. The heart of the gamy flavor is fat, so trim appropriately if you’re not comfortable with that. Soaking lamb in buttermilk for at least 2 hours and as much as overnight will help a lot to tame the game and keep them moist and juicy. While you can certainly cook and serve single rib chops, you’ll get a much juicier result if you leave them as doubles; you can then cut them into singles for an appetizer and leave them doubled as an entrée.

Game Ribs
Then there’s game; I’ve personally had and cooked venison, elk, boar, buffalo, bear and ostrich. The first thing to remember with game ribs is to use them; I don’t know how many hunters and cooks I’ve known who don’t even consider this, but we all should. First off, if you harvest, you’ve got the responsibility not to waste, and that’s a biggy. Seconly, if you love game, ribs can and should be a signature taste of the beastie. As with lamb, game ribs can be gamy, so trim the fat, if any, and marinate. Buttermilk works great here, but wine and herb, or a nice flavorful brine will shine as well. Keeping in mind that fleet-footed game like deer and elk are quite lean to begin with, so marinating will do a lot to keep things tender and juicy.


Here’s a wet rub and BBQ sauce that will go great with any of the above.
This recipe will serve for a couple of racks of ribs.
We’ll do a low and slow cook with a grilled finish for knockout flavor.

2 Tablespoons extra virgin Olive Oil
1/4 Cup Honey or Agave Nectar
2 Tablespoons Smoked Sweet Paprika
1 Tablespoon cracked black Pepper
1 teaspoon Onion powder
1 teaspoon granulated Garlic
1 teaspoon Sea Salt
3-4 Shots Tabasco or dried Chile Powder
Optional: 1 teaspoon Smoke Powder

Preheat oven to 225° F.

Rub ribs generously with the olive oil.

In a mixing bowl, combine the honey, paprika, pepper, onion powder, garlic and Tabasco or chile powder, and the smoke powder if you’re using that. Rub evenly over the ribs, taking time to work it on to all surfaces.

Wrap racks, meaty side down, in a large piece of metal foil (The wide, heavy duty stuff does best; if you’ve got light weight stuff, double it). Seal the edges of foil with a double fold.


Cooking Stage 1, oven low and slow.
Cook smaller, more delicate ribs like baby backs for three and a half hours; the bigger ones can go four hours.

Preheat grill on high, then reduce heat to low with lid open. If you’re just using your oven, leave it at 225° F.

Remove ribs from oven and drain off any excess drippings. Carefully flip ribs over to bone side down, using a big grilling spatula or two smaller ones. Your ribs should be at the pint where they’re starting to fall off the bone, so be gentle.

Trim the foil back to so you’ve got a baking sheet kind of affair, with a 3/4″ inch lip of rolled foil all the way around the ribs, to catch juices and keep the sauce in place for the remainder of the cooking.

Apply an even, thick layer of sauce to the meat side with a basting brush.

Cooking Stage 2, sauced and grilled, (or not)
Transfer ribs to the grill if you’re going that route.
Cook on low heat, with the lid down, for 20 to 30 minutes more.

If you’re using the oven for the whole job, cook uncovered for 20 to 30 minutes more.

Remove from oven and serve promptly with more sauce, house made potato salad, and baked beans.

A nice local Pilsner, Lager or dry white wine is the perfect accompaniment, refreshing your pallet and cutting through the fat for that next juicy rib.


Try this amazing cranberry powered sauce; folks are gonna make yummy noises and ask “what IS that?” in a good way…

Eben’s Cranberry BBQ Sauce

1 bag Cranberries
1 Cup Sweet Onion
1 bottle Porter or Stout
1 large Navel Orange
1/2 Cup dry Red Wine
1/2 Cup Balsamic Vinegar
1/2 Cup Honey or Agave Nectar
1/3 Cup Worcestershire Sauce
1/3 Cup Soy Sauce
2 cloves Garlic

Peel and dice onion, peel and mince garlic. Zest and juice the orange.

Use a nice, fresh local Porter or Stout.

Throw everybody into a large stainless steel sauce pan over medium high heat and blend well.

As soon as the cranberries start to pop, reduce heat to achieve a nice, steady simmer. Allow to simmer for 1 hour, stirring occasionally.

Process sauce with an immersion blender, or carefully transfer to a blender, if that’s what you’ve got. Be very careful if you use a blender; process in batches and watch out for the hot sauce. Process until the sauce is uniform and smooth. If you don’t have an immersion blender, AKA. A motor boat, go buy yourself one for Christmas, they’re indispensable.

If you like your sauce a bit chunkier, as we do, you’re done; if you like it smoother, run the sauce through a strainer once.

Transfer to a glass bowl or jar and refrigerate for at least 4 hours prior to use, to allow the flavors to marry and the sauce to finish thickening.

And remember, save those piles of bones for making pork or beef stock; they’re way too good to toss!

House Made Dog & Burger Buns


We make our own hot dogs and burgers these days, and if you’ve not done so yet, you owe it yourself to try; it’s fun, fabulous and very soul satisfying indeed. Naturally, if you go to all that trouble, you aughta make buns at home as well, right? Here’s how.

Burger or Dog Buns
1/2 Cup Milk
1/4 Cup Water
2 Tablespoons Butter
2 – 2 1/2 Cups All Purpose Flour
1 heaping teaspoon active dry Yeast
1 Tablespoon granulated Sugar
3/4 teaspoon Salt
1 Egg

Heat the milk, water and butter to roughly 100° F. Fill your primary mixing bowl with water as warm as you can get outta your faucet and let it sit until warmed through.

Mix 1 cup of flour, the yeast, sugar and salt together thoroughly.

Put the wet mix into the drained mixer bowl; add the dry mix and mix by hand. Crack the egg and reserve a teaspoon of egg white. Mix the rest of the egg into the blend.

Add remaining flour 1/4 cup at a time, mixing until the dough pulls away from the mixer bowl, leaving it more or less clean.

Continue to knead for about 5 minutes until the dough is smooth and elastic.

NOTE: You can do this entirely in your mixer if you prefer; just use the dough hook and mix/knead on low speed.

For hamburgers, form 6 equal balls, place on a greased baking sheet and flatten into roughly 3″ discs.
For hot dog buns, form six rectangles about 3″ x 6″, then roll them up tightly along the long axis and fold the ends in on themselves. Place on a greased baking sheet, seams down.

Allow to rise for about half an hour. Preheat oven to 400° F.

Mix egg white with a 1/4 teaspoon of cold water.
Brush buns with egg white mixture and bake for 10 minutes, or until golden brown.

Remove and allow to cool before cutting.


Champagne Mangoes Three Ways


You might have been perusing the produce aisle recently and seen a fruit called a Champagne Mango. They’re somewhat new to many parts of the US, but they ain’t new in the Big Picture view. The Champagne, also known as an Ataúlfo, (and young, baby, yellow, honey, or adolpho), is a well established Mexican cultivar. Champagnes are gorgeous; big, heavy, golden-yellow beauties that are somewhat pear shaped. They’re thin skinned, with deep yellow, rich flesh and a very skinny pit. They’re quite high in sugar, with a tangy-sweet flavor, rich in vitamin C and dietary fiber.

Down in the Mexican state of Chiapas, when Ataúlfo Morales bought Some land back in 1950, there were already bearing mango trees on the property. Around eight years later, a researcher from the Mexican Commission of Pomology heard of Señor Morales’ mangoes and came to have a look. He went off with samples and stock which he named Ataúlfo, in honor of the property owner, and the rest is history.

If you like mangoes, (and even if you don’t), you owe it yourself to try these beauties. While they’re a real treat to peel and eat straight away, here are three of our favorite things to do with them.

Fruit Curds go back quite a ways in history. Technically, since they include eggs, butter, and require preparation like an emulsion, they’re probably more of a custard than a preserve, I guess. The 1844 edition of The Lady’s Own Cookery Book included a primitive version of a lemon curd;, using lemons to acidify cream, then separating the lemony curds from the whey. Further back yet you’ll find recipes for ‘lemon cheese’, used to make what was called a lemon cheese cake, but reads like what we’d call a lemon tart these days. Our version of Mango Curd is stunningly good, if we do say so ourselves…

2 ripe Mangoes
3 large Eggs
6 Tablespoons unsalted Butter
1/2 Cup Agave Nectar or Honey
1 fresh small Lemon
1 fresh small Lime
Pinch of Sea Salt

Rinse, Peel and roughly chop the mangoes; you’ll want to kind of shave the meat away from the skinny pit.

Purée the mango chunks with a stick blender or food processor. You want to end up with about 1 cup of purée.
Set that aside.

Rinse, zest and juice the lemon and lime, then set juice and zest aside.

Cut very cold butter into about 1/2″ cubes.

Crack eggs into a mixing bowl and whisk lightly.

For cooking the blend, a double boiler is best. If you don’t have one, work with a bowl or pan that will fit comfortably inside a larger one. Fill your double boiler bottom or pan about 2/3 full of water and heat over medium flame. You want the water steaming, but not simmering when you’re ready to cook.

Combine the eggs, lemon and lime zest, citrus juice, the agave nectar or honey, and a pinch of salt. Whisk the mixture until fully incorporated and evenly colored, about 2 to 3 minutes.

Add the mango purée to the blend and whisk for about a minute to fully incorporate.

Put your bowl with the blended ingredients over your pan filled with hot water, (Or double boiler). Allow the mixture to heat, stirring gently but continuously, for about 3 minutes. Start adding the butter in small batches of 6 to 8 cubes, whisking steadily and allowing each batch to melt and incorporate before adding the next.

Again, a curd is an emulsion, so the butter, (fat), needs time and gentle whisking to properly marry with the egg and fruit blend.

When all the butter is melted, continue whisking gently and steadily until the curd begins to thicken noticeably, about another 2 to 3 minutes.

Remove the curd from the heat. Transfer the curd to a fine mesh strainer over a glass or steel bowl and use a spatula to gently strain the curd through the strainer. You’ll end up with some zest and fiber that doesn’t make it through.

Refrigerate in a glass jar or airtight container for at least four hours. The curd will keep for about a week refrigerated, but I’ll bet it won’t last anything close to that long…

A small dish of this lovely stuff is a remarkably delicious desert, or an excellent palate cleanser after a heavy course in a fancy meal. Try it on freshly made shortbread with strawberries for a real treat.

NOTE: You may substitute coconut oil for butter for a dairy free variation.


Granitas are the pure essence of fruit and natural sweeteners. With no diary on board, they’re actually not at all bad for you either. This version was the best we’ve made, of any fruit.

2 ripe Champagne Mangoes
2 Cups Water
1 fresh small Lemon
1 fresh small Lime
3/4 cup Agave Nectar or Honey

Rinse, peel and rough chop the mango flesh.

Rinse, zest, and juice the lemon and lime.

In a food processor or blender, purée the mango until smooth and uniform, about 1 to 2 minutes, stopping to scrape down the sides with a rubber spatula as needed.

Add the water and honey or agave to a sauce pan over medium heat. Thoroughly melt the sweetener, then add the purée, zest, lemon and lime juice, and stir to incorporate.

Add the puréed mango and stir steadily and gently until the blend starts to simmer. When the whole blend is evenly mango colored and starts to thicken slightly, remove it from the heat; the whole heating process will take around 3 to 5 minutes.


Remove the mixture from heat and pour the blend through a single layer strainer into a 9-inch-square shallow baking pan. This pan size works best ­because it provides a large surface area, a key point in speeding up the freezing process. To further hasten freezing, use a heavy steel or glass pan.

Put the pan in the freezer and stir about every hour with a large fork, times down like you’re raking the granita. Depending on your freezer temp, it will take around 3 to 5 hours for the granita to freeze completely.

You can eat the granita as soon as it’s frozen through, but the flavor will genuinely develop appreciably if you transfer it to an airtight container and freeze it over­night.

When you’re ready to serve the granita, just scape up the shaved ice and fill a chilled margarita glass, band top with a mint sprig.


Mango salsa is a real treat; the counterpoint of sweet and heat is great with fish, poultry, and pork. Try it on freshly scrambled eggs too.

1 Champagne Mango
2 ripe Roma Tomatoes
1/2 Red Onion
1-3 Jalapeño Chiles
2-4 sprigs fresh Cilantro
1 small Lemon
1 small Lime
Pinch of Sea Salt

Rinse all fruits and veggies. Peel and dice mango. Core, seed and dice the tomatoes. Dice the onion. Chiffonade the cilantro. Juice the citrus.

Combined all ingredients in a non-reactive bowl. Cover and chill for at least 30 minutes, (and as long as overnight – The flavors just get better.)

Smoked Chicken Stew


So, from last nights butterflied, grilled chicken, I saved the carcass and made stock and stew therefrom. If you’re not doing this kind of thing on a regular basis, you really need to be reading this blog more often.
Here’s how.

For the stock,
1/2 sweet Onion
1 Carrot
1 stalk Celery
2 Bay leaves

Rinse, trim and then chop veggies to uniform rough dice. Note: Can’t tell you how often I see home cooks throw out celery tops with leaves on them, or how wrong that is. Especially when using celery for mirepoix, making stock, etc, you want those leaves; they pack beautiful, delicate celery flavor, and impart it to other foods better than the stalks do.

Glean any appreciable meat from the chicken and reserve for lunch, (we didn’t have any left, frankly, and we’ll be using breast meat for the making of this stew anyway…)

Everything goes into a stock pot over high heat with enough water to cover well, about 3/4 gallon. As soon as things start to simmer, reduce heat to just maintain that, and let it go for at least 2 hours and up to 4. As you lose water to cooking, gradually add more. Ideally, you want to end up with about 8-10 cups of lightly colored and flavored stock. That is rather light as stock goes, but we’re making a robust stew that will pack its own flavors; this is just the canvas…

Remove from heat, discard all the big chunks by straining through a colander. Chill the rough stock in a large bowl in the freezer until most of the fat has risen to the top. Skim that off, then clarify the stock once or twice by running it through a chinoise or strainer.

Return stock to a stock pot over medium heat.

For the stew,
2 Carrots
2 stalks Celery
3 Red Potatoes
1 Tomato
1 Lemon
2 cloves Garlic
1/4 sweet Onion
2 sprigs Cilantro
Extra virgin Olive Oil
White Wine
Black Pepper
Smoked Salt

Rinse and trim all veggies. Cut carrots, celery, potatoes, tomato, onion and cilantro to a fairly uniform rough dice, about 1/2″ pieces. Mince the garlic and cilantro and toss everybody but those into the stew pot.

Heat a tablespoon of extra virgin olive oil in a sauté pan over medium high heat. Toss in onion and sauté until it starts to go translucent. Add garlic and sauté about another minute. Add a splash of white wine and continue sautéing until the raw alcohol is burned off. Toss all that into the stew pot. This step, done with strong aromatic veggies like onion and garlic, adds a nice richness to a soup or stew, and helps tame the raw heat they can pack.

For the chicken, you can smoke it over your grill, barbecue or smoker with a bit of smoking wood, pellets, what have you, or you can cheat like I did. If you’re a regular here, you know how much I love Butcher & Packers hickory smoke powder. As advertised, it gives a pure taste of hickory smoke and nothing else. I’ve fooled Texas BBQ snobs with this stuff. Saves a bunch of time and sacrifices nada in the process; try it. They also make chipotle powder, and powdered mesquite, which are equally fabulous. 

Dirty Rotten Cheater’s Smoked Chicken,

2 Cups Chicken Breast
1/2 Cup Whole Grain White Flour
1-2 teaspoons Smoke Powder
1/2 teaspoon Smoked Salt
1/2 Teaspoon ground black Pepper
2 Tablespoons vegetable oil

Cut chicken into roughly 3/4″ dice.

Add 2 tablespoons of oil to a large sauté pan over medium high heat.

Combine flour, smoke powder, salt and pepper in a paper bag, (amount of smoke is up to you). Add the chicken and shake until all the chicken is thoroughly coated. Remove the chicken and tap/shake off excess dredge.

Add chicken to pan and allow it to cook long enough to sear well on all sides. You want to develop a genuine, caramelized crust, so don’t play with it too much or turn it too often. Keep a close eye on it so it doesn’t burn.

Once the chicken is well seared, transfer it to the stew pot and stir it in well. Turn heat down until you’re at a nice low and slow temperature, with no signs of simmering.

Let the stew cook for at least two hours. Slice the lemon into quarters. Add the juice from half to the stew, reserve the others for service. Adjust seasoning with smoked salt and pepper. Stir regularly, taking care to make sure stuff isn’t sticking to the bottom. The regular stir helps release the dredge from the chicken and combine it with fats, which is what is going to thicken your stew. If you like things thicker yet, microwave an extra Yukon potato, mash it with a tablespoon of butter, and stir that into the stew as well.

Serve with crema, sliced lemon, our jalapeño-cheddar cornbread, and a nice, cold Negro Modelo.