Peanut Butter Nanaimo Bars


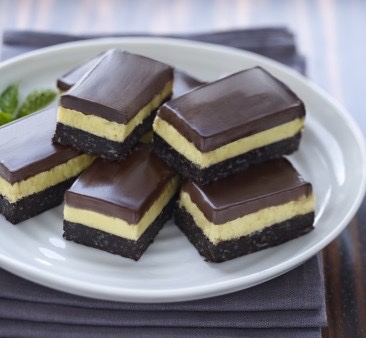
By multiple requests, here’s my peanut butter Nanaimo Bar. Something this good demands local, fresh ingredients, so please, don’t skimp. As decadent as this is, the final product has an amazing balance of salty to sweet, accented by the almonds and the peanut butter. We enjoy ours with freshly brewed, French roast coffee.


Bottom Layer

½ Cup Unsalted Butter

¼ Cup Dark Brown Sugar

5 Tablespoons Cocoa Powder

1 large Egg

1 ¼ Cups Graham Cracker Crumbs

½ Cup Almonds

1 Cup flaked Coconut


In a sauté pan over medium heat, melt 1 ounce of butter, then add the almonds, and sauté until golden brown. Remove from heat and allow to cool.

In a food processor, add graham crackers and process to a rough crumb. Add the almonds and coconut and pulse to a fine, even consistency.

In a double boiler over hot, but not simmering water, melt and combine the butter, sugar, and cocoa powder.

Add the egg and stir gently but continuously, until the blend is thoroughly heated through and the begins to thicken.

Remove from heat, add the wet to the dry mix, and incorporate thoroughly.

Press the mixture into an ungreased 8″ x 11″ pan; your base layer should be roughly 1/2″ thick.

Slide the pan into the freezer while you work on the next layer.


Second Layer

½ cup Unsalted Butter

3/4 Cup fresh Peanut Butter

3 Tablespoons Sour Cream

1 1/2 Cups Powdered Sugar


In a large mixing bowl, combine all ingredients and whisk briskly to a creamy consistency. You want to incorporate enough air to notably lighten the feel. Taste and adjust proportions so that you taste peanut butter over sweet for this layer. Spread evenly over the bottom layer, then return to the freezer.


Third Layer

4 Ounces 72% Cacao Dark Chocolate

2 Tablespoons unsalted Butter

2 Tablespoons Sour Cream

Pinch of Sea Salt


In a double boiler over medium low heat, melt the chocolate. Cut the butter into roughly 1/2″ squares, add a couple at a time and let them melt and incorporate before adding more. Finally, add the sour cream and salt and whisk to an even consistency.

Remove from heat and allow to cool until the blend starts to thicken.

Pour and spread evenly over the second layer.


Chill the bars in the fridge for at least 2 – 4 hours before cutting into roughly 2″ x 4″ bars.


Bars will be good for at least a week refrigerated, but there’s no way on God’s green earth they’ll last that long.


Nanaimo Bars, Eh?


We live at the muzzle of the Georgia Straight, that formidable body of water that separates Vancouver Island from the British Columbian mainland, and funnels equally formidable weather down to us from Alaska and northern B. C.

North of us, up the straight about 70 miles as the gull flies and due west of Vancouver on Vancouver Island, lies the city of Nanaimo. With sweeping views of ocean, mountains, and the Vancouver skyline, it’s a truly lovely place to visit. And more notably still, it’s the tacit birth place of that heavenly, legendary confection, the Nanaimo Bar. Here’s the official line on those little gems, courtesy of the City of Nanaimo website.

“This creamy, chocolatey treat’s origin is elusive, shrouded in mystery, and claimed by many as their own. Of course, we know that Nanaimo Bars originated in Nanaimo, or they would be called New York Bars, or New Brunswick Bars.” Now that’s logic hard to argue with, eh?

While the precise origin of the Nanaimo bar is unknown, the first recipes using ingredients that mirror the Official Version appeared in the 1952 Women’s Auxiliary to the Nanaimo Hospital Cookbook; they were named the Chocolate Square and the Chocolate Slice. Nanaimo Bars formally showed up a year later, in the 14th Edition of the Edith Adams’ Prize Cookbook. A copy is on display at the Nanaimo museum.

Technically, this is a no-bake dessert bar constructed in three layers, a graham cracker/almond/coconut base, a vanilla custard middle, and a chocolate top. Variants are as broad as the land that spawned them, with everything from different crumb bases and nuts, to mint, peanut butter, coconut, or mocha replacing the vanilla custard, and of course, a myriad of different chocolates

The Nanaimo Bar is incredibly rich, truly delightful treat. If you’ve never made them you simply must. They sound fussy to build, but in fact they’re quite easy and will store well refrigerated, so are an excellent make-ahead dessert. Use the best, local ingredients you can get your hands on. The recipe shown here is our take on this classic.

Serve with a high quality Muscat, Canadian Ice Wine, or a Tawny Port to cut the richness of the bar.


The Not Official UrbanMonique Nanaimo Bar Recipe

Bottom Layer

½ Cup Unsalted Butter

¼ Dark Brown Sugar

5 Tablespoons Cocoa Powder

1 large Egg

1 ¼ Cups Graham Cracker Crumbs

½ Cup Almonds

1 Cup flaked Coconut


In a dry pan over medium heat, lightly toast the almonds. Allow to cool and finely chop.

In a double boiler over hot, but not simmering water, melt and combine the butter, sugar, and cocoa powder.

Add the egg and stir gently but continuously, until the egg is heated through and the blend begins to thicken. Stay right with this part, as this will set up quite quickly.

Remove from heat add the graham crumbs, coconut, and almonds and combine thoroughly.

Press the mixture by hand into an ungreased 8″ x 8″ pan; your base layer should be roughly 1/2″ thick.

Refrigerate this layer while you work on the next.


Second Layer

½ cup Unsalted Butter

3 Tablespoons Sour Cream

2 Tablespoons Corn Starch

1 1/2 teaspoons pure Vanilla Extract

2 cups Powdered Sugar


In a large mixing bowl, combine all ingredients and whisk briskly to a creamy consistency. You want to incorporate enough air to notably lighten the overall consistency. Spread evenly over the bottom layer.

Return the doubled layers to the fridge.


Third Layer

8 ounces semi-sweet chocolate

4 Tablespoons unsalted Butter

2 Tablespoons Sour Cream


In a double boiler over medium low heat, combine and thoroughly blend chocolate and butter. Add the sour cream and blend thoroughly

Remove from heat and allow to cool for a moment until the blend starts to thicken.

While the blend is still liquid, pour and spread evenly over the second layer.

Chill the bars in the fridge for at least 4 hours before cutting into roughly 2″ x 4″ bars.

Bars will be good for at least a week refrigerated, but there’s no way on God’s green earth they’ll last that long.