It’s all about eggs Benedict, and for some reason, it didn’t trigger a notice. So, this is your notice – check it out!
Author: urbanmonique
I cook, write, throw flies, and play music in the Great Pacific Northwet.
Easy Eggs Benedict at Home – No, Really
It’s the youngest’s Birthday, and he’s up for a visit, so I offered several options for breakfast – he landed on Eggs Benedict. It’s also Palm Sunday, which means that this weekend and certainly next, a lot of folks are gonna think about going out for a special breakfast, and often enough, for the same dish. That’s all the reason you should need to make it at home.
Few breakfast dishes are more celebrated than Eggs Benedict. This is as it should be, because when done well, there are few things more delightful. And yet they’re rarely done at home, due to the assumption that they’re a royal pain in the ass to make. They’re really not if you go in understanding what you’re gonna do and have a pretty simple mis en place ready – do that, and they can and will be pretty easy.
There’s a couple versions of Benedict that claim to be the original out there. What’s generally agreed to is that it is an 19th century American dish and that hollandaise is involved. I was raised believing in the Lemuel Benedict version, named after a retired stockbroker with a hangover who wobbled in to the legendary Waldorf one morning in the late nineteenth century and ordered toast, bacon, poached eggs, and hollandaise. The Maître d’ on duty liked the idea and put it on the menu, subbing English muffin for toast and ham for the bacon.
The competing ‘original’ Benedict came from Elias Cornelius Benedict, a New York City banker – his version included a mixture of chopped, hard boiled eggs and minced ham topped with hollandaise.
With this post as an excuse, we tried both versions. We found them both delish, but it was agreed that Lemuel’s version is best. In any event, it’s quite obvious who has won at least the popular vote, if not the naming rights.
There’s a boatload of variants, from Florentine to mournay and Chesapeake to Hebridean. As far as I’m concerned, any variant is still Benedict so long as it involves eggs, bread and hollandaise.
So why does the dish have such a bad rep for home kitchens? The overall sense of fussiness and time pressure when constructing the dish, (largely due to a broad belief that you must make the hollandaise last), and mixed results when poaching eggs are the top complaints.
What you’ll find here does away with all that, and produces consistent, pretty results. We’ll build the hollandaise first, with a grounding in how and why it works, which makes for an unfussy, unhurried brunch. We’ll also deploy a skillet instead of a sauce pan to poach – that way you can clearly see how your eggs are cooking and have a much easier time with assembly.
First a bit about hollandaise. This is an emulsion, not much different than salad dressing in what we’re after getting it to do for us. The egg yolks we’ll use are basically protein rich water, and butter is our fat.
Successful hollandaise involves giving egg yolks, a little water, and lemon juice the time and gentle heat needed to allow us to gradually add butter and end up with a delicious, stable emulsion.
A couple tablespoons of water isn’t much, but it’s key to allowing the proteins in the yolks to relax. For the life of me I can’t understand recipes that omit it. Acids like lemon juice or vinegar also help relax yolk proteins, but the real protagonist here is gentle heat, with a strong emphasis on gentle.
Heating that mixture too much or too fast is the top cause of Hollandaise failure for home cooks. I’ll have you use far less heat than most recipes, and none if it direct -that’ll solve the overcooking problem. The indirect, (mostly steam), heat in the double boiler, coupled with the latent heat of the melted butter is more than sufficient to get the job done. Here’s how you do it.

Painless Hollandaise
4 large, fresh Egg Yolks
1/2 Cup fresh Butter
2 Tablespoons Cold Water
2 teaspoons fresh Lemon Juice
2-3 shakes Tabasco Sauce
Separate eggs. Place whites in an airtight container and refrigerate or freeze for future projects.
Put about 2″ of water in a sauce pan sized such that a mixing bowl or double boiler will fit within. You want the bottom of the bowl you’ll work in to be above the water by a good 2″. Not doing this right is a primary cause of failed hollandaise – Too much heat, and/or heating too fast.
Turn heat to medium low.
In a separate sauce pan, melt butter over medium low heat.
When the water starts to simmer, turn off the heat.
In a small mixing bowl, combine egg yolks, water, and lemon juice.
Whisk briskly by hand to combine, until blend thickens and the volume has increased notably, about 2 minutes.
Place bowl over the hot water pan.
Gently but steadily whisk the egg yolk mixture to heat it through, about 1 – 2 minutes.
Begin slowly adding butter in a thin stream; add a few seconds worth, whisking gently but constantly, until the yolk mixture has incorporated the butter, then add a little more, and keep doing so until all the butter is absorbed.
The sauce will thicken somewhat, but possibly not as much as you like it to end up, but don’t sweat that point; as the sauce sits while you prep the rest of the dish, it’ll thicken a bit more.
Whisk in the Tabasco, then set the whole double boiler rig on the back of your oven, and cover with a clean towel.
What to do if your Hollandaise breaks – It’s gonna happen some day, so just accept that and be prepared. It’s not the end of the world, and you can fix it, so – deep breath! Broken hollendaise looks like oil with little bits of egg in it – fear not. Grab a small spoon and snag a little hot water from your double boiling rig. Add a couple of those to the hollandaise and slowly, steadily whisk it in. Add a couple more and repeat. You can go as high as 25% of the volume of your sauce, but you probably won’t need to. Be patient – keep adding a couple small spoons of hot water and whisk slowly and steadily until your sauce emulsifies and takes on the smooth texture you’re after. Taste it, adjust lemon and Tabasco balance, and carry on – all is well again.
Eggs Benedict – Serves 2
4 large, fresh Eggs
2-4 slices thick cut Ham, (Cooked)
4 slices thick cut Sourdough Bread
Tablespoon of White Vinegar
Optional: Pinch of fresh Dill
Preheat oven to Warm.
Cut sourdough into roughly 4″rounds, and do the same with the ham.
Toast sourdough lightly, then place ham onto plates in the oven to heat through.
In a large skillet over medium heat, add about 2″ of hot water, and the vinegar.
When the water starts to simmer, roll the heat back to medium low.
Gently crack an egg and, with the shell just above the water, slowly release it into the pan. The vinegar will help the whites to solidify quickly, keeping your eggs together. Repeat with the other three eggs.
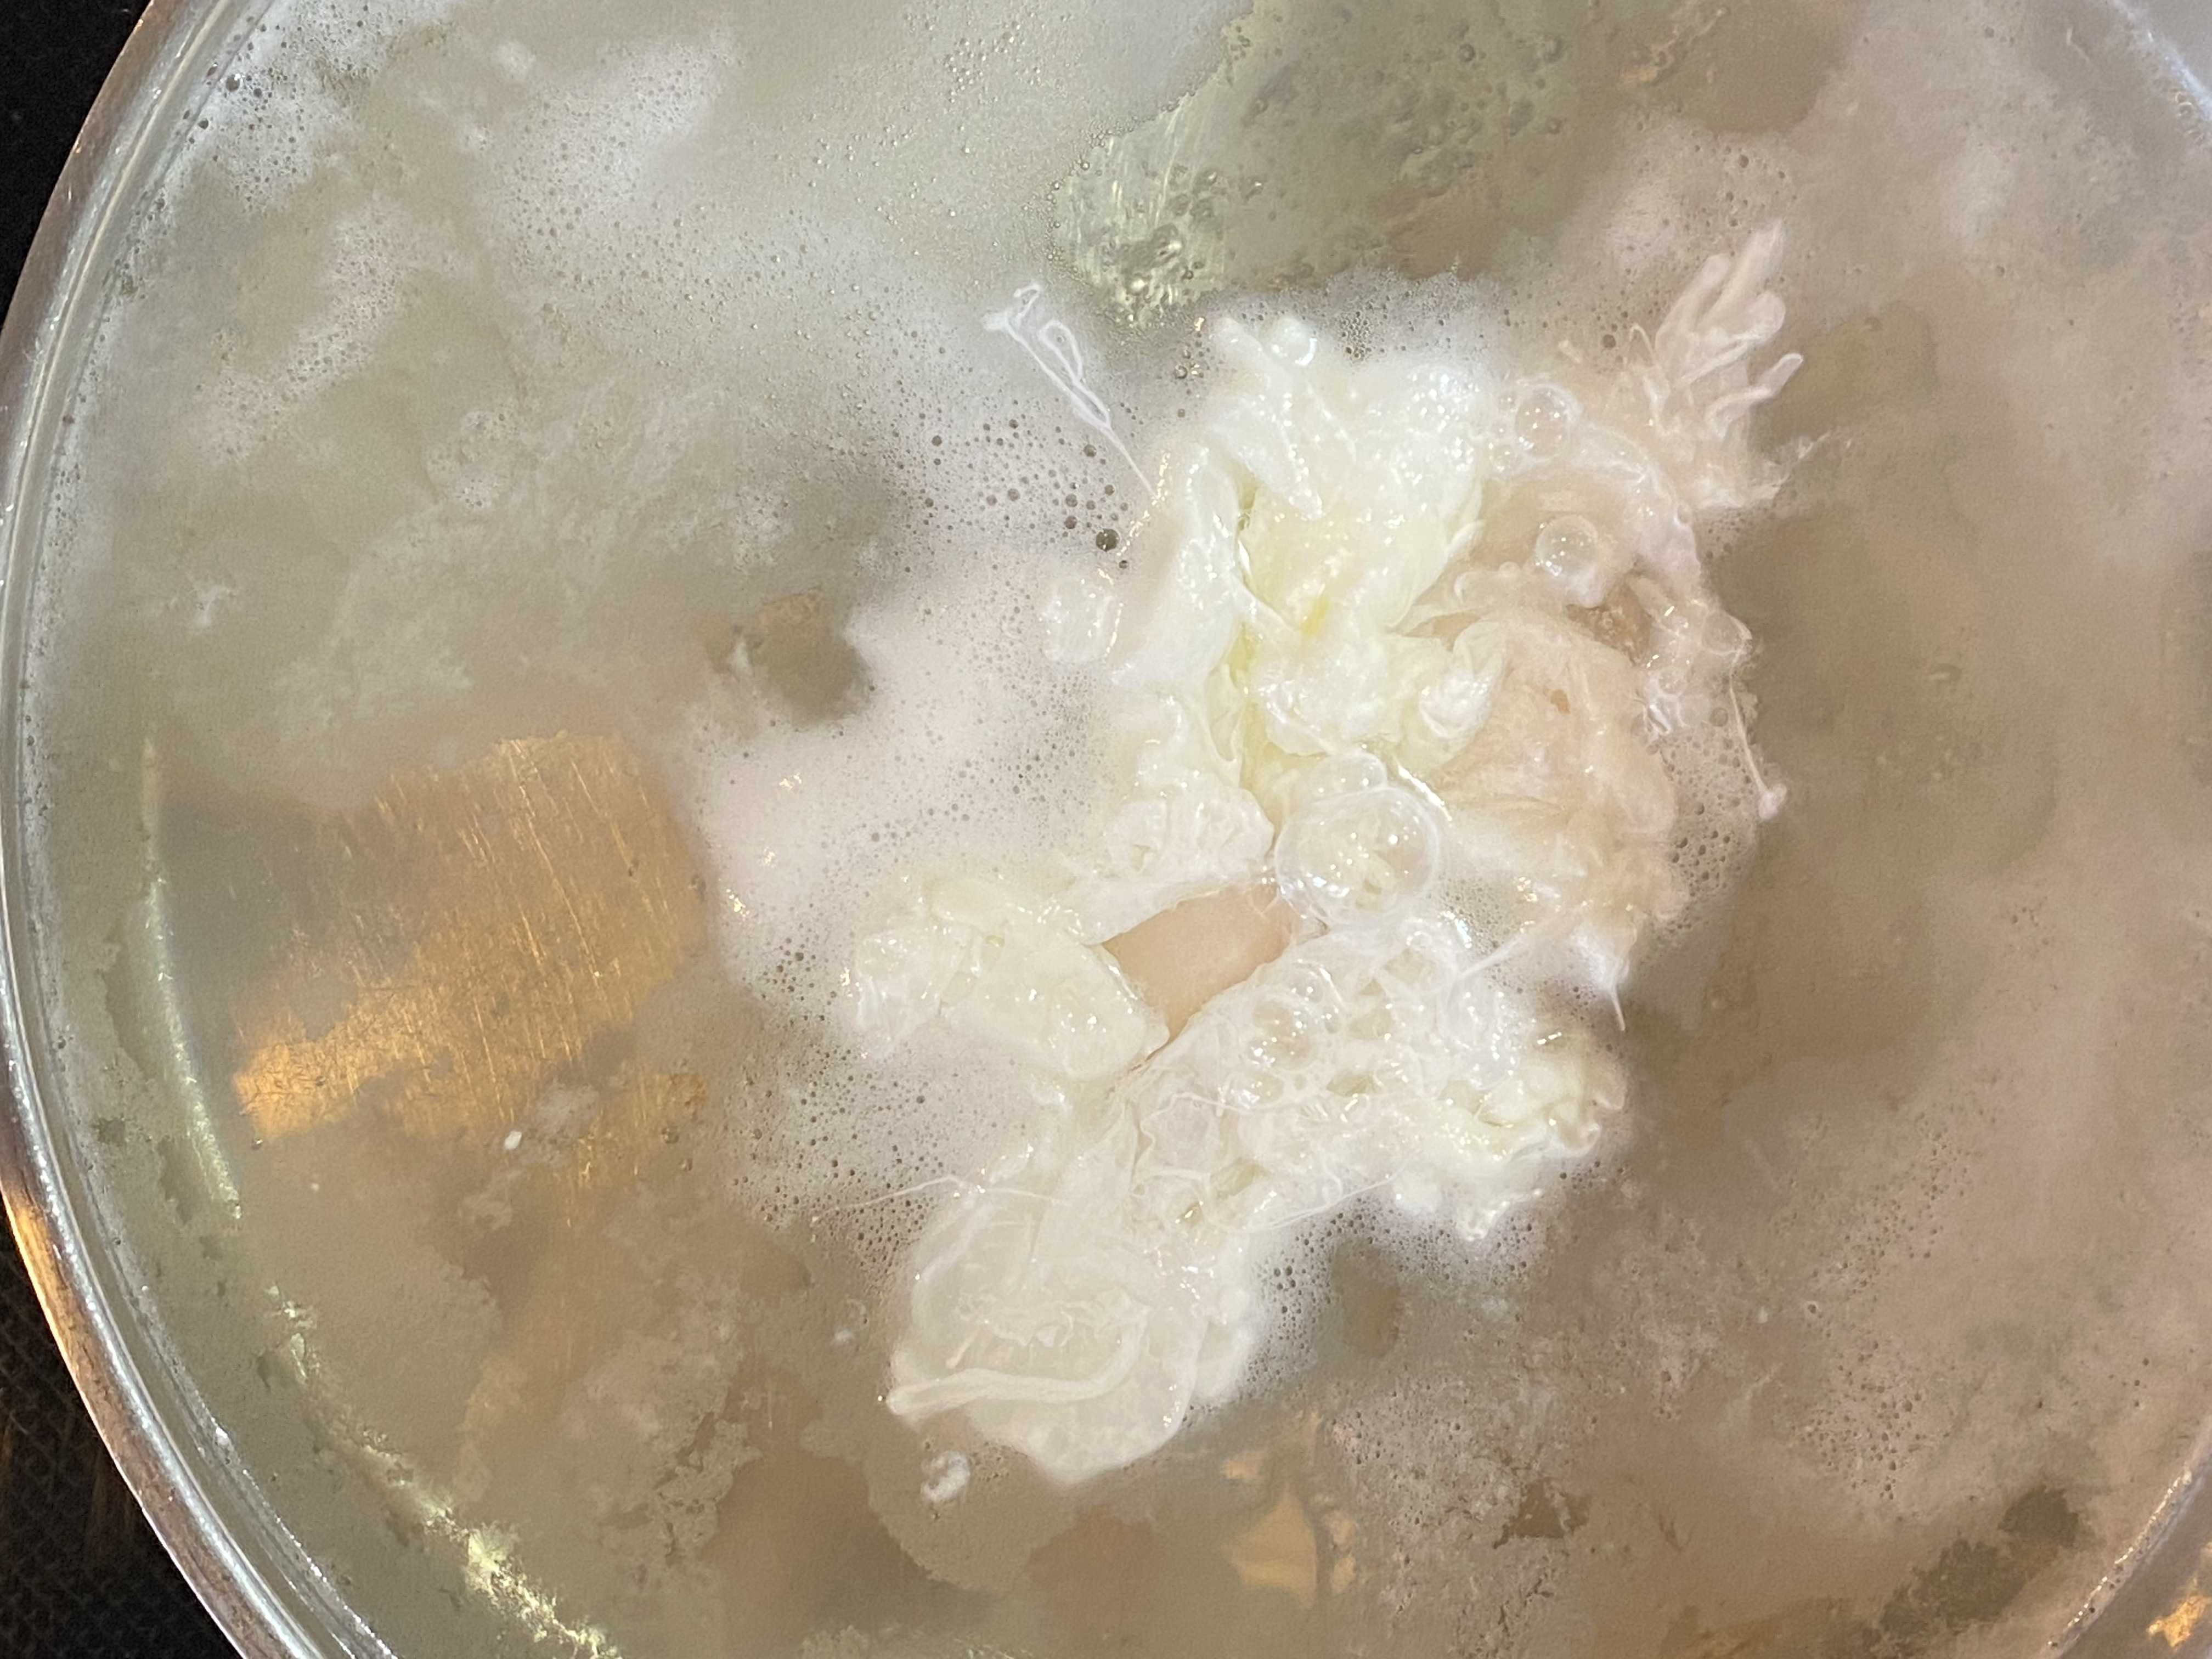
Poach eggs for about 3 minutes, until all the whites are nicely set and the yolks are still semi-liquid.
Remove plates, toast, and ham and set up two of each on warm plates.
Use a slotted spoon to gently corral eggs and set them carefully on the ham and toast stacks.
Uncover hollandaise and whisk to loosen it up a bit. If it’s a bit too thin, a little burst of heat and whisking will take care of that in less than a minute. If perchance it’s thickened too much, a teaspoon to two of milk whisked in will bring everything back to status quo.

Spoon generously over eggs and garnish with a little fresh dill if you wish.
The pretty plate up there? That was the Birthday Boy’s – here’s mine.

Mim Delia’s Old Style Italian Bean Salad
If you fly fish in Washington state, especially around the Olympic Peninsula, chances are good you’ve heard of Jeffrey Delia. He’s a master Sea Run Cutthroat fisher and fly tier – Check out Peninsula Outfitters and you might luck into an SRC or tying class taught by Jeff, or find some of the many flies he’s developed for sale.

That’s one facet of the man, and yeah, I fly fish and that’s how I met him – but he’s here because he’s one hell of a fine home cook. Jeff is of Italian heritage, and his cooking shows that love for fresh ingredients, and honors them by highlighting their finest qualities.
If there’s one cold salad I really, really love, it’s a beany thing, and Jeff has consented to share his Mom’s venerable recipe with us today – So with no further ado, here’s Mim Delia’s Old Style Italian Bean Salad, perfect for Spring.
Jeff writes, I’ve been eating this Italian style bean salad since I was a little kid so I know it’s at least 60 or 70 years old. You can boil your own beans and that will make it even more delicious, but in a pinch, canned beans make a great salad for a party or a last-minute addition to dinner. You can also use cannelloni beans, black beans, or even black-eyed peas, or beans of your choice. The measurements in the following recipe will serve 6-8 people generously.
Conversion Note: 1 pound of dry beans will yield around 6-7 cups of beans when boiled, and a 15 ounce can of beans yields 1 1/2 to 2 cups.

Mim Delia’s Old Style Italian Bean Salad
3 – 4 Cups Garbanzo Beans, drained.
1 1/2 – 2 Cups Red Kidney Beans, drained.
1 1/2 – 2 Cups Black Olives, drained.
10-2 Pimento Stuffed Green Olives.
10-20 pitted Kalamata Olives.
1 Medium red, white, or yellow Onion, sliced as thin as you can.
Mix all ingredients well.
Make a classic Vinaigrette –
1/4 C Red Wine Vinegar.
3/4 C Olive Oil
1-2 Tablespoons stone ground Mustard.
1/2-1 teaspoons ground black Pepper.
Pinch dried oregano and dried basil.
Pinch of Salt

Whisk salad ingredients until dressing is emulsified, pour over salad ingredients, mix well and let marinade for at least an hour, (it gets better by the hour so make it the day before if you can.)
If there’s any leftovers I often heat them in a small frying pan and then scramble some eggs into the mixture for a tasty Italian omelette breakfast.
Velveting Proteins – What To Do, (And what not to do!)
This morning a friend chimed in on social media and asked me about a post she’d seen, adding ‘Eben, I know there is some kind of science behind this – re baking soda breaking down the meat fibers, but?’ the post she referenced referred to using baking soda, and only baking soda, to act as a velveting agent. I’m not going to reprint that post here, because, well…. My response might seem rude, and I don’t want to do that – but I have to respond to the concept, without a doubt.
What we really need to be talking about is velveting, a Chinese cooking method that softens texture and retains moisture in proteins to a delightful degree. For things like chicken breast, lean beef or pork that might not go through the high heat of grilling or stir frying in a wok as well as they could, it’s the secret behind the tender, juicy stuff you expect at good restaurants – and they do not use baking soda, period.

Why not, then? Baking soda is bicarbonate of soda, an alkaline salt – it will indeed dissolve cell walls in proteins, but there’s a heavy price to pay. Even when done ‘correctly’ (i.e. according to that recipe my friend posted about), what you end up with is a protein that tastes kind of soapy, with a texture from slightly rubbery to mushy – it’s absolutely unpleasant, and it is not, repeat not how proper velveting is done.
So my overall response to the author of that piece is this – I’m glad you like it, but I’ll pass – The baking soda method is a crude chemical process, and nothing like the real thing. Fortunately, the right way is out there. Like all good things, it requires a bit more work, but not too much – and it’s very much worth it.
If you’ve ever had really good Chinese stir fry, it’s likely been velveted. The real deal process deploys a mix of egg whites, starch, (usually cornstarch), and a little wetting agent – most often plain old water, but sometimes rice vinegar or rice wine. The process does not marinate the protein, it simply adds a bit of additional moisture, allows time for that to integrate, and then lets the starch seal all that in.

My friend Grace Young writes, in her wonderful book Stir-Frying To The Sky’s Edge, that the technique is called waat, 滑, meaning smooth or slippery, (anglicized as velveting). The process implies proteins being ‘passed through’ water or oil, meaning blanching in oil or water.
While a fair number of American Chinese restaurants deep fry after deploying velveting, we at home are far better off blanching in water – less calories, less kitchen danger, and very tasty results. That’s what I do at home, and so can you. In any event, that blanching step is important – that’s what gets everything sealed in prior to stir frying or grilling.
So with Grace’s blessing, and rather than trying to rephrase what’s already been written very well, I’m going to simply point you to a link for a recent article that quotes her and several other notable experts, and let them tell you how to do it right at home.

My only add is this – I’ve taken to using arrowroot instead of cornstarch when I velvet. Cornstarch is made from, well – corn, so it does impart a bit of a cereal taste to thing. Arrowroot is a more potent starch, and doesn’t add any flavor note I can detect – It’s strong enough that I use about half the volume called for cornstarch, with excellent, consistent results.

Finally, if you don’t have Stir-Frying To The Sky’s Edge, get it – and when you do, flip it open to pages 100 and 101 and you’ll find great in-depth tips for velveting pretty much everything, the right way.
Deb Paskall’s Chicken & Vegetable Soup
Deb Paskall is another friend I’ve met on social media, through mutual love for flyfishing and cooking. I’m definitely an amateur of the former, while Deb is very much an accomplished professional – She’s a Pro Staff member for Sport Fishing on the Fly, and for Semperfli as well.

I recently commented that Deb ‘paints with fly tying stuff,’ a bit tongue in cheek, but on the mark. Like developing recipes, coming up with fly patterns that not only look amazing and catch fish is no easy task. While she seems to do both effortlessly, it ain’t necessarily so – she’s put in a lot of hard work to get to where she is. Deb lives, fishes and ties in the stunningly beautiful town of Nelson, British Columbia – and she still cooks wonderful food.

Speaking thereof, she brings us soup today, done right – fast enough to be a fairly quick decision, slow enough to be done right. She writes, ‘according to my sweet neighbor, this is the best chicken vegetable soup she’s ever had – I’ve been making soups for many years, and I used to own a soup kitchen.’
What she’s sharing with us today demonstrates what great home cooking is all about – deceptively simple, inspired, delicious, and based on experience and intuition – she wrote, ‘Here’s my recipe, and sorry, but I don’t measure anything – All to taste.’ As such, some of the proportions and play by play here are mine, which is also how things should work – when you make it, use Deb’s and then make it yours.

Deb’s Chicken & Vegetable Soup
4-6 Chicken Thighs (Bone in, skinned)
1 large Onion (your choice – I prefer Red or Sweet)
2-3 Stalks Celery (with leaves, and Celeriac would be fine too)
2 large Carrots
1 large or two medium Potatoes
3-5 fat Cloves Garlic
3-5 whole Turkish Bay Leaves
1-2 teaspoons Italian Seasoning (Store Bought, or see below)
Kosher Salt & ground Black Pepper to taste
Optional: Fresh Parsley to garnish

House Made Italian Seasoning
1 Tablespoon dried Basil
1 Tablespoon dried Oregano
1 teaspoon dried Parsley
1 teaspoon dried Thyme
1/2 teaspoon dried Marjoram
1/2 teaspoon dried Rosemary
Thoroughly combine all ingredients, store in clean glass, in a cool, dark spot.

Remove the skin from the chicken thighs if you didn’t get skinless.
End trim, peel, and rough chop onion, celery, and carrot.
Peel, end trim and mince garlic.
In a stock pot over medium heat, add a tablespoon of olive oil and heat until shimmering.
Add diced and minced veggies and sauté for a couple of minutes, until onions just start to turn translucent.
Add the chicken, bay leaves, and fresh water to cover, plus about 2” over everything.
When soup begins to boil, reduce heat to maintain a bare simmer – let that work for about 60 minutes.
With a pair of tongs, pull the thighs from the mix and put ‘em in a mixing bowl.
Peel and dice the potato(es), and leave them in a mixing bowl, covered with water.
Let the soup simmer for another 30 minutes.
Remove the chicken meat from the bones, shredding by hand.
Add the chicken, drained potatoes, and Italian seasoning to the mix, and simmer for another 30 minutes.
Taste the soup and season with salt and pepper as needed.
Deb notes that you can substitute noodles, rice, or quinoa for the spuds if you prefer – If you do that, it’s best to have those cooked, and add them to individual bowls right before service.
Molé Making Brilliance from Megan Heberlein
A couple of things, for the record – I know Megan Heberlein through social media, and this post is written with her blessing – albeit she wanted to make sure that I did not refer to her as ‘any kind of expert,’ so I ain’t.
I connected with her through the Rancho Gordo Bean Club Members group, a gang of folks who share recipes, questions, techniques and all things bean-loving over on FB. Unlike a lot of social media in broad strokes and FB in particular, this group is fun, friendly, supportive, and ridiculously wholesome – I love it to pieces.
What drew my attention to her was a well thought out piece of advice on making and storing molé – one of those why didn’t I think of that cooking moments that you instantly want to adopt and turn others on to.

Her molé strategy is nothing short of brilliant, far as I’m concerned. As she notes below, this sauce is ubiquitous in Mexican regional cookery, and every family really does have their own fave – just like pasta sauce in Italy or bourguignon in France. I couldn’t say it any better than she does when she exhorts us to try a bunch and make a fave or three ours. So without further ado, here’s Megan’s stellar advice.

1. Make a big batch – a really big batch – as big of a batch as you are willing to deal with. It doesn’t take much longer, and mole freezes really well.
2. Use gloves for the chili handling. If you’re not already, it really does help keep the burn down!
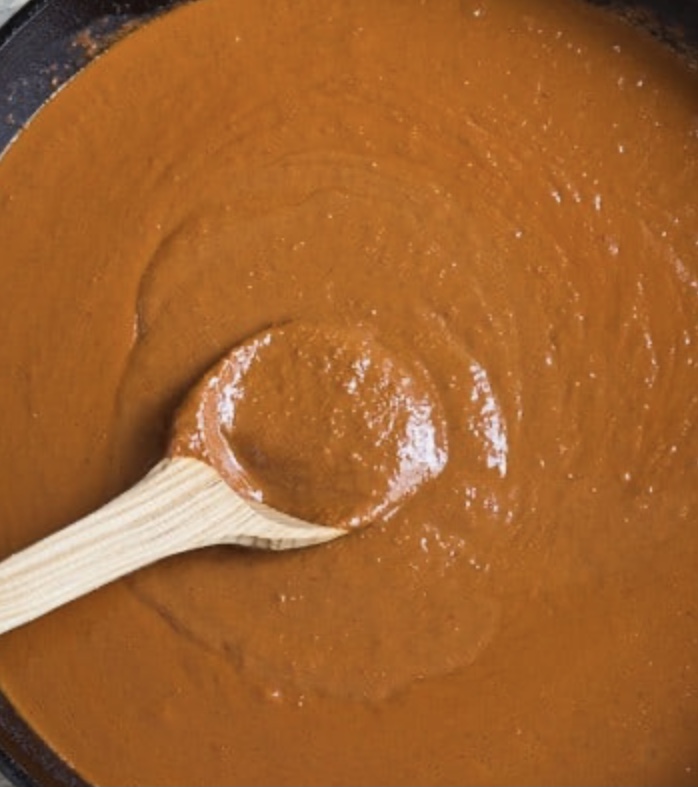
3. Once everything is together and run through the blender to smooth it out, don’t pour it back into the pan. Set the oven for 250, and pour the mole into a roasting pan, or something similar that is size appropriate. It will take longer to cook down, but you don’t have to hover over it. Just walk away from it, give it a stir every couple hours – or even set your oven lower, and go to bed! The other great thing about this method is that you don’t have to worry about cleaning mole splatters off your walls and ceilings for months. 🙄
4. Cook it down. Cook it way down, and turn it into a paste. This will take up less space in your freezer, and is easy to turn into a sauce with the addition of stock.
5. Glass jars are your friends for storage. I usually pack mine into pint jars, and 1 pint jar plus stock is plenty to use on a family size package of chicken thighs. Come time to use, you can either thaw on the counter (if you’re one of those people who actually plan ahead), or stick in the microwave without the lid (if you’re me). I haven’t tried it, but if you’re good with liquids in vacuum seal bags, that would probably store really well, and just throw it into warm water to defrost.
6. Freeze, don’t can! I’ve got it on very good authority that canning mole at home is right out, even with a pressure canner – Apparently it’s too dense to be safe.
7. Every region of Mexico has it’s own style of mole, and every family has their own recipe. Try various recipes, and find the style(s) you like! One of the most fun things about mole is that, because they are so varied, you can change up recipes as you’d like. Change up the peppers, the amounts of onion/garlic/tomato/tomatillo, the fruits, the nuts/seeds, whatever.
8. Know that every pepper has it’s own flavor profile, and playing with the peppers can change up the flavor. Ancho is fruity, chipotle is smoky, etc.
There you have it, with big thanks to Megan. What I love about her strategy is how demonstrative it is of the innovative capability of us home cooks – and it’s a great reminder to always be on the lookout for better ways to do stuff in your busy home kitchen – now y’all go have some fun!
