Sometimes, OK… Most of the time, we just cook for ourselves – No show, no fancy, just what we like… And you know what? It’s really, really good.


Seriously…
From standards to radical departures, homemade is always best
Sometimes, OK… Most of the time, we just cook for ourselves – No show, no fancy, just what we like… And you know what? It’s really, really good.
Seriously…
Ok, so we suddenly have, shall we say, a whole pantload of cucumbers! What to do, what to do… Can’t preserve much of them, can’t give them all away, so gotta get cookin’. first thing that comes to mind for me is Tzatziki, just ’cause I do love it so. Secondly, we wanted something cool, ’cause it’s bloody 100+ outside and we neither need a bunch of cooking heat nor hot food on days like this, eh?
So off to the market, with a vague idea of a Greek themed dindin. I saw no lamb, so I settled on pork and beef, both USDA Choice, which they had as a Buy-1-Get-3-Free deal, so I bought three of each, of course. Snagged some very nice Greek yoghurt and some flatbread. No Retsina in sight, so a dry white wine, and back to the kitchen I went. I decided to make the protein as Greek-Like as a could and work from there. Here’s what I came up with.
Kinda-Greek Sausage
50%-50% cuts of beef and pork
Basil
Rosemary
Oregano
Thyme
Granulated Garlic
Salt & Pepper
Olive Oil
Note: I did this as sausage ’cause I have an attachment for our Kitchenaid – If you don’t, fret not – Just cut stuff to about 1/2″ and go with that, it’ll be fine – You won’t need to freeze/chill the flesh if you go this route, but limit its time outside the fridge strictly for food safety considerations.
Remove meat from packages, cube to about 1.5″ and throw them into the freezer for about 15 minutes. Throw another stainless bowl in there too, to catch the finished product. When making sausage, or really, any forcemeat, keeping your ingredients really cold all throughout the process is critical: This is necessary first and foremost to keep the proteins under 40°F and thus out of the Food Temperature Danger Zone. Secondly, it helps make a more homogenous end product with better taste and texture.


I grabbed the herbs from the garden, of course, (Which you should do too, by the way…) Field strip herbs and chiffenade/mince. Remove protein from freezer, coat liberally with oil, add herbs, garlic, salt and pepper, mix well.


Process through grinder with the wider of the two plates provided. Use chilled bowl for catching the finished sausage and return finished product to the fridge ASAP.


I cooked off the sausage in a saute pan, and M came home as I was doing so – I knew I’d done OK when the first words out her mouth were “Oh that smells soooo good!”

Now for the magic ingredient…
Tzatziki
1 8 oz container of Greek Yogurt, (You can use regular too)
1 med cucumber
2 tbspn olive oil
Juice from 1/2 to 1 lemon, (As you like it)
1 tspn dill, chopped fine, (You can sub spearmint)
2 cloves of garlic, minced
salt to taste
If you don’t have Greek Yoghurt, plain will do, but find Greek if you can; it is richer, tangier and thicker, all of which are good things when it comes to Tzatziki.
Line a colander or strainer with paper towel and drain the yogurt for 15 to 30 minutes; this is critical in avoiding a runny final product.
Peel, seed and grate cucumber. We used Armenian from our garden, which have wonderful taste and nice, firm flesh. Any decent cuke will do, but make sure it is nice and firm!
Combine everything and mix well by hand, as blending or processing will make your yogurt break down.
Place in a non-reactive bowl, cover, and refrigerate for 1 to 2 hours.


Let the sausage cool along with the Tzatziki.
Cut up veggies of your choice for garnish – We went with yellow bell pepper, tomato, cilantro, lettuce, onion, and pimento stuffed green olives – Talk about yummy!

Grill or toast flatbread. I wanted flatbread we could open and stuff like a Gyro, but the stuff I found wouldn’t do that, so we just cut grilled wedges and called it good. If you like cheese, then Feta or Mizithra would rock with this – We didn’t want to cloud the wonderful Tzatziki, so we left it off of ours.
Pile everything on and απολαύστε – εύγευστος!
(Enjoy – Delicious!)


What a GAS!! We had such a fantastic day with all the folks up in Walker! Erin and Theresa and all the gang at the GreenScene were so nice and supportive, it was an effortless day of food, fun, great music, crafts, and lots of happy people. Perfect day, humidity and heat way down from the days before, thank God…
I gotta tell you, if you’re around Walker, go to the GreenScene, without fail! That is one great store, filled with great food and treats and wonderful folks to cook with it and show you how to do your own with their great ingredients. I was a bit intimidated every time I stepped into the kitchen, ’cause Stacy and Erin and the gang were whipping up some amazing eats of their own – Go and get something, anything with their Jasmine tea smoked chicken – You can thank me later…
We made some great stuff with the incredible veggies from Neighborhood and King’s Gardens CSA; Roasted Corn Pico de Gallo, Green Chile sauce, Smoked Guacamole, Gazpacho, and roasted, tamed jalapenos with sauteed Chorizo and Queso Fresco. many thanks to the wonderful folks of Walker and visitors who stopped by to say hello, chat about food and try out our stuff! Here are the recipes for the goodies, enjoy!
Literally translated, Pico de Gallo means ‘Roosters Beak’ and maybe for that reason it’s also sometimes called Salsa Fresca. Pico is our personal favorite manifestation of the art. The essence of it is simply tomato and onion, though for our minds, you must have cilantro and chile as well. Pico lends itself to many, many things, from simple munching with chips, to a scoop on soup or stew or damn near anything else from eggs to enchiladas. Here’s the basic recipe we work from:
Roasted Corn Pico de Gallo
4 tomatoes.
1 sweet onion.
¼ cup fresh cilantro.
2 ears fresh sweet corn.
2 cloves garlic.
1-3 chiles of your choice, (We used Jalapenos at Walker).
Juice of 1 -2 fresh limes.
Salt and pepper to taste.
Core, seed and dice tomatoes, onion and fine chop or chiffenade cilantro.
Coat corn, (On the cob), with olive oil and lightly salt and pepper. Roast corn and peeled, whole garlic cloves on a grill or under a broiler. Remove and cool, then cut kernels from cob and fine mince the garlic.
Throw everything into a non-reactive bowl, squeeze lime juice over all, toss well and season with salt and pepper to taste.
Options:
MANY, is the bottom line. Add FRESH lemon, orange, or grapefruit juice to add a great citrus note to the flavor. Juice a tomato and add that. Dill, shallot, annatto, chipotle, smoked paprika, smoked cherries, smoked salt, smoked pepper seed – Get the picture? Experiment and see what floats your boat!
Picante:
A lot of folks yesterday asked about the difference between a pico style salsa and a picante style salsa; it’s a great question, not a dumb one! Pico is the uncooked, mixed veggie salsa with a minimal juice or sauce component, while picante is a salsa that is predominantly sauce-based. If you think of restaurant salsa, it is much more often picante style than pico. That said, there’s a broad assumption that picante style salsas are always cooked, and I’m here to say that it ain’t necessarily so; to me, the freshest and best picantes are NOT cooked, but that’s just me – You do what floats your boat, right? Right! One general note, the components of picante should be a finer dice/mince than pico; it’s just a bit more blended/refined…
Fresh Salsa Picante
4 tomatoes of your choice
1 onion, skinned and minced
¼ cup minced cilantro
2-3 chiles of your choice, seeded, cored and minced
1 clove garlic, minced
Salt, pepper, and cumin to taste.
Blanche your tomatoes; peel them all after blanching.
Take 3 of your ‘maters and put ‘em in a blender, processor, or have at ‘em with a boat motor until they are thoroughly liquefied. Add salt, pepper, garlic and cumin to taste to this liquid and set aside.
Dice your remaining tomatoes, and combine with onion, cilantro, and chiles. Add your liquid component and blend thoroughly. Taste and adjust spicing as needed. Refrigerate and allow to chill and blend for at least an hour prior to serving.
Salsa Verde
10-12 tomatillos, husks removed, of course…
1-2 small sweet onion, diced
¼ cup fresh cilantro, chopped
2-4 green chiles of your choice, (Anaheim or Hatch are nice), diced
1-2 cloves of garlic, minced
Salt and pepper to taste.
Employ the exact same process as for the red salsa above and you’re good to go!
Here’s the basics for the Green Chile Sauce we made in Walker.
Classic Green Chile Sauce
5 – 7 Hatch green chiles, roasted, field stripped, skinned and rough chopped.
1 cup diced sweet onion.
1-2 cloves garlic, peeled and minced.
1-2 sprigs cilantro or ½ teaspoon coriander.
2 cups chicken stock.
1 teaspoon flour.
1 teaspoon butter.
Salt and pepper to taste.
2-3 tablespoons vegetable oil.
Heat oil to medium high in a deep sauté pan. Sauté onion until it start to become translucent. Add garlic and briefly sauté. Add chiles, cilantro, and stock and simmer for about half an hour. Remove pan from heat. Pour mixture into blender and blend until you hit the consistency you like. Heat flour and butter in sauté pan. When roux is well blended and heated through, pour blended mixture back in and allow to blend and thicken. Remove from heat and allow to sit covered.
Note for Walkerians: We roasted all our chiles, onion, and garlic for the one y’all enjoyed, and added 1/2 a roasted Avocado as well! We did not use flour and butter to thicken, ’cause it just didn’t need it – If it’s thick enough, you can feel free to let it be…
Smoked Guacamole
Here’s a great twist on the standard chip fodder. The smoked avocados add a really savory, distinct note to a wonderful dip.
2 ripe Avocados.
1 medium Onion.
1 firm Tomato.
1-3 cloves Garlic.
½ fresh Grapefruit.
5 – 8 sprigs fresh Cilantro.
Juice of 1 – 2 fresh Limes.
Salt, Pepper and Chile flake to taste.
For the Walker version, we prepared some smoking wood by soaking it in water for about half an hour, then placing that on top of hot charcoal. After loading the grill with the avocados, onion, tomatoes, garlic and the grapefruit, we closed the cover and dampered the vents so the air flow was minimal, allowing the smoke to work low and slow for about forty five minutes. We did not smoke or roast the tomato, ‘cause it gets too mushy.
Allow the grilled/smoked stuff to cool. Dice the tomato, onion, avocado and garlic, then combine in a non-reactive bowl and mix well. Add chiffenaded cilantro, juice from one lime, and squeeze juice from ¼ of the grapefruit.
Add salt, pepper and chile flake to taste, and add additional lime and/or grapefruit juice as desired – When you get the balance right, you’ll have a nice, tangy citrus counterpoint to the smoky veggies.
And finally, here’s the Gazpacho recipe! For the Walker folks, the cold final version y’all tasted was made the night before, as we noted. The version we made that day, we smoked the tomatoes, pepper, and garlic, and the results were sublime indeed – I highly recommend you try that version too!
Gazpacho Andaluz
Here’s a classic take on Gazpacho from Andalucía, thickened with bread. It’s a delightful meal on a hot, sticky day, and double bonus, the prep doesn’t require heat either! I’ve been making this since the ‘60s when a Spanish friend of my mom’s showed me how this works.
Gazpacho Andaluz
4-5 medium tomatoes.
1 medium cucumber.
1 medium red bell pepper.
1-3 cloves garlic.
1/3 cup extra virgin olive oil.
2 tablespoons white balsamic or white wine vinegar.
Salt, Pepper, ground chile to taste.
2 slices (About ¾” thick) dense white bread.
1 cup cold water.
Put your bread in a bowl, cover with cold water and allow to soak for about 15 to 20 minutes.
Peel, core, seed and rough chop tomatoes, cucumber, pepper and garlic. Throw all those into a blender or processor and blend until everything is smooth, with no big chunks left.
Grab your bread and squeeze it into a ball as hard as you can. Crumble bread into a bowl, and add oil and vinegar. Mix well.
Slowly add bread to veggie mix while blending on low until you get the consistency you like. You want a nice, relatively thick soup that will coat a spoon. If you get too aggressive with the bread, thin the mix out with a little more cold water.
Pour soup into a fine-mesh strainer or chinoise and carefully force through with the cone or the back of a metal spoon.
Place soup in a glass bowl or container and refrigerate for at least 2 hours, and more is better – You want this icy cold!
Serve with garnishes that float your boat; chopped dry sausage, hard-boiled egg, cilantro, diced tomato, cucumber, onion or shallot, sour cream or even better, crema, all are wonderful.
The Jalapeno/chorizo/queso dish I’m gonna save for later, because I want to flesh that out and show y’all how to make your own chorizo and queso, ‘K?
Here’s a few pics for fun!


 Walker
OK, have had a ton of requests for more detail on comfort food faves and mac and cheese as I do it in particular, so here ya go!
If and when we do a restaurant, mac & cheese will be a mainstay, and I’ll guarantee in advance that, while it likely will never be the same twice, it’ll always make you come back for more. Here’s my secret, honed over decades of serious research…
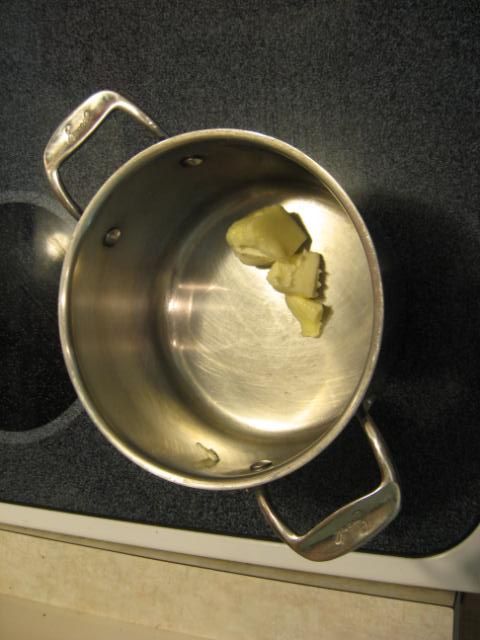
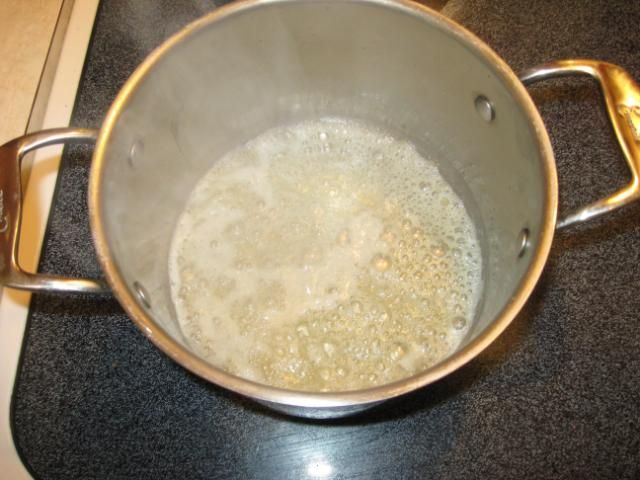
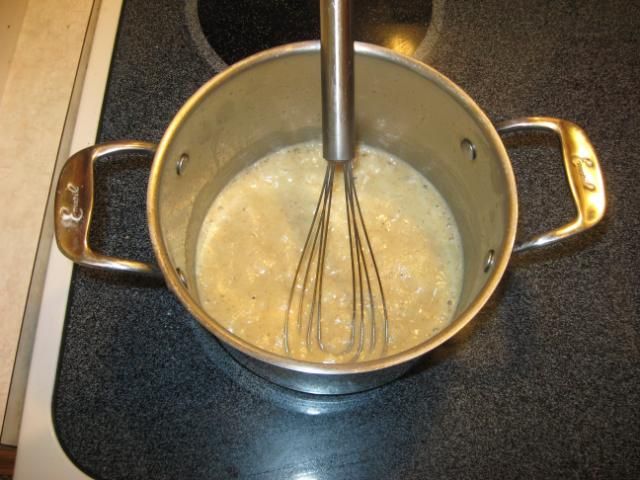
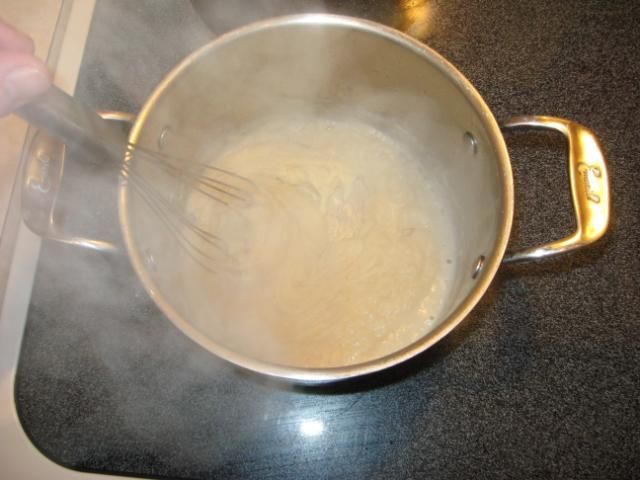
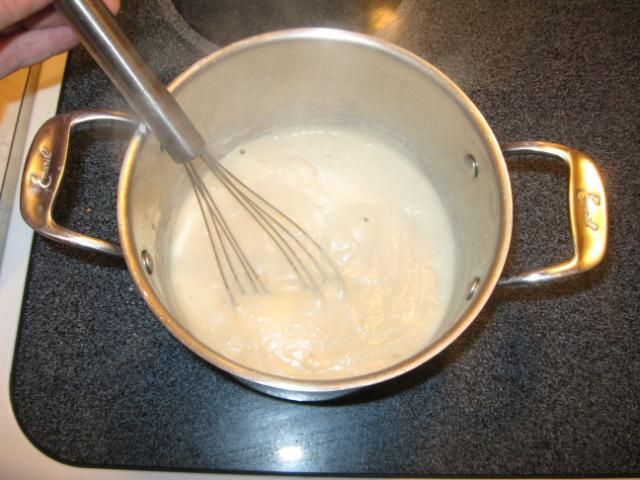
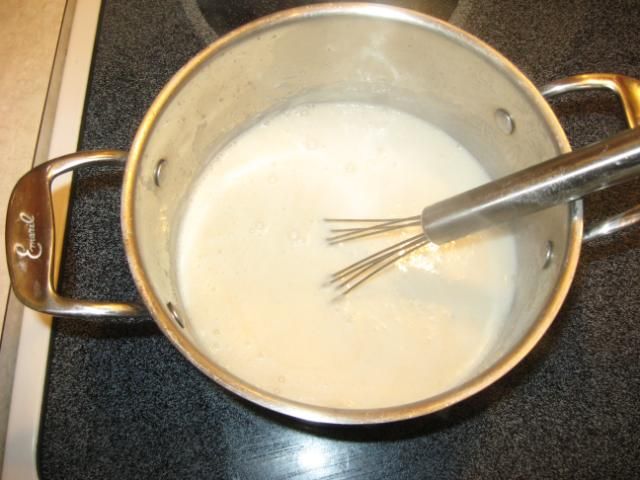
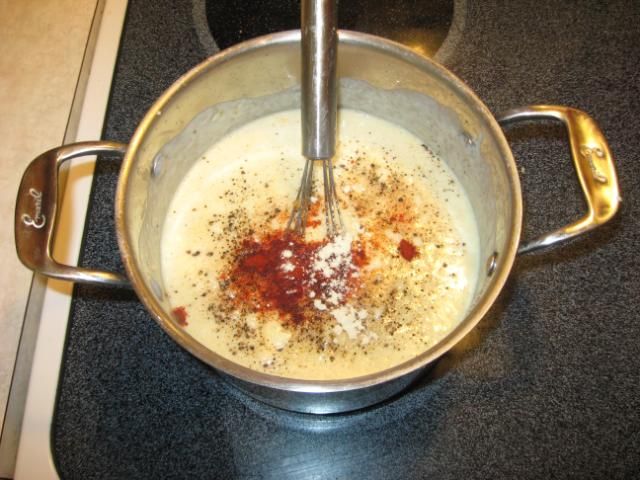
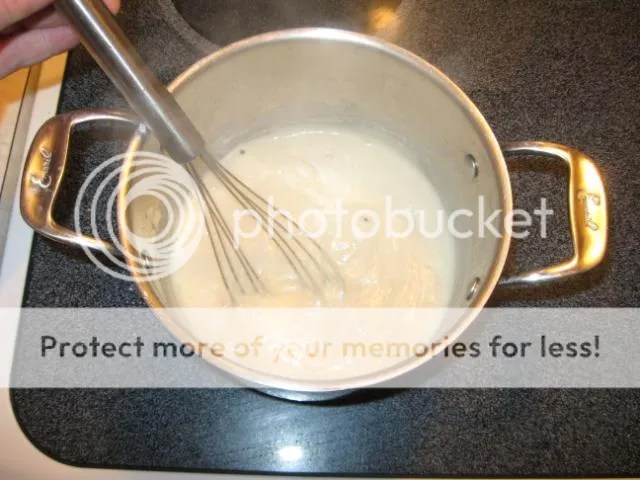
The Roux
3 Tablespoons unsalted Butter.
3 Tablespoons Flour.
3 cups Milk.
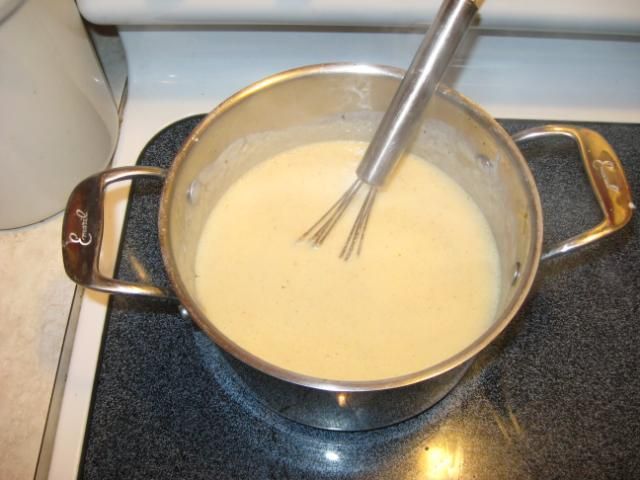
Roux is the key to sauce, as far as I am concerned. I have an idiosyncrasy about roux making that was shown to me many moons ago by a French Chef in a French kitchen, and it was sooo durn good, I’ve done it this way ever since. The bottom line is this; never break the roux. What I mean is this: You’re adding fat and starch, (Well, gluten), to liquid to make the resultant sauce thicker. Therefore, you want the chemistry that adds those qualities maintained. The how-to is simple: As you mix flour with butter, and then add liquid, do it slowly enough that you start with almost a paste, and maintain that stretchy, thick consistency throughout your mixing. Add milk slowly, a little at a time, incorporate, allow it to get back up to heat and repeat until all the liquid is added – In other words, do not mix butter and flour and then just dump in milk – Doing that defetas the purpose of the roux completely, for my mind… The other consideration is the shade of your roux. The beauty of roux to me is the simplicity. When roux is cooking alone, it’s that sweet, bready, rich theme we want to exploit. Personally, I like my roux for stuff like this to be nut brown, the color of done shortbread, before I start adding milk. You do what smells, looks, tastes and feels best to you! Hopefully, this series of pics will illustrate my ramblings adequately…
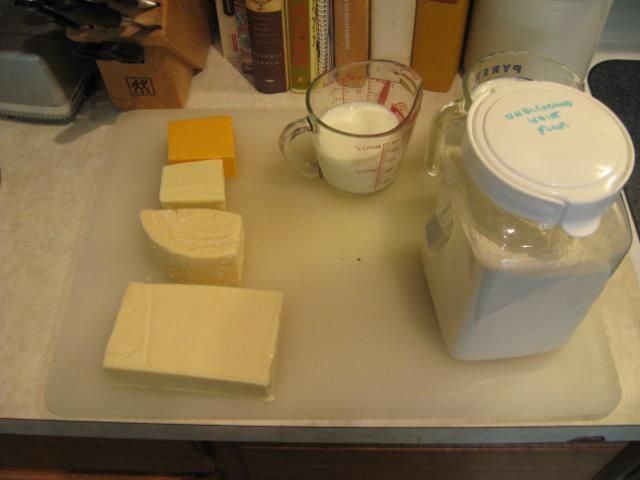
The Cheese
2 to 3 cups of your choice, shredded.
Here’s where that statement above about my stuff never being quite the same twice comes to fruition. Put simply, I open the fridge and use what’s there and floats my boat at the moment. If you buy and eat good cheese, you quite simply cannot fail in this regard. And frankly, why do the same old thing all the time? variety is the spice of life, so mix it up! If you come upon a really spectacular blend, (And you will), write it down, take pics and do it again, by all means, but first, ya gotta discover!
Tonight, I found a bunch of candidates and decided upon a four cheese blend. I went with Swiss and Jack as dominant notes, (About a cup each), and extra sharp yellow cheddar with 2 year old WSU white Cheddar as minors, and there’s your cheese chord!
Add cheese about a half cup at a time and allow to incorporate and heat thoroughly before ya throw in more.
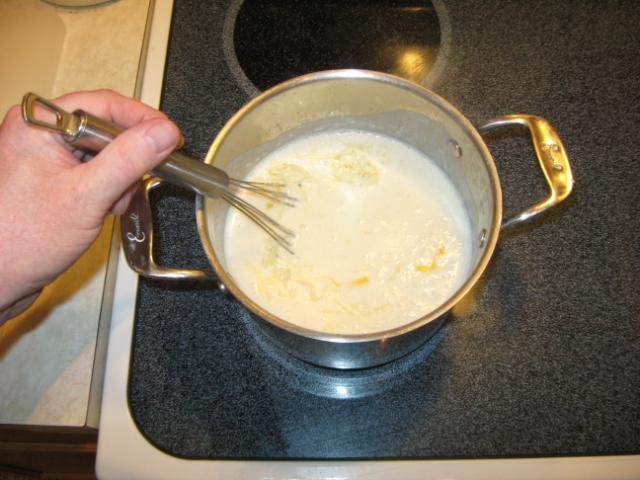
Once that’s all in, it’s seasoning time. Here again, other than salt and pepper, there are no hard and fast rules. Do what smells, looks, feels and tastes right! Tonight, salt, pepper, garlic, onion powder, smoked paprika and a shake of dried Tabasco chile was the stuff. Blend well and then take your sauce off the heat, and start into pasta.
Pasta
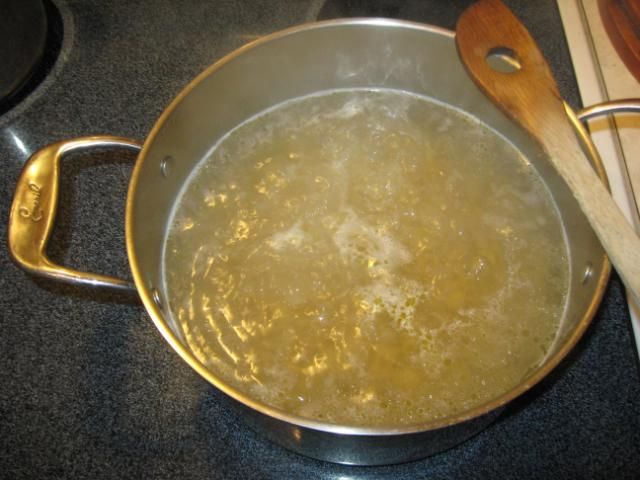
Use roughly 12 ounces of what you like
Yep, that’s it. We don’t use long and skinny stuff, for obvious reasons, but you could if you like it! We like shells a lot because they act like little boats for the sauce, but macaroni, fusilli, rotini, bowtie, radiatori, ruote, whatever floats your boat, throw it in!
Make sure your water is well salted, (As in about like seawater) and lightly oiled. Boil pasta to firm al dente, then drain and toss to remove al excess water.
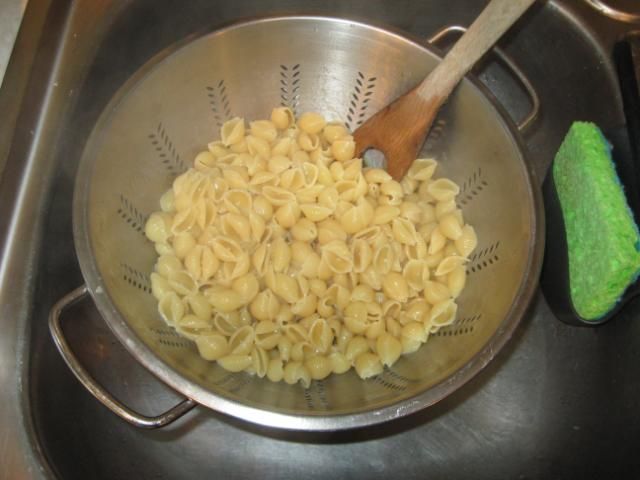
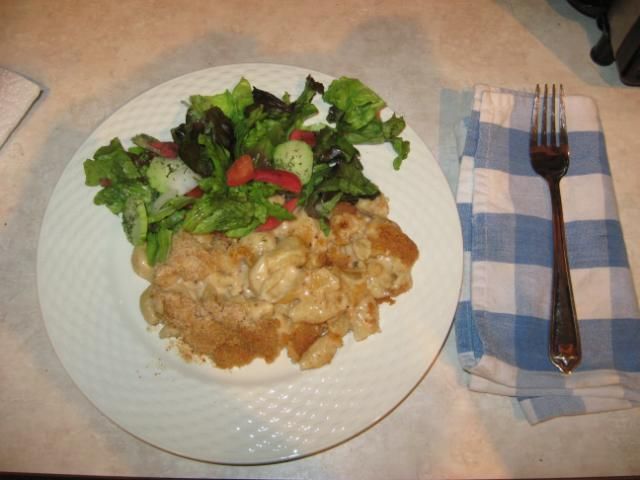
Throw your pasta into a lightly oiled baking dish, add the sauce and mix well. Don’t put so much pasta in there that things will be dry. Mac and cheese needs to be luxurious, decadent, rich and creamy, not dry and pasty! I top with something, again, whatever floats my boat, but I always top. The nice, crunchy crust is a great addition and it helps seal in the casserole too. I’ve used everything from panko bread crumbs to crushed jalapeno potato chips and everything in between; again, it’s about what you have and that feels good!

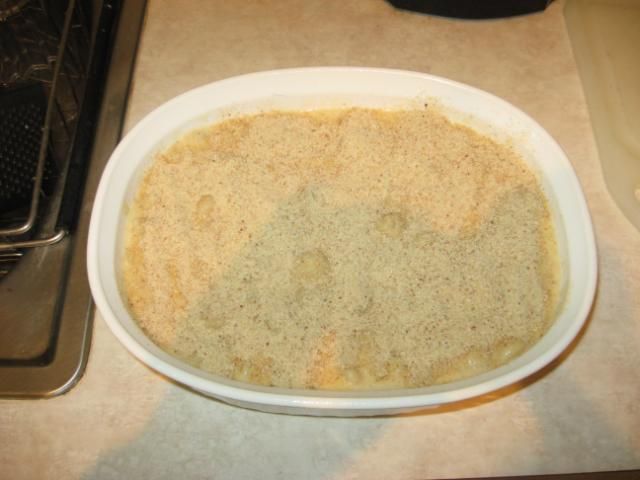
To bake or not to bake; there ain’t any question…
Bake, plain and simple. 350 F for 30 minutes, preheat your oven first, of course. Baking infuses and blends flavors, textures and smells. Do it – Eating something like this without doing so is like taking the middle out of an Oreo, throwing it away and just munching the wafer – Good, but not right…
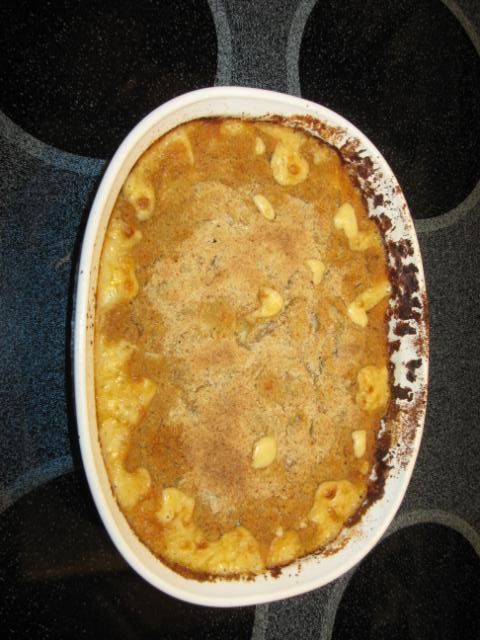
See? doesn’t that look incredible?!
Yes. Yes it does…
Pair It
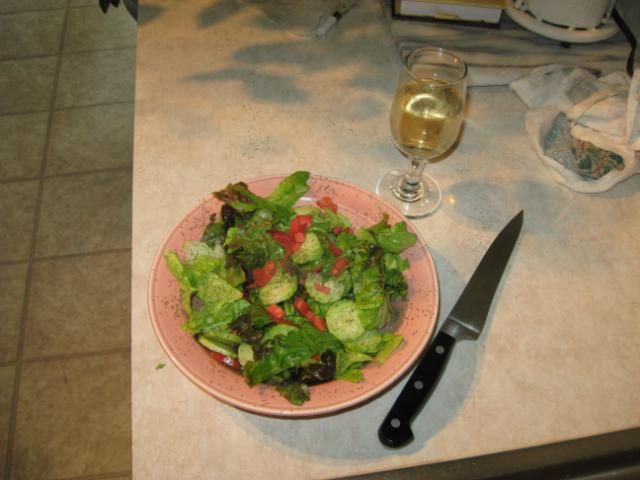
Now, I am the first to say that stuff this good don’t need nuthin’ to help it, but that would be wrong. Pair your mac with a nice, light salad. That will provide a counterpoint to the incredible richness, help clear your palate, let you eat and appreciate everything more, and that’s good! Monica did a beautiful job with fresh greens, onion, pickled radish, homegrown tomatoes and cucumbers, dusted with dill, and tossed with a light balsamic vinaigrette – Perfect counterpoint!
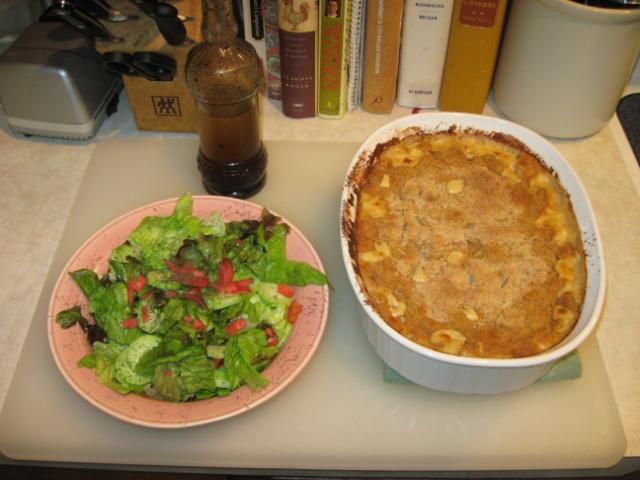
And there you have it – The cat’s outta the bag – Bon appetit!
OK, have had a ton of requests for more detail on comfort food faves and mac and cheese as I do it in particular, so here ya go!
If and when we do a restaurant, mac & cheese will be a mainstay, and I’ll guarantee in advance that, while it likely will never be the same twice, it’ll always make you come back for more. Here’s my secret, honed over decades of serious research…
The Roux
3 Tablespoons unsalted Butter.
3 Tablespoons Flour.
3 cups Milk.
Roux is the key to sauce, as far as I am concerned. I have an idiosyncrasy about roux making that was explained to me many moons ago by a rather famous French Chef, and it was sooo durn good, I’ve done it this way ever since. The bottom line is this; never break the roux. What I mean is this: You’re adding fat and starch, (Well, gluten), to liquid to make the resultant sauce thicker. Therefore, you want the chemistry that adds those qualities maintained. The how-to is simple: As you mix flour with butter, and then add liquid, do it slowly enough that you start with almost a paste, and maintain that stretchy, thick consistency throughout your mixing. Add milk slowly, a little at a time, incorporate, allow it to get back up to heat and repeat until all the liquid is added – In other words, do not mix butter and flour and then just dump in milk – Doing that defetas the purpose of the roux completely, for my mind… The other consideration is the shade of your roux. The beauty of roux to me is the simplicity. When roux is cooking alone, it’s that sweet, bready, rich theme we want to exploit. Personally, I like my roux for stuff like this to be nut brown, the color of done shortbread, before I start adding milk. You do what smells, looks, tastes and feels best to you! Hopefully, this series of pics will illustrate my ramblings adequately…


The Cheese
2 to 3 cups of your choice, shredded.
Here’s where that statement above about my stuff never being quite the same twice comes to fruition. Put simply, I open the fridge and use what’s there and floats my boat at the moment. If you buy and eat good cheese, you quite simply cannot fail in this regard. And frankly, why do the same old thing all the time? variety is the spice of life, so mix it up! If you come upon a really spectacular blend, (And you will), write it down, take pics and do it again, by all means, but first, ya gotta discover!
Tonight, I found a bunch of candidates and decided upon a four cheese blend. I went with Swiss and Jack as dominant notes, (About a cup each), and extra sharp yellow cheddar with 2 year old WSU white Cheddar as minors, and there’s your cheese chord!
Add cheese about a half cup at a time and allow to incorporate and heat thoroughly before ya throw in more.


Once that’s all in, it’s seasoning time. Here again, other than salt and pepper, there are no hard and fast rules. Do what smells, looks, feels and tastes right! Tonight, salt, pepper, garlic, onion powder, smoked paprika and a shake of dried Tabasco chile was the stuff. Blend well and then take your sauce off the heat, and start into pasta.


Pasta
Use roughly 12 ounces of what you like
Yep, that’s it. We don’t use long and skinny stuff, for obvious reasons, but you could if you like it! We like shells a lot because they act like little boats for the sauce, but macaroni, fusilli, rotini, bowtie, radiatori, ruote, whatever floats your boat, throw it in!
Make sure your water is well salted, (As in about like seawater) and lightly oiled. Boil pasta to firm al dente, then drain and toss to remove al excess water.


Throw your pasta into a lightly oiled baking dish, add the sauce and mix well. Don’t put so much pasta in there that things will be dry. Mac and cheese needs to be luxurious, decadent, rich and creamy, not dry and pasty! I top with something, again, whatever floats my boat, but I always top. The nice, crunchy crust is a great addition and it helps seal in the casserole too. I’ve used everything from panko bread crumbs to crushed jalapeno potato chips and everything in between; again, it’s about what you have and that feels good!


To bake or not to bake; there ain’t any question…
Bake, plain and simple. 350 F for 30 minutes, preheat your oven first, of course. Baking infuses and blends flavors, textures and smells. Do it – Eating something like this without doing so is like taking the middle out of an Oreo, throwing it away and just munching the wafer – Good, but not right…

See? doesn’t that look incredible?!
Yes. Yes it does…
Pair It
Now, I am the first to say that stuff this good don’t need nuthin’ to help it, but that would be wrong. Pair your mac with a nice, light salad. That will provide a counterpoint to the incredible richness, help clear your palate, let you eat and appreciate everything more, and that’s good! Monica did a beautiful job with fresh greens, onion, pickled radish, homegrown tomatoes and cucumbers, dusted with dill, and tossed with a light balsamic vinaigrette – Perfect counterpoint!


And there you have it – The cat’s outta the bag – Bon appetit!
Green Chile & Pork Enchiladas
There’s not much more seminal Tex-Mex than a nice enchilada. My fave combo for this is pork and green chile, hands down – There’s something about it that’s juuuuust right.
Chile sauce is something we make and can for later on; you need to pressure can to do that, but it is well worth it and another great way to take advantage of the annual Hatch chile release! This sauce goes great with enchiladas, tacos, burritos, chimichangas, huevos, and on and on…
Classic Green Chile Sauce
5 – 7 Hatch green chiles, roasted, field stripped, skinned and rough chopped.
1 cup diced sweet onion.
1-2 cloves garlic, peeled and minced.
1-2 sprigs cilantro or ½ teaspoon coriander.
2 cups chicken stock.
1 teaspoon flour.
1 teaspoon butter.
Salt and pepper to taste.
2-3 tablespoons vegetable oil.
Heat oil to medium high in a deep sauté pan. Sauté onion until it start to become translucent. Add garlic and briefly sauté. Add chiles, cilantro, and stock and simmer for about half an hour. Remove pan from heat. Pour mixture into blender and blend until you hit the consistency you like. Heat flour and butter in sauté pan. When roux is well blended and heated through, pour blended mixture back in and allow to blend and thicken. Remove from heat and allow to sit covered.

For the enchilada filling, I cut the pork thin and then diced it. That went in to a deep sauté pan, was lightly browned, and then doused with enchilada sauce and allowed to simmer for about ½ hour on low heat. I diced up more onion, black olives, some of our tomatoes, and shredded some jack cheese. I used lovely flour tortillas from a local tortillaria, since I was too lazy to make my own today… I also did up some plain red beans and rice, with no seasoning other than a little salt.


Finally, I put everything in a production line, did some assembly and off we went.


I left plating to your imagination, because I was way hungry. I assure you that none of those poor things survived the night! (FYI, we like to bed these on shredded lettuce tossed with a little more cilantro, salt and pepper.)
