Canada Day? 4th of July? Here’s your Meal.


Canada Day Dinner, Eh, or fare for the fourth? Either way, here’s one from the archives for ya. Enjoy, and just say NO to fireworks!

Living as close to the border as we do, (you can pretty much throw rocks at it from here), Canada Day is a bit of a big deal. Held each July 1st, what once was known as Dominion Day harkens back to 1867. In that year, the British North America Act came into play, uniting the independent colonies of Canada, Nova Scotia, and New Brunswick into one big, happy Canada. Fifteen years later, the Canada Act made It Canada Day, and the rest is glorious history. Our northern pals pretty much have a holiday three day weekend every month, (which is incredibly sensible, by the way), but this is a biggy – Coming when it does, it means food, and in particular, stuff appropriate for a picnic, barbecue, what have you. We gathered our one available kid, (the eldest, sans grandkids but with dawg), and decided to do up an appropriate meal – And as fate would have it, this wouldn’t suck on the 4th of July, either.

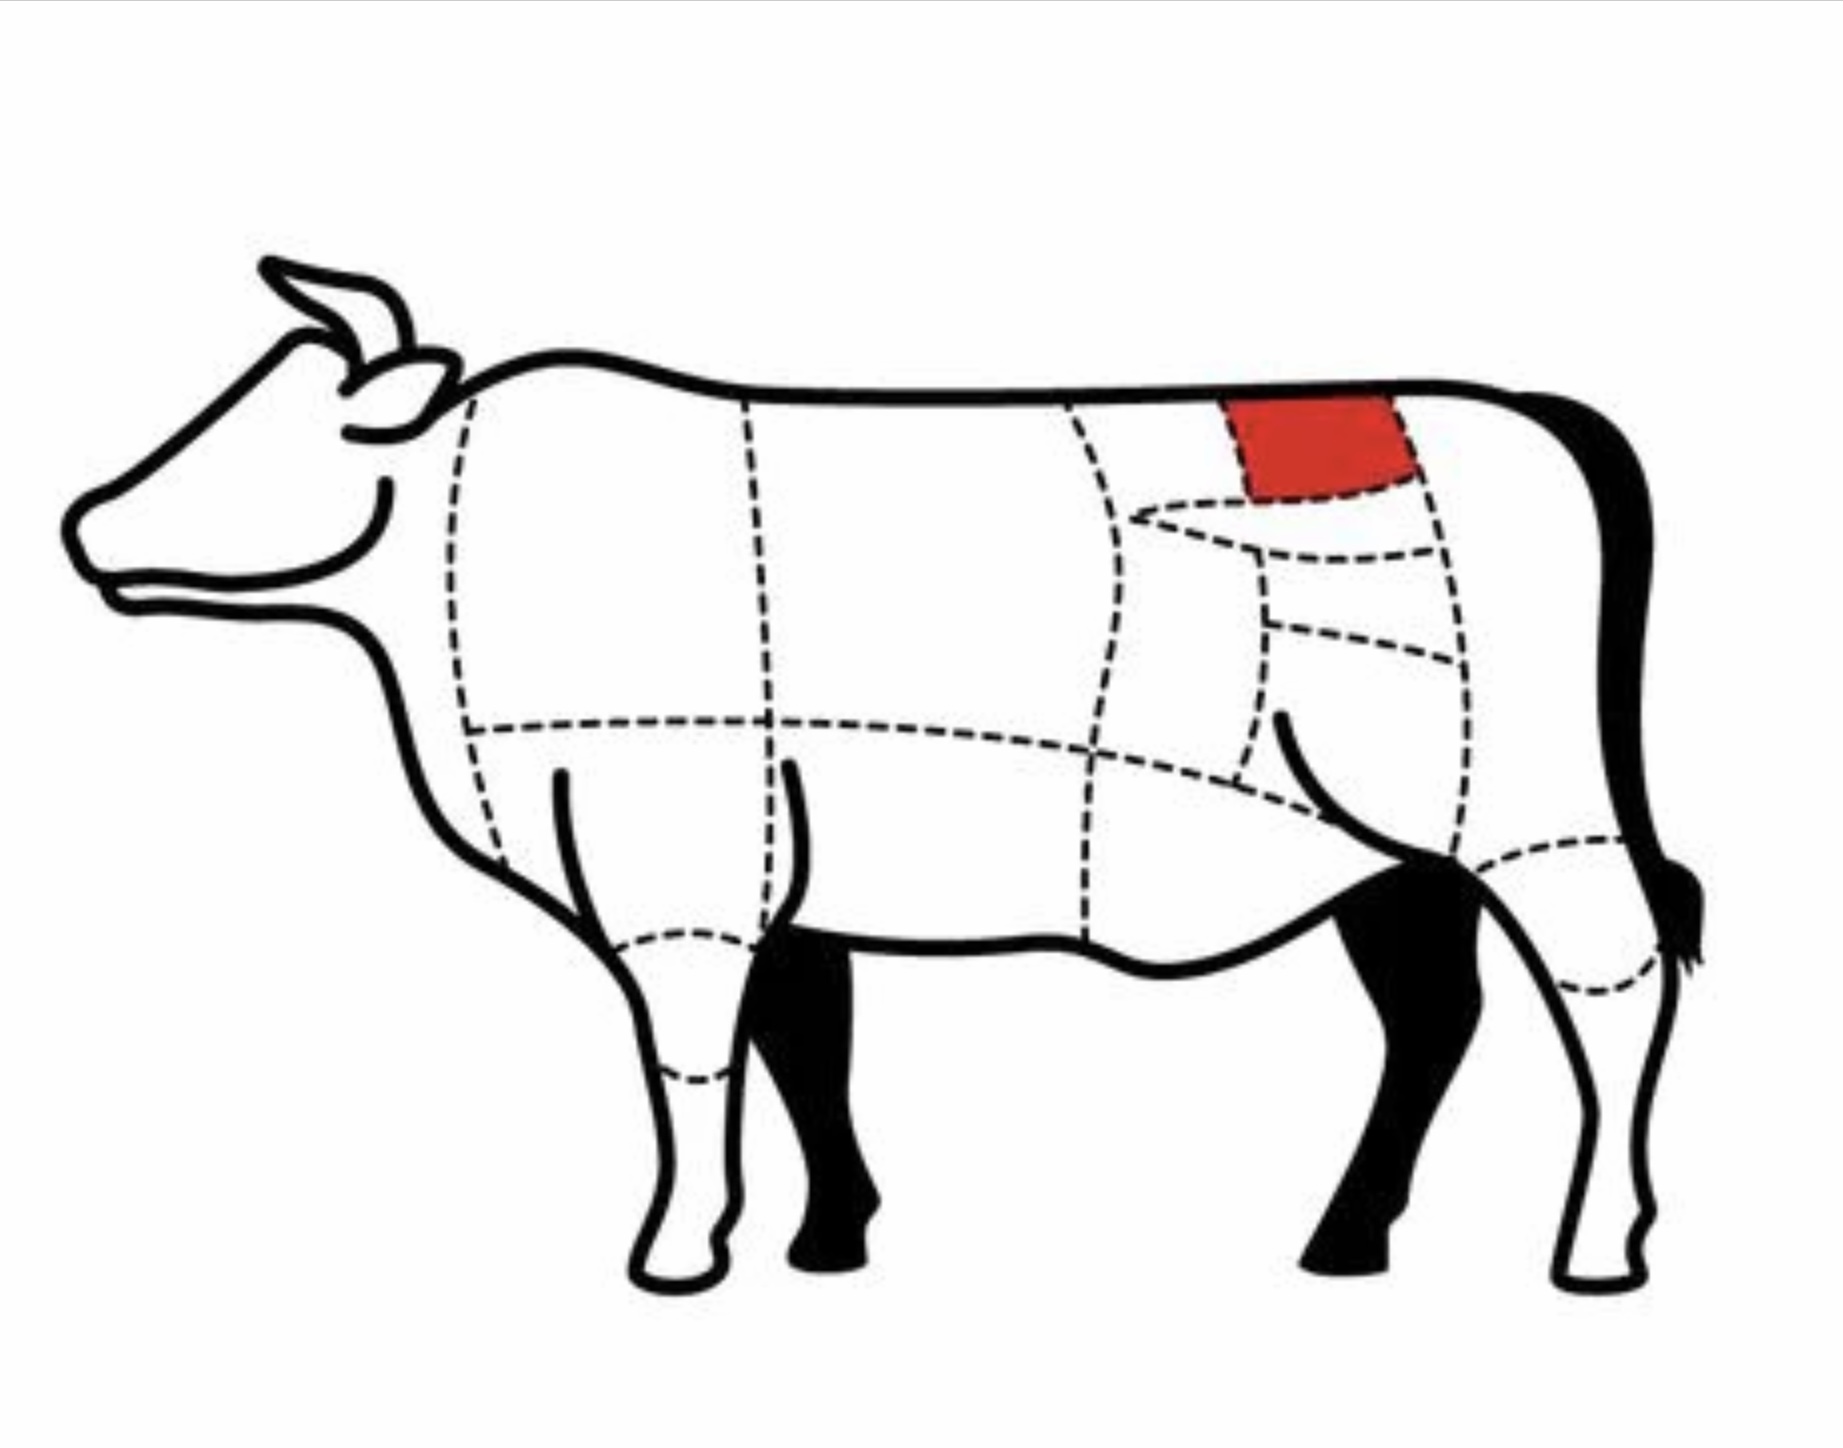
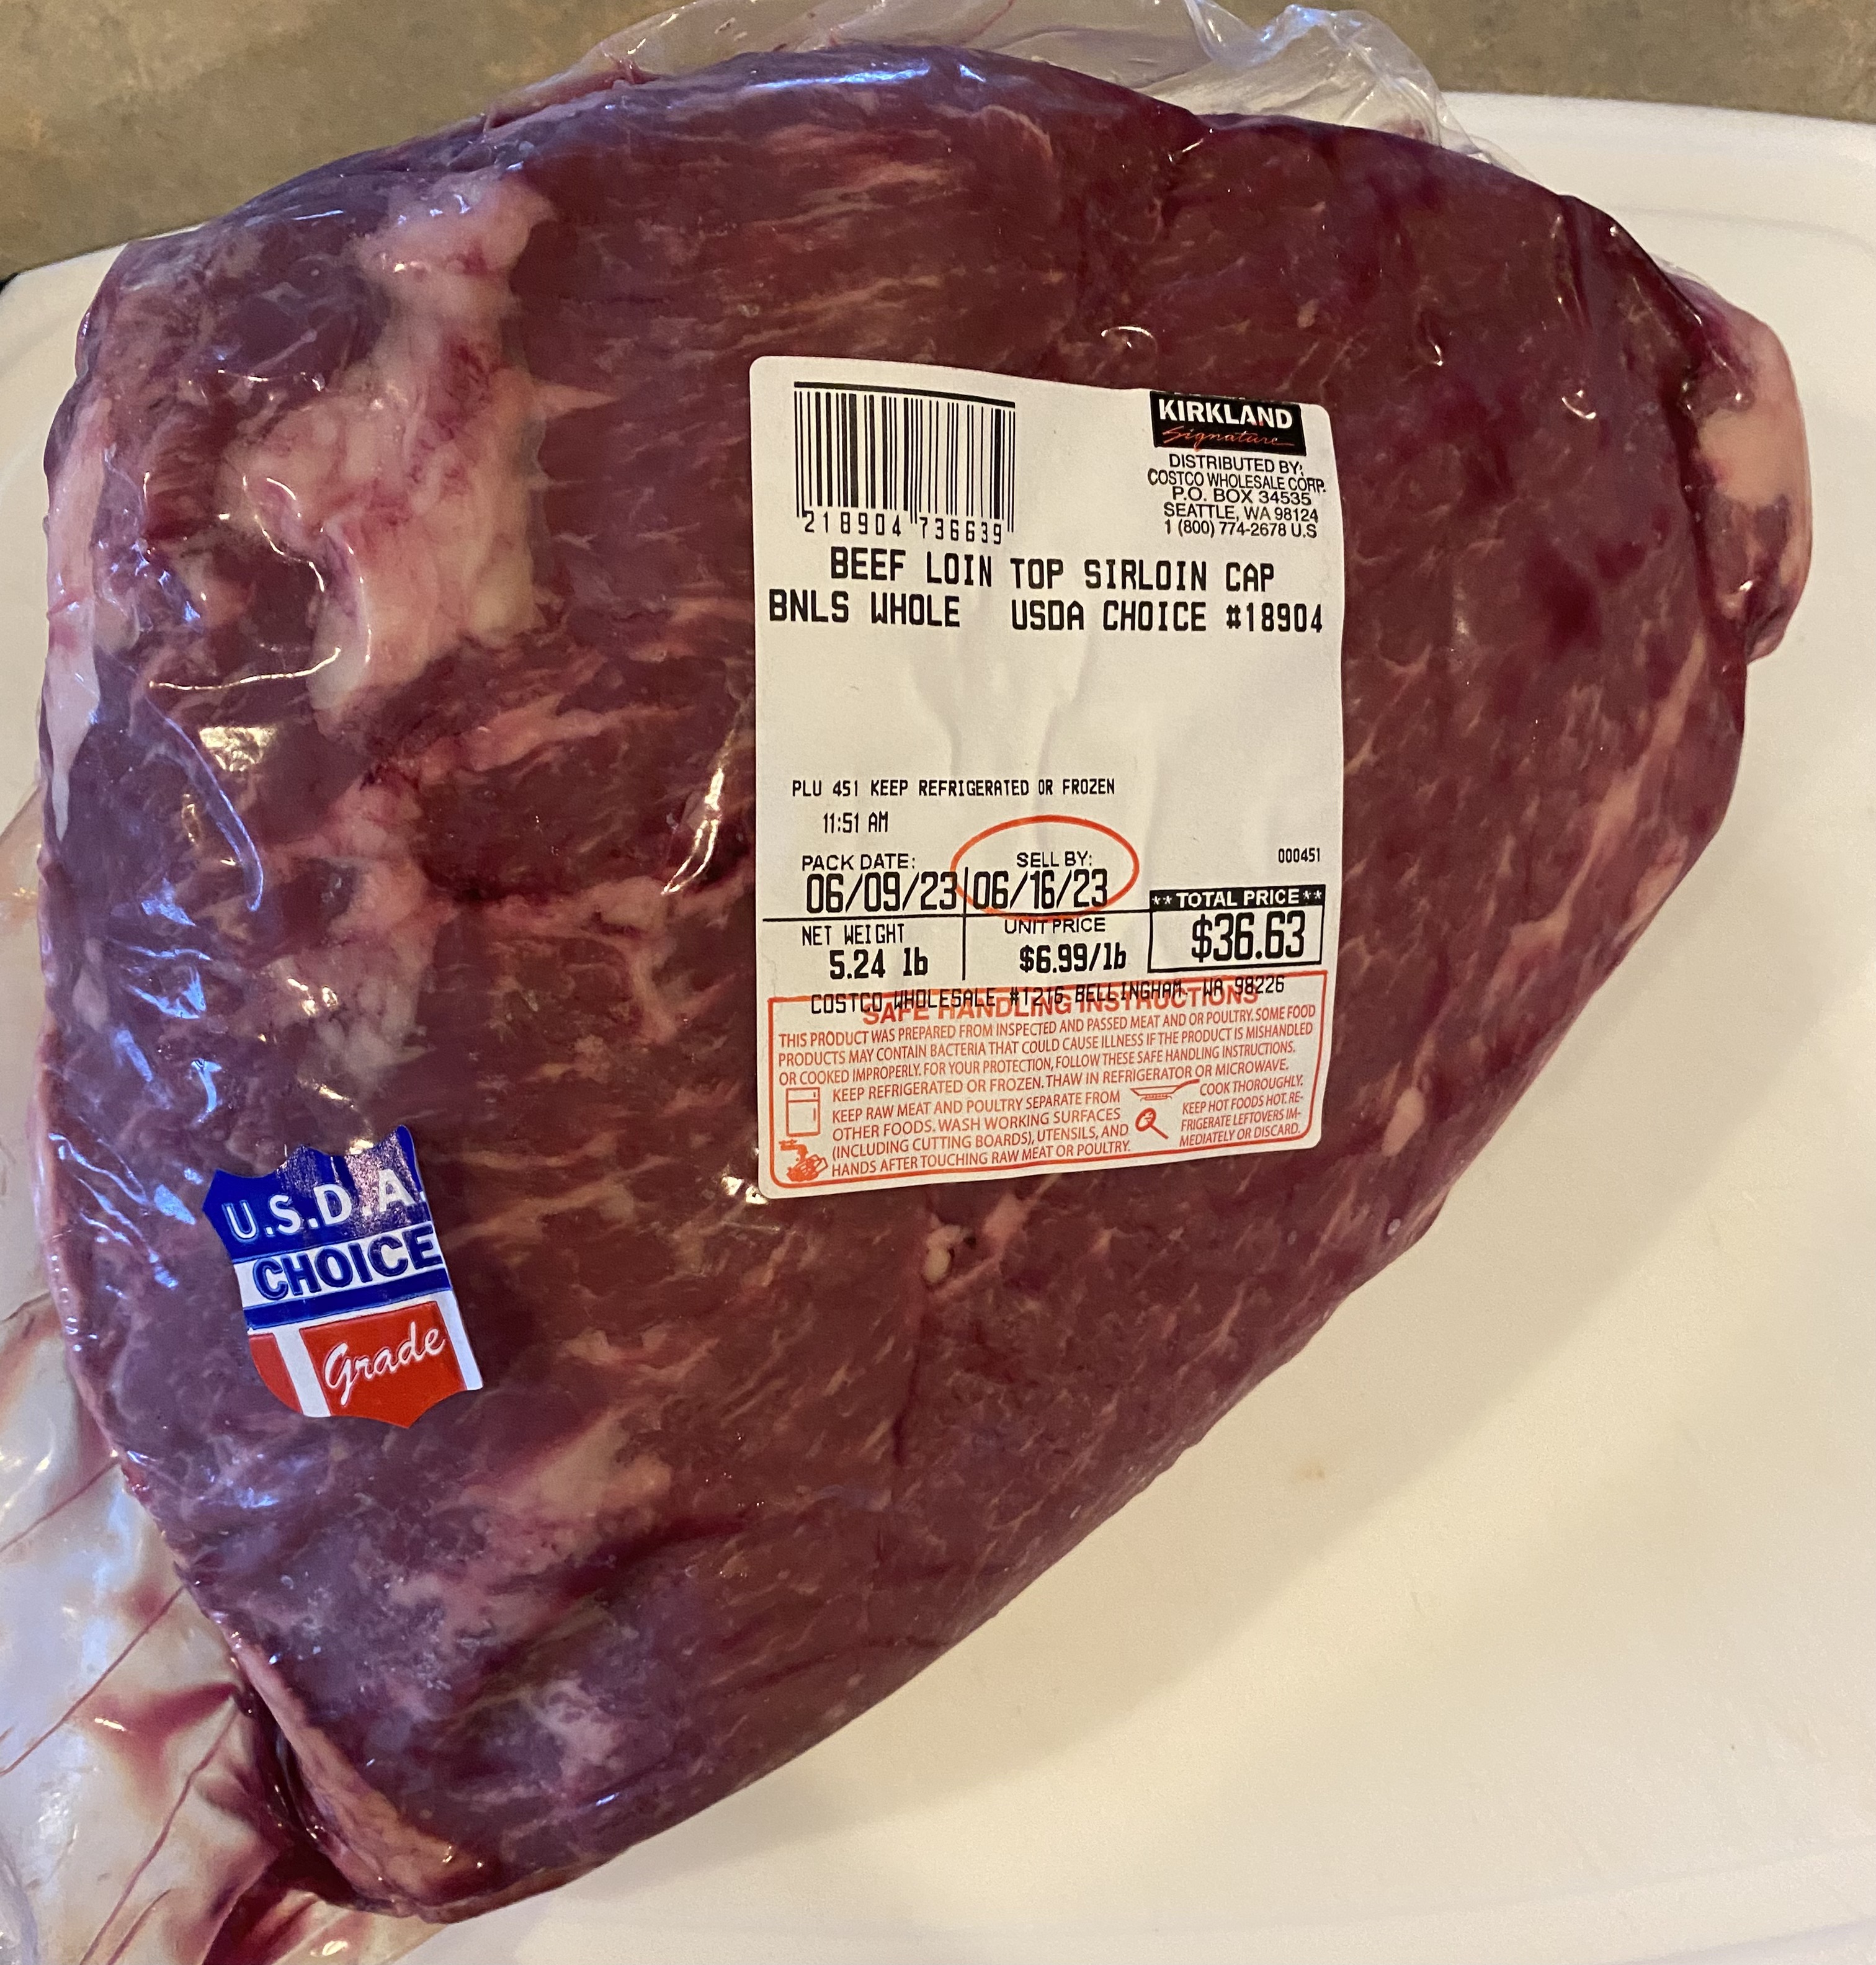
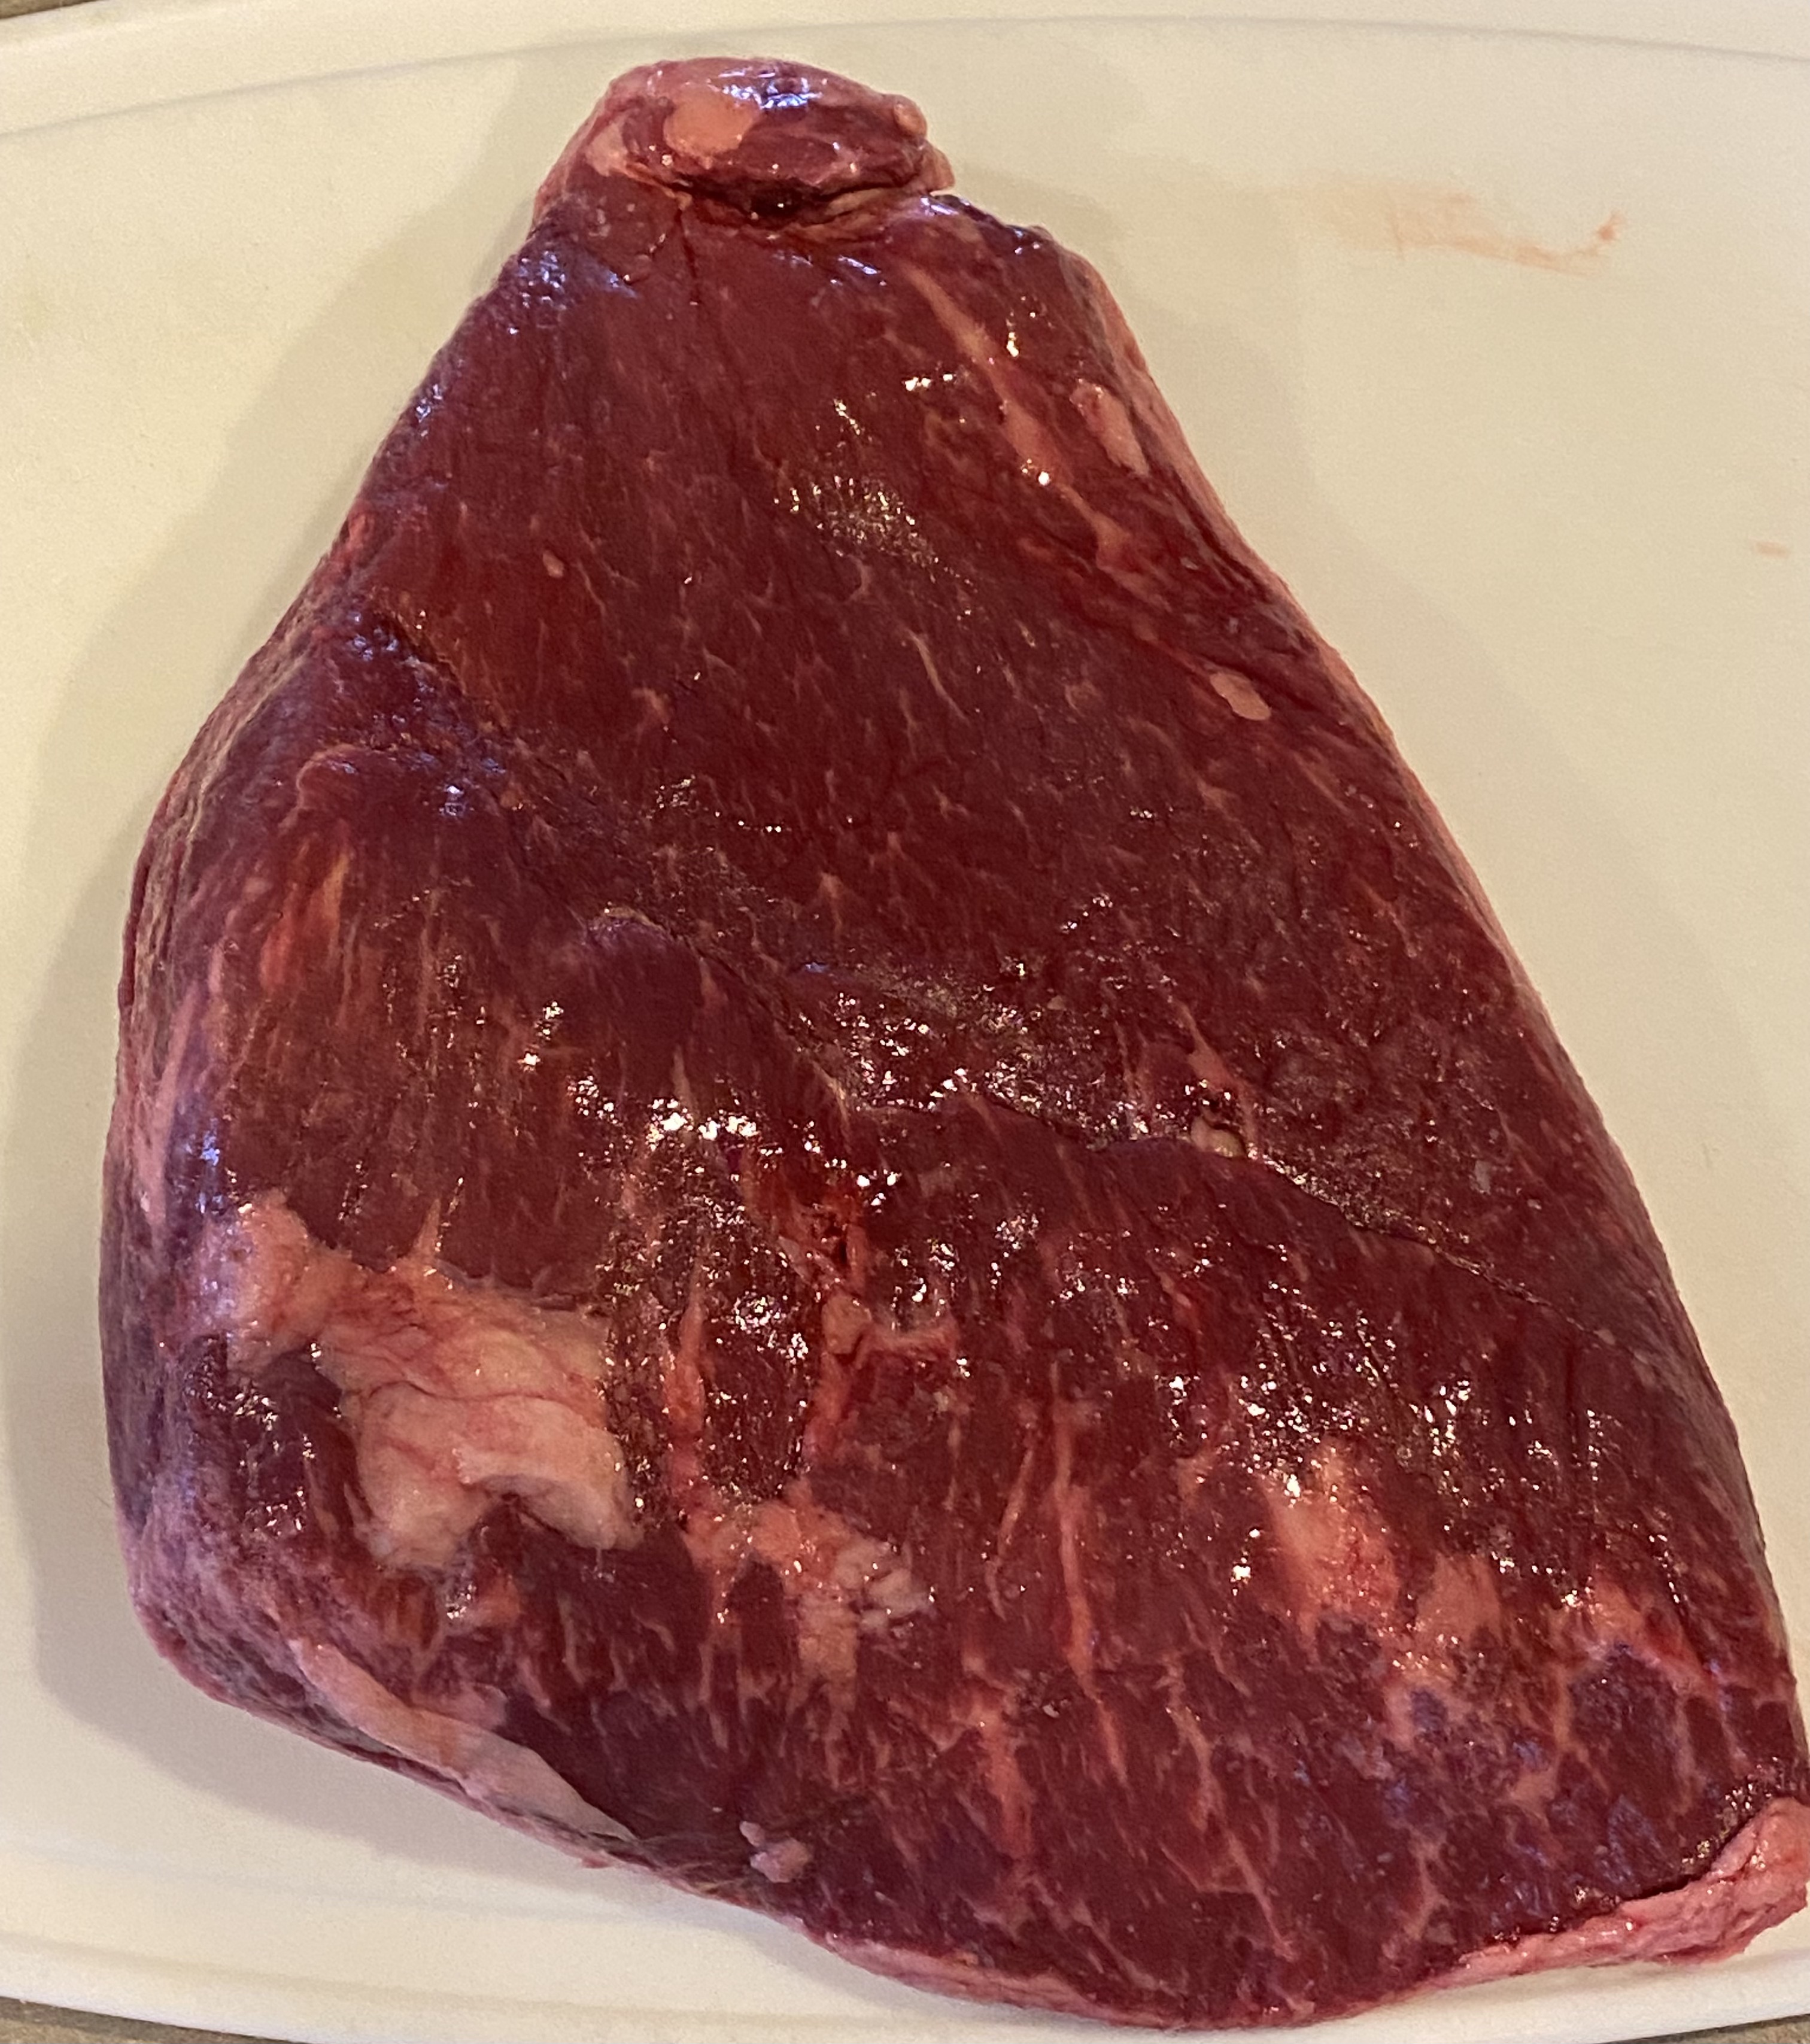
We settled on brisket, because we had a lovely, local grass fed hunk of beef just begging to be honored. Naturally, we just had to do some bbq beans and potato salad to go with it. Might seem heavy, but frankly, it wasn’t at all – It was ethereal – Perfect, in fact.

With the day kind of cloudy and cold, I decided I’d rather do the brisket in the oven, rather than on the grill and smoker. This raises the issue of authenticity – A beautiful hunk of beef like that deserves all glory, laud, and honor, so the prep and cooking absolutely cannot be half assed. Secondly, I decided on beans too late in the day to do traditional slow cooked, so those would have to go in the Instant Pot, and again, be as good as the real deal. M rounded things out with a stunningly good potato salad. While this may sound pretty pedestrian, I assure you, it’s not – Everything came out surprisingly good – Good enough that we had to write it down and share it. While we do the same kind of things a lot, we’re constantly tweaking methods and recipes. When the stars align and a meal is this good, it’s time to stop, think, and write down exactly what you used and what you did, because yeah – It’s so worth recreating again.

Let me say that again – Whenever you make something great, write it down, right then and there. Stop and write it down. I do this daily – Everything from a few scratches on a post it note, (sometimes fast enough that I later can’t read them), to more than a few thousand words. My food notes are vast, and many haven’t yet been revisited since they were recorded – Some have been researched, added to, recipes fleshed out, etc, (which sometimes leads to me saying, ‘Yeah I gotta recipe for that,’ after which I discover that answer to be sorta kinda true at best.) In any case, here is a shining truism – The worst thing we can do when cooking is to think, I’ll remember that, because chances are real good that you won’t. Sure, if it’s a thing you do the same way every time, or a basic, you don’t need to record that, (unless you want to share it, of course.) When I’m after a new idea, more oft than not, I’ll plow into my raw notes, see something that triggers a memory, (or at least piques my interest), and away we go. If it struck you as great food, write it down, don’t lose it – As for remembering what you wrote it down on, and where that is – you’re on your own.

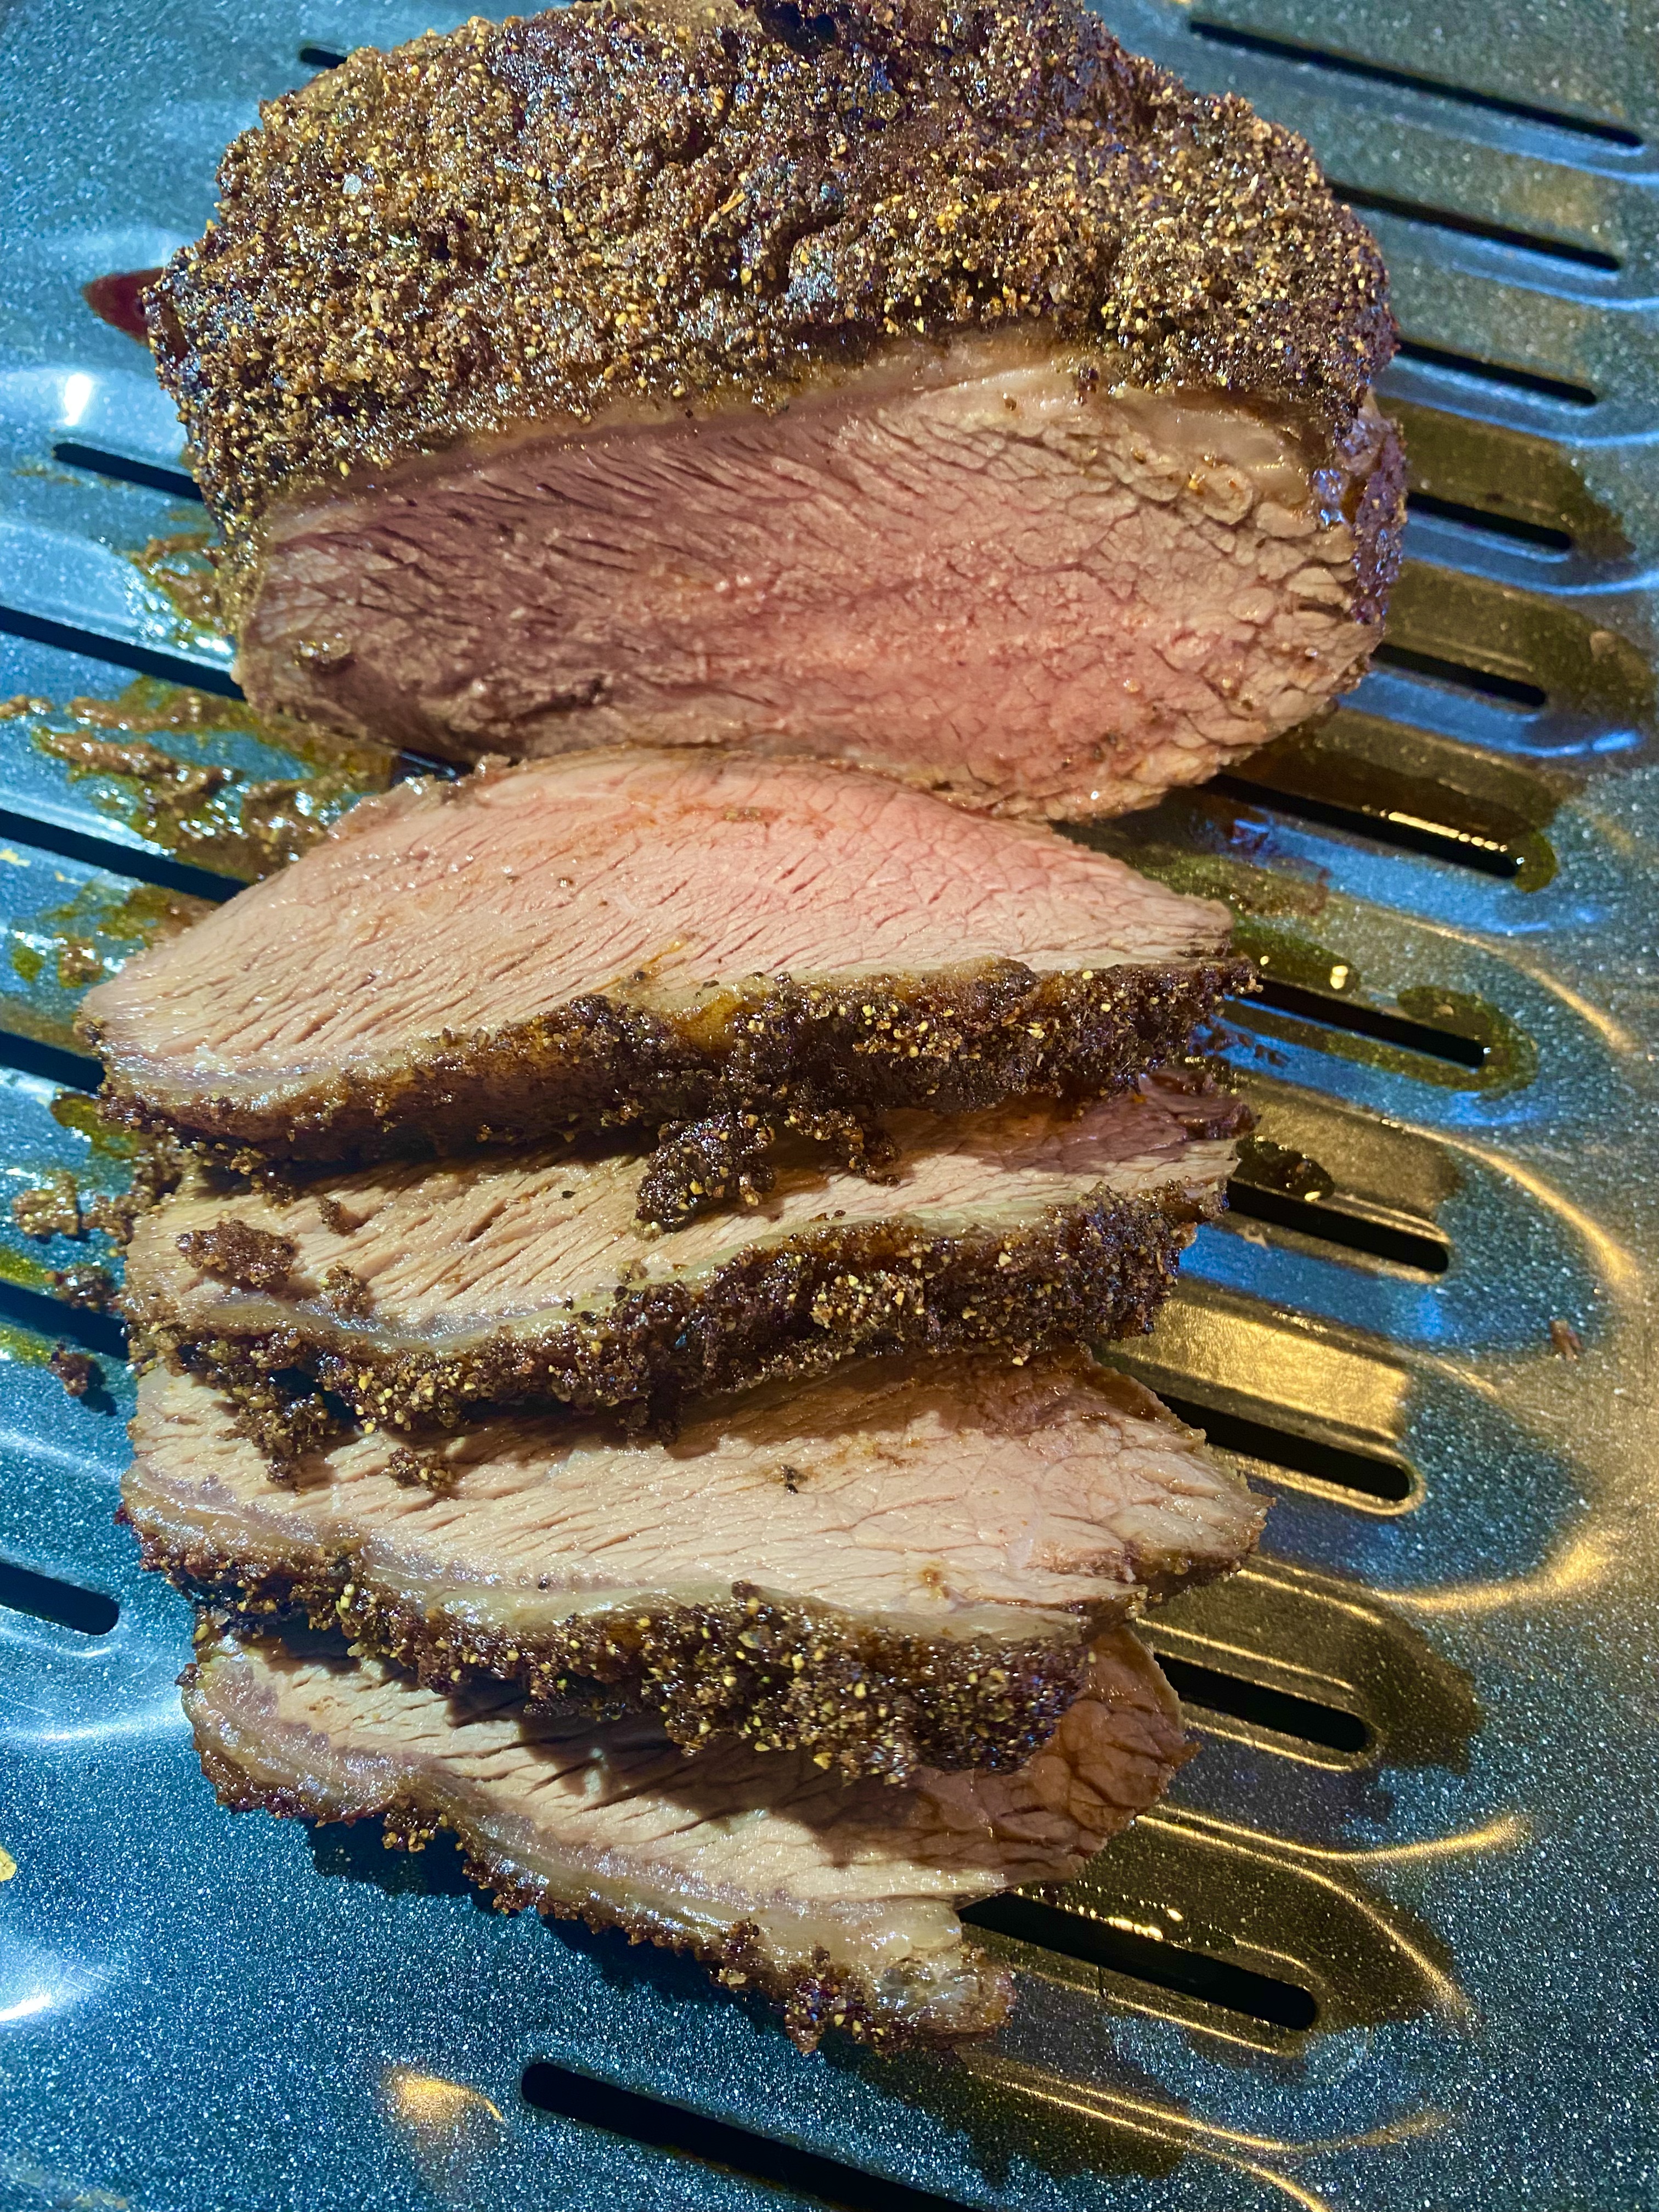
So the first challenge was that brisket. Having lived a dozen years in Texas, I know better than to screw with something so culinarily sacred – You are welcome to try alternatives to the Gold Standard, (even if it might earn you some sideways glances or a mumbled comment), but whatever you produce had damned well be real good, y’all hear? Now, far as I’m concerned, there are three non-negotiables for a finished brisket

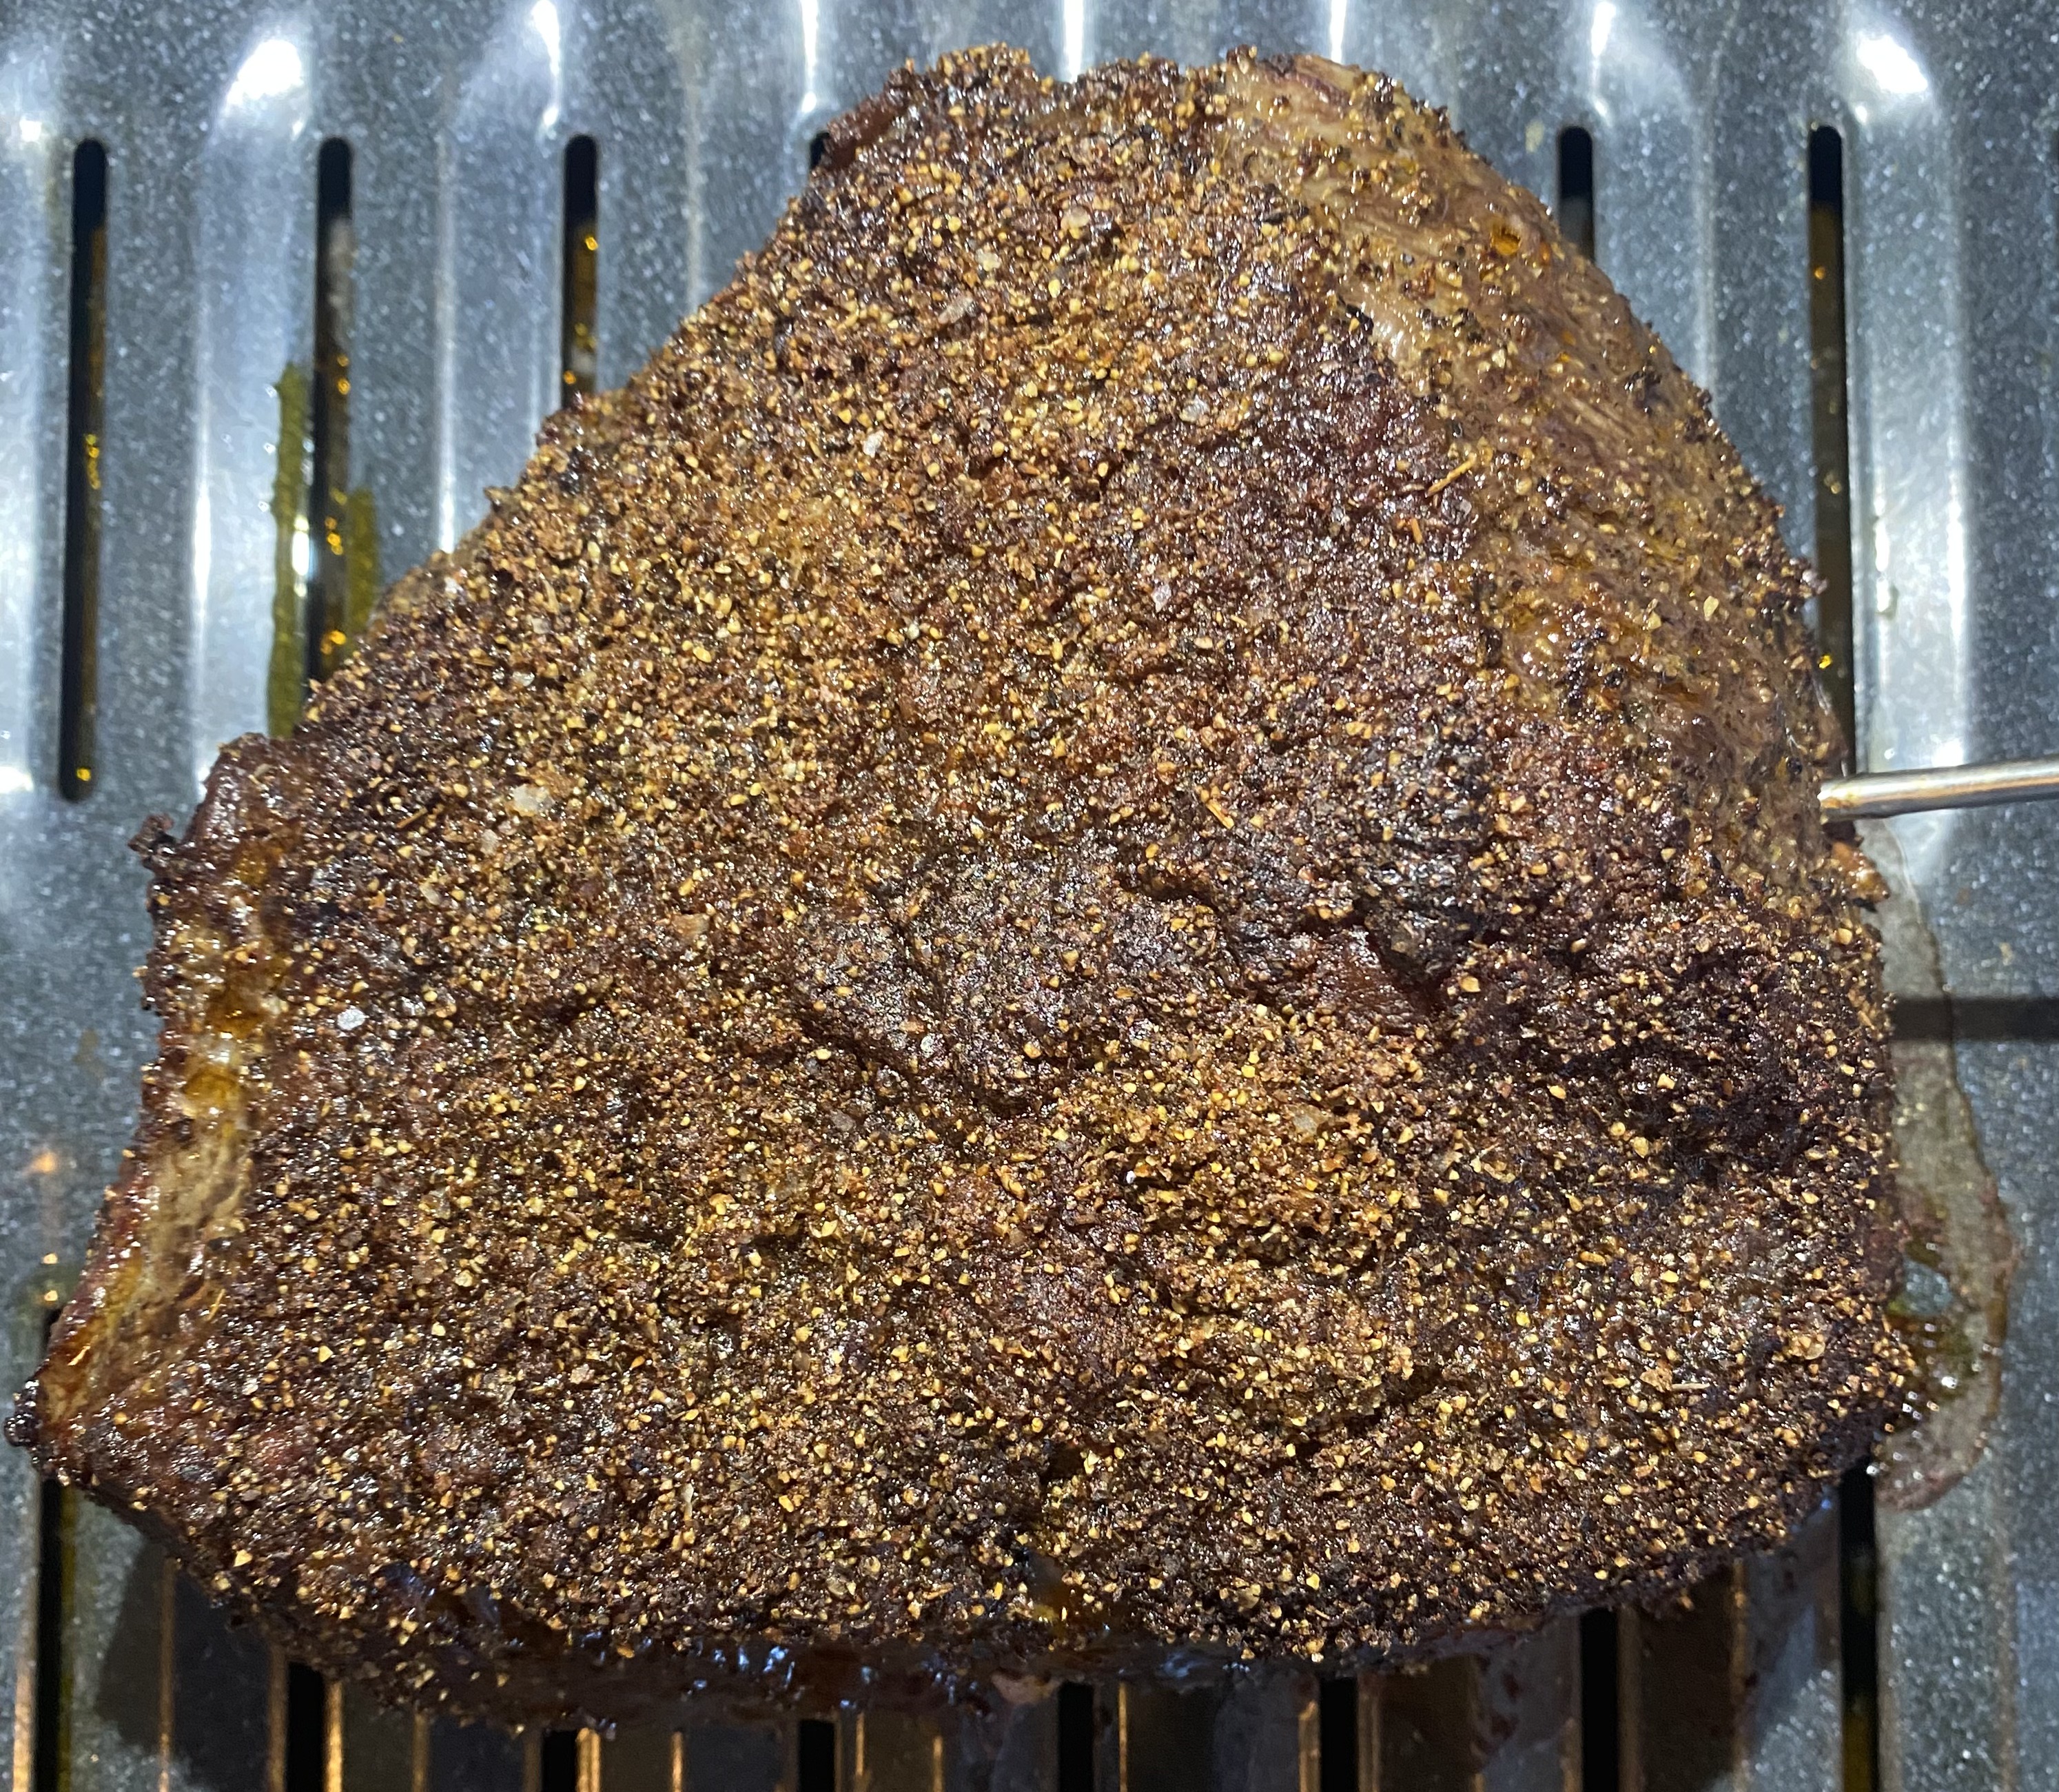
It must have a nice, crisp crust formed by a dry rub.

It must have notable smoke to the flavor profile.

It must end up fork tender and juicy as all get out.

This version was good enough that, when M noted that Joe didn’t have a knife, his response was, ‘You don’t need one.’

Obviously the quality of the beef is paramount. We had that covered, but I guess I’m getting wimpy in my old age, because I just really didn’t wanna cook out there on a gray, drizzly day, so I sussed out a viable alternative method. When I do brisket on a grill, it’s charcoal, for sure – Two zone set up. Once it’s mostly done, it goes to the smoker for the last hour or so. My solution was to incorporate smoke into the rub, in the form of smoke powder from Butcher and Packer. Through what they call a “highly refined process,” smoke is turned into powder form and mixed with dextrose so that it won’t clump too much. What you get is true to the wood smoke flavor that will fool damn near anyone into thinking you smoked whatever it is you apply it to – In the immortal words of Jackie Chan, ‘No bullshit.’ They make hickory and mesquite, and they’re sublime stuff, indeed. Next, we plugged in an uncovered dry/covered wet cooking process that approximates grilling to a very acceptable degree.

My big twist here is a North African Berbere spice mix to the rub, which was totally serendipitous – It added a delightful, exotic warmth and heat that really popped. I intended to do my typical brisket rub that calls for chili powder, only to find that I didn’t have any mixed up. As I was searching, I saw the berbere and thought, why the hell not? Here’s the deal with that stuff, (but you could absolutely just sub chile powder if you’re not feeling adventurous.)

Urban’s Indoor Brisket

3-4 Pound Beef Brisket

1 1/2 Cups Beef Stock

2 Tablespoons Berbere Spice Blend

2 Tablespoons Sea Salt

2 Tablespoons Mesquite Smoke Powder

1 Tablespoon Granulated Garlic

1 Tablespoon Granulated Onion

1 Tablespoon ground Tellicherry Pepper

1 Tablespoon Dark Brown Sugar

2 teaspoons Dry Mustard

1/2 teaspoon crushed Sage

Preheat oven to 350° F

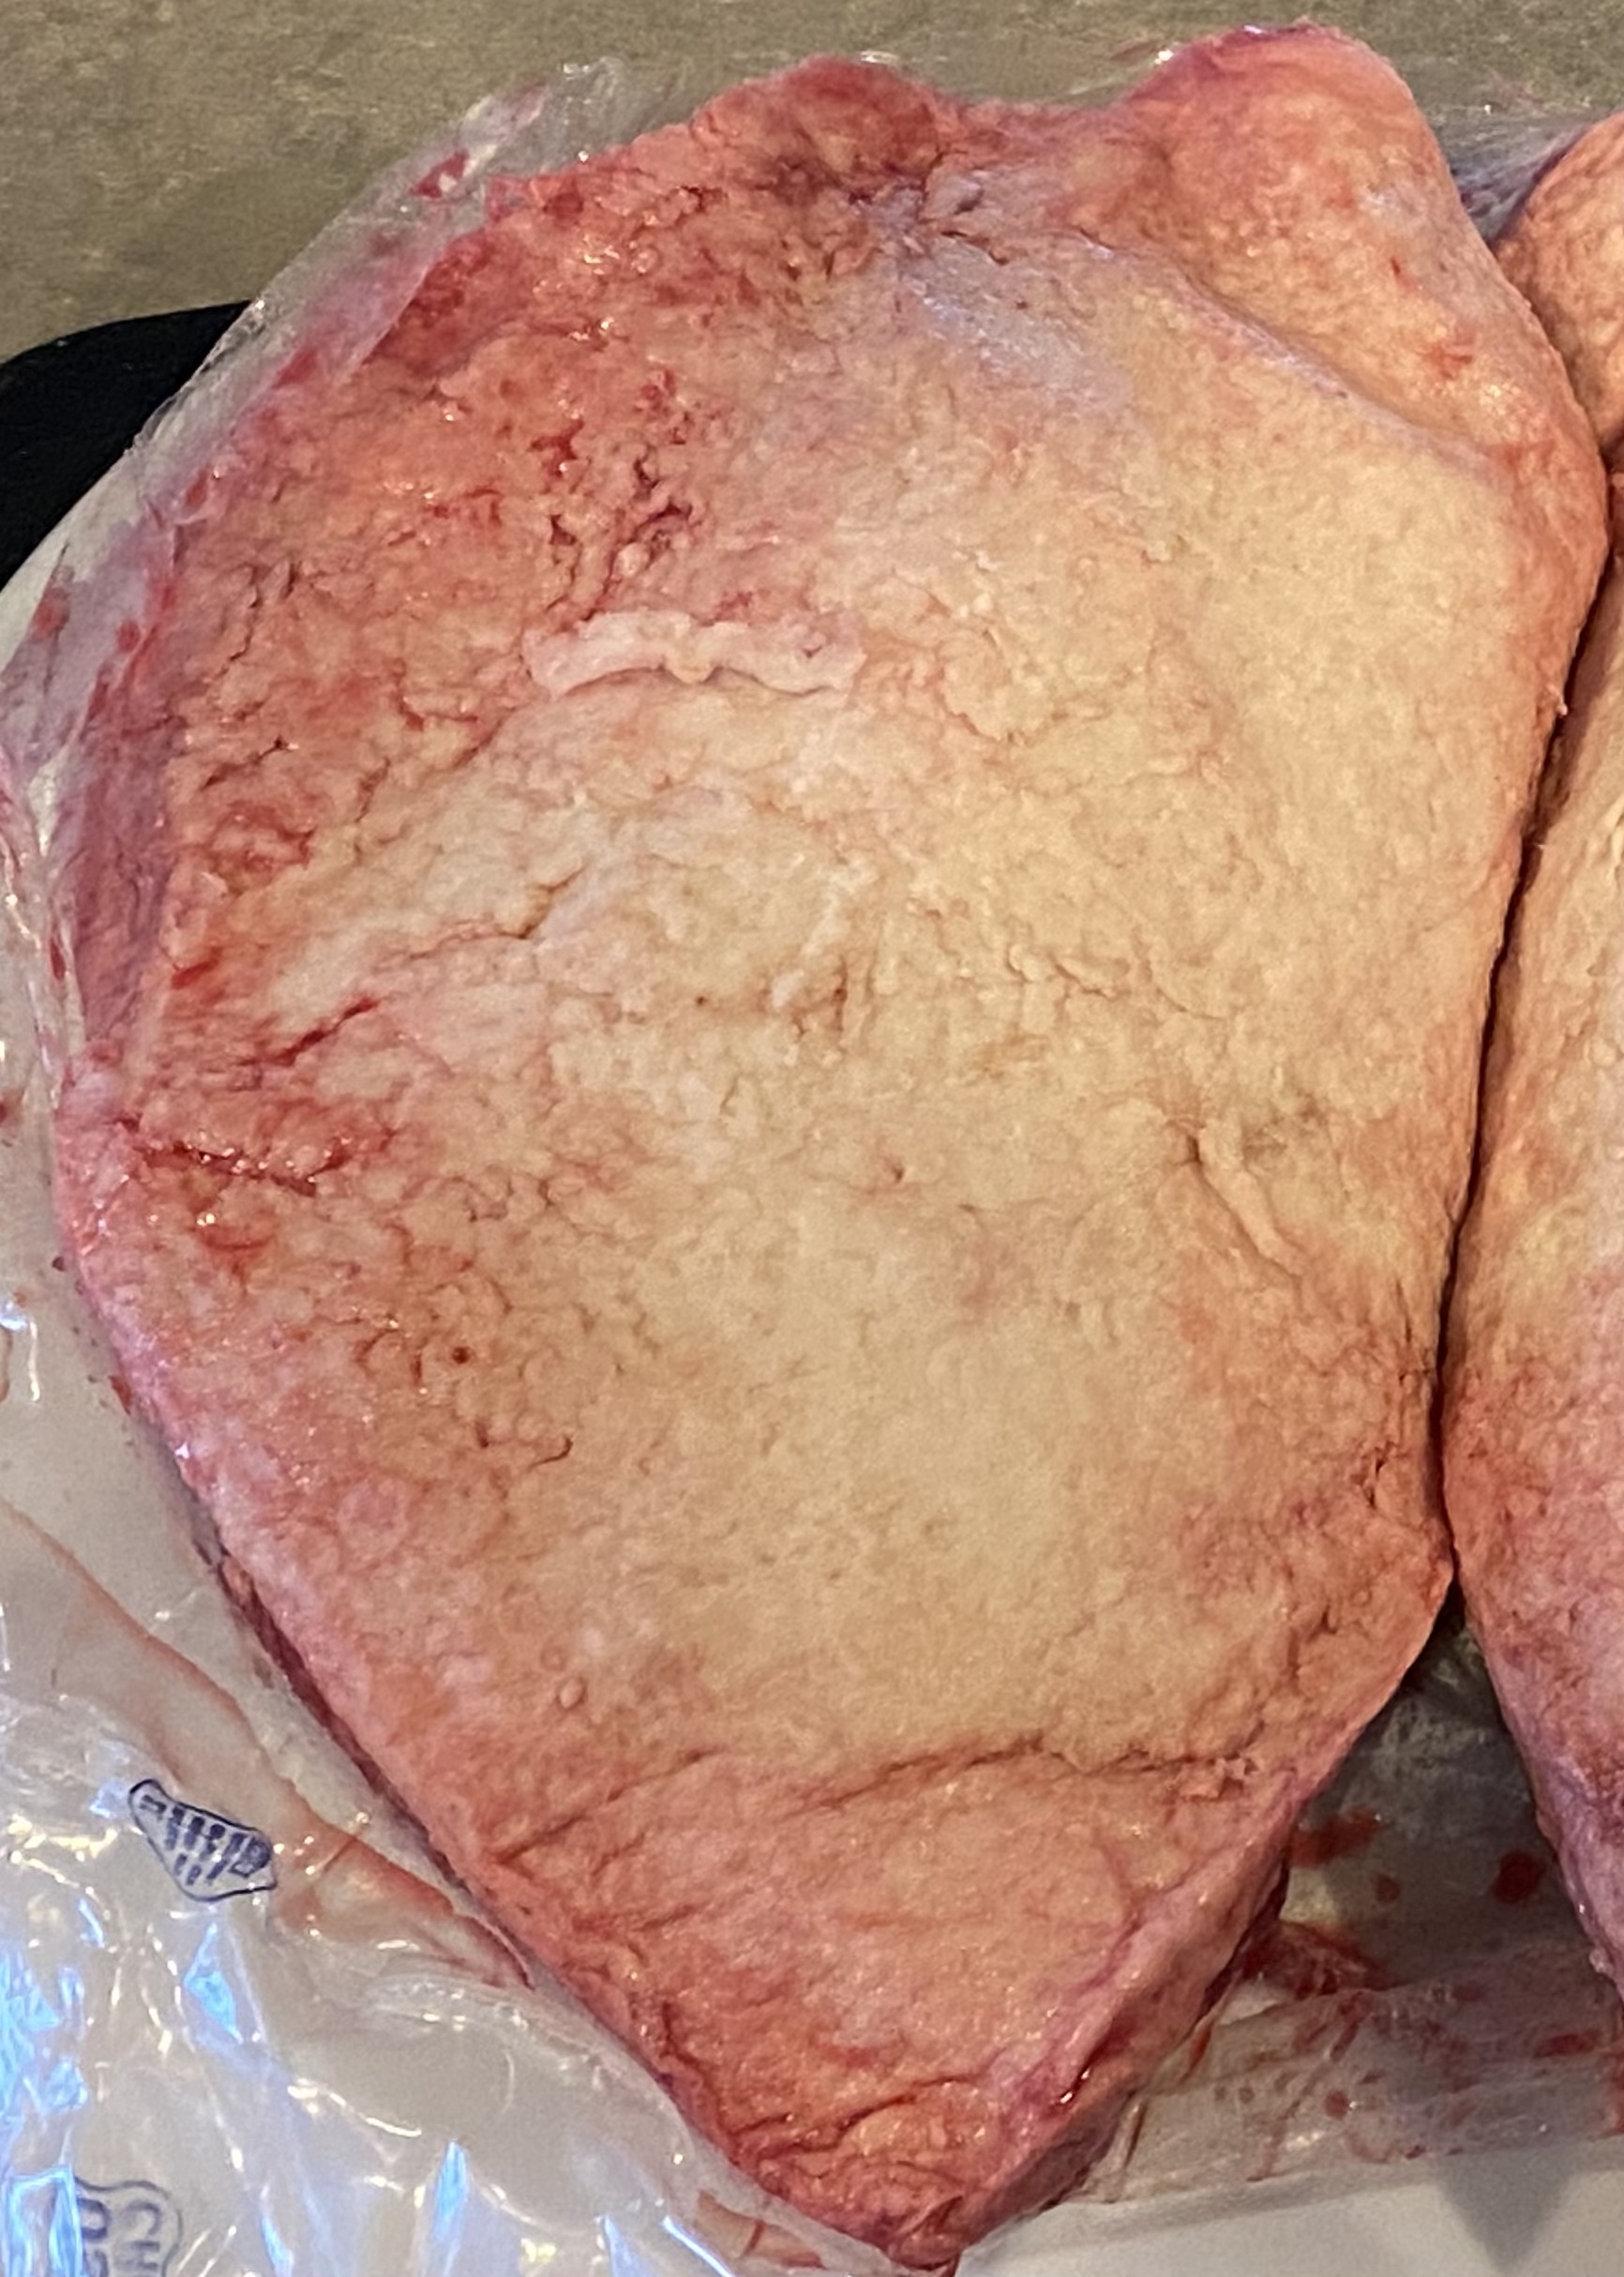
Unwrap and trim brisket, leaving a nice fat cap.

Combine all dry ingredients and hand blend thoroughly.

Rub a generous layer of the mix into all surfaces of the brisket – Do it by hand, take your time and really work the rub into the meat.

Place the brisket fat side up on a broiling pan.

Roast for 1 hour, uncovered.

Reduce the heat to 300° F, carefully add the beef stock to the bottom of the broiler pan, then tightly wrap and seal the entire pan with metal foil – Wrap it fairly tight to the meat – Don’t leave a whole bunch of air space around the brisket.

Roast for about another 3 hours, until the brisket is fork tender.

Remove from oven, keep the brisket covered and allow a 15 minute rest.

Carve roughly 1/4” slices across the grain and serve.

You can use pan juices as is, or transfer them to a sauté pan, add a little butter and a little more stock over medium heat, and use that as well.

Next came Beans, which I defaulted to the Instant Pot – I can assure you that they were amazing, and suffered not at all from that cooking method, (and I have witnesses). As you’ll see, it’s a three step cooking process with the IP, but it’s all done onboard, it’s super efficient, and the results are stunningly good.

Here again, quality matters a lot. You’ll recall that not long ago, I wrote a bit of a paean to Rancho Gordo beans – On the social media site for RG Club members, a newer convert recently commented as follows, ‘I love my beans so much, but… RG has ruined other beans for me. I can no longer grab a can of garbanzos or a bag of black beans, because they don’t even compare to the quality of RG beans.’ This is so true. I used a variety called Rio Zape, which RG owner Steve Sando describes as, ‘the classic heirloom bean that inspired the birth of Rancho Gordo. Suggestions of chocolate and coffee make this pinto-family rarity one of our favorite and most requested beans.’ It’s no joke – Those beans, coming out of the initial cook with nothing involved but a little salt, are amazing – Taste them, give them to others to taste, and everyone’s eyebrows go up and they start making little spontaneous yum yum noises – Get the picture? If you love beans, you must try Rancho Gordo – They’re that good.

Urban’s BBQ IP Beans

1 Pound Rancho Gordo Rio Zape Beans

1 small Sweet Onion

1-2 Serrano Chiles

6 slices Bacon

3/4 Cup Blackstrap Molasses

1/2 Cup Chicken Stock

1/2 Cup Ketchup

1/4 Cup Agave Nectar

1 Tablespoon Yellow Mustard

1 Tablespoon Apple Cider Vinegar

3-4 Shakes of Worcestershire Sauce

1 Tablespoon Avocado Oil for sautéing.

Add dry beans and 6 cups of water to the IP.

Set to Beans and 60 minutes and start the cook.

Allow the pressure to reduce by natural release.

Transfer beans to a colander and drain, (save the liquor for soups and stews – It freezes great)

Dice onion and chiles, cut bacon into roughly 1/4” strips across each piece, (the short way, so you end up with strips about 1/4” by 3/4” or thereabouts.

In a non-reactive mixing bowl, combine molasses, ketchup, mustard, agave nectar, vinegar, and Worcestershire – Whisk thoroughly to incorporate.

Set the IP on sauté, add the tablespoon of avocado oil and allow it to heat through.

Add onion, chiles, and bacon – Sauté until onion is soft and bacon lightly browned – about 3 to 4 minutes.

Turn IP off, leaving veggies and bacon therein. Deglaze the bottom of the IP pan with 1/2 cup of chicken stock, scraping up and loosening all the naughty bits.

Add beans and sauce to veggies, bacon, and stock, and gently stir to incorporate thoroughly.

Set for normal pressure run, 30 minutes.

Natural release.

Go wild.

And finally, M’s potato salad incorporates two different pickle flavors that really shine together – Dills in the salad, and bread and butter brine in the dressing. It was stellar.

M’s Two Pickle Potato Salad

4 large Potatoes

3 Eggs

1/2 Cup Sweet Onion, diced

1 stalk Celery, fine diced

1 Cup Olive Oil Mayonnaise

1 Tablespoon Yellow Mustard

1 Tablespoon minced fresh Dill

2 teaspoons minced fresh Parsley

2-3 dill pickles, fine diced

1/3 Cup Bread & Butter Pickle Brine

Sea Salt and fresh ground Pepper to taste.

Prepare an ice bath in a large mixing bowl.

Put eggs in a pan large enough to cover with 2” or so of water.

Bring to a boil, cover, then turn the heat off, and let them sit in the covered pan for 20 minutes.

Pour out the hot water and replace with cold a couple of times, then let the eggs sit in that until you’re ready to deal with them.

Boil potatoes until just fork tender, then plunge into the ice bath to shock, (stops the cooking process).

Prepare veggies as per above.

In a large non-reactive mixing bowl, add potatoes and veggies, including pickles, and eggs. Stir gently with a kitchen spoon to thoroughly combine.

Add mayo, mustard, dill, parsley, pickle brine, and lightly salt and pepper. Stir to combine and thoroughly coat the salad. Taste and adjust brine, salt, and pepper to your liking. Cover and chill for at least 30 minutes prior to serving.

There ya go – Happy Days, whatever they are!

Picanha – Brazil’s Best Kept Secret


Picanha – that sounds so much sexier than sirlion cap, rump cap, or rump cover, doesn’t it? And if the Portuguese doesn’t grab you, there’s always the French term, Coulotte. Picanha likely stems from picana, a Spanish word meaning the pointed stick vaqueros used to herd cattle. Whatever you choose to call it, believe me when I tell you that, if you love great beef, you want this.


Picanha is a triangular shaped muscle derived from the primal loin cut. It’s not well known here because American butchers usually turn this into rump, round, and loin. But down in Brazil, they know better, and they leave the Picanha whole – just as they do in France, and also in Portugal. Picanha compares favorably to ribeye for tender, juicy, flavorful steaks and roasts, and for far less money. If you’ve got a real butcher shop near you, you should be able to score this cut – and Costco counts in this regard – they call it a sirlion cap, but they cut it right. 


Even better, I got a couple USDA Choice beauties for $6.99 a pound yesterday – compare that to choice ribeye at $12.99 a pound and you get it. Picanha is also pretty close to brisket in price, and much easier to find in the 2-3 pound per cut range.


Above and below you see images of a proper picanha. That fat cap is the real secret of this cut’s fantastic properties. Cooked right, that cap melts, basting your steaks or roast and culminating in fork tender meat with incredibly silky mouth feel.


So, once you score a picanha, what to do with it? It’s a relatively thin roast, maybe 3” to 4” thick. In Brazilian Churrascaria, the traditional preparation is to cut the picanha into steaks, skewer them, and cook them quickly over charcoal or wood. You can treat it like tri-tip and grill it whole, or braise, roast, or go low and slow in a grill or smoker like a brisket – picanha will shine through any of those methods. 

Whatever you do, see that you keep that glorious fat onboard until cooking is done, after which you can trim off any remaining if you wish. Some do, and some don’t – it’s a personal preference and either way is fine. Seasoning is up to you as well. Picanha is a bold, flavorful cut, so not much is truly needed. Brazilians tend to use only coarse salt, but there’s nothing wrong with applying your favorite wet or dry rub.


My advice is to leave your picanha whole. Steaks may be easier and faster to cook, but again, this is not a thick cut, and it does not take long, unless you purposefully opt for low and slow. The magic here is a flavorful, not particularly heavily marbled cut that relies on that fat cap to really flourish. While you can lean toward well done if you do it up brisket style, picanha really shines when fairly rare.

If you do prefer steaks, then roast whole first and then cut steaks – that takes full advantage of the fat cap. You can make them as thick as you like, and you can have them relatively rare, or sear them more if you like.

Speaking of searing, my advice is don’t. Let’s let Harold McGee, from On Food and Cooking, explain what searing may do for us, ‘Food scientists who have studied the subjective sensation of juiciness find that it consists of two phases: the initial impression of moisture as you bite into the food, and the continued release of moisture as you chew. Juiciness at first bite comes directly from the meat’s own free water, while continued juiciness comes from the meat’s fat and flavor, both of which stimulate the flow of our own saliva. This is probably why well-seared meat is often credited with greater juiciness despite the fact that searing squeezes more of the meat’s own juice out.’

Note that McGee wrote ‘probably,’ not ‘is’. It probably is true that searing can help in this regard, however with a picanha, I’ll tell you that you don’t need the additional cooking steps – roasting this beast with the fat cap up will give you all you could desire, and then some.


Roasted Whole Picanha

2-3 Pound Picanha Roast

Coarse Kosher Salt or

Dry or Wet Rub of your choice

Bring the roast out to room temperature and pat dry with clean toweling.

Trim the fat cap to roughly 1/2” thickness, and then score through about half of that in a large X pattern.

Rub the roast generously with salt and allow to sit at room temp for an hour prior to cooking.

Preheat oven to 350° F and set a rack in a middle slot.

Add about 1/2” of water to a clean broiling pan and set your roast on that, fat side up.

Use an active oven safe probe to closely monitor meat temperature.

Roast until internal temperature reaches 122° F.

Remove from oven, leave in the broiling pan, cover loosely with foil, and allow to rest for 15 minutes.

Cutting at 90° to the grain, carve slices or steaks and serve.


Brisket Style Grilled or Smoked Picanha 

Note: this is a true low and slow cook that will take a good few hours, so be prepared!

2-3 Pound Picanha Roast

Coarse Kosher Salt or

Dry or Wet Rub of your choice

Bring the roast out to room temperature and pat dry with clean toweling.

Trim the fat cap to roughly 1/2” thickness, and then score through about half of that in a large X pattern.

Rub the roast generously with salt and allow to sit at room temp for an hour prior to cooking.

Use an active oven safe probe to closely monitor meat temperature.

Set up grill or smoker at 250° F – if you’re grilling, set it up two-zoned, and you’ll place the picanha on the cool side.

Add smoking wood if you like that – wet or dry is up to you.

Prepare a mop of 50% water-50% apple cider vinegar.

After 90 minutes of cooking, mop the picanha lightly.

Keep mopping lightly about every hour until your bark has set – it’ll look like this.

Once bark is set, (likely around 3 hours) wrap the picanha snugly in foil and return to the grill or smoker.

Continue cooking until your internal temperature reaches 200° F.

Pull the picanha and let it rest for at least an hour, and two is fine.

Unwrap and slice across the grain to serve.

Mike’s Choco-Chile & Poor Man’s Mole


My friend Mike is a retired dentist, who spent most of his working life in New England. Born and raised in California, this is likely why he and his wife beat feet for Oaxaca every winter. He is a wonderful  observer, lover, and sharer of that vibrant corner of the world, and his super simple Choco-Chile blend is one of the favorite things he’s shared with me. For anything that you think would be great with a black molé on board, this is a fantastic option that can be made and deployed in no time – something you definitely cannot do with most dark molés.

The only thing I’ve changed from the recipe Mike sent me is specifying chocolate de mesa, Mexican table chocolate. This stuff is prepared in a manner much closer to the old indigenous ways than bar chocolate is – it’s often stone ground – you may find it labeled chocolate de metate or chocolate tradicional. The best stuff comes from small fincas (farms) around Oaxaca, Chiapas, and the Yucatán. Look for the darker varieties.

Since there are so few ingredients in this blend, the quality matters greatly – that doesn’t mean expensive, it means tasty and to your liking. Something as simple as changing the chile you use, or the chocolate, will yield a whole new profile – it’s pretty wondrous. Give it a try and you’ll be hooked as I am.

Choco-Chile base

Mike’s Choco-Chile

Makes about 1 cup (enough to sauce four entrées) 

2 Ounces dried Pasilla or Ancho Chilies 

1 clove Garlic

1 to 2 Ounces Mexican Table Chocolate, (or any least 70% cacao chocolate you like)

1 teaspoon Honey 

Zest and juice of 1⁄2 Lime 

1⁄2 teaspoon Salt 

Choco-Chile fixins

Stem and seed the chilies. 

Place chiles in a small, non-reactive bowl and cover them with boiling water. Let sit for at least 15 minutes. 

Peel, end trim and mince garlic.

Finely chop chocolate.

Zest and juice the 1/2 lime.

Drain the chilies, reserving the soaking liquid.

In a food processor, purée all ingredients, adding a teaspoon or so of chile soaking liquid as needed to achieve a paste that blends smoothly.

Adjust lime and/or salt as desired.

Mike notes, ‘The sauce will keep for at least a week (possibly forever; I’ve never tested its longevity) and its flavor will actually improve after a day or so.’

You can enjoy the sauce a bunch of ways – I have three favorites.

One is to sauté whatever protein or veggies you’re wanting, then deglaze the pan with good, homemade chicken, or veggie stock, scraping the fond from the pan bottom. Add choco-chile, whisk to thoroughly incorporate, then add back the protein or veggies and heat everything through before serving.

Second is to thin choco-chile with straight stock and use it as enchilada sauce.

But the best, hands down, is Mike’s fantastic Poor Man’s Molé. 

Mike’s Poor Man’s Molé

4 Cups shredded or cubed Meat (chicken, Turkey, or Pork), or veggies.

1 medium Yellow Onion

1 14 ounce can diced Tomato

1 Cup toasted Pumpkin Seeds (Pepitas)

1 Cup Choco-Chile sauce 

1 Tablespoon Avocado Oil

1/2 to 1 Cup Stock (Chicken, Veggie)

Salt to taste

In a large skillet over medium heat, add oil and heat until shimmering.

Add onion and cook, stirring steadily, until softened, about 4 minutes, then remove from heat.

In a blender or food processor, add tomatoes, pepitas, choco-chile, and onions. Process until fairly smooth as you like and a little texture is fine. Thin with stock as needed to make this happen.

Return skillet to heat over medium low and add the sauce.

Cook sauce until it begins to simmer, about 5 minutes, whisking constantly to keep the sauce from sticking.

Add meat or veggies and stir to thoroughly coat and incorporate. 

Reduce heat to low and simmer for 10 to 15 minutes more until everything is heated through. Sauce thickens as it cooks, so add stock as needed to end up at a consistency you like.

Taste and add sale as needed.

Serve hot with cilantro and fresh tortillas.

Asian Chicken Lettuce Wraps


It’s finally warmed up around here, and the garden has wasted no time in playing catch up. When M and I went out for a look and saw a bunch of gorgeous lettuce, she said ‘lettuce wraps,’ and I got busy.

Are you one who sneers at lettuce? If you’re of the opinion that lettuce, like celery, is a tasteless veggie, you’re not all that wrong – far too much of what we find in grocery stores is a pale shadow of the real deal. Like commercial apples not so long ago, what you find in stores is iceberg, romaine, and one or two varieties of leaf – they’re usually not local, and they’re not grown for taste – they’re made to travel and store well, and that’s why they generally suck. The image below underlines this trend. That’s a field of iceberg lettuce – Study that and ask yourself, when was the last time the iceberg you saw in the store looked like this?

A field of iceberg lettuce

Lettuce is a member of the daisy family – Asteraceae. It was first cultivated in Egypt around 3,500 years ago, grown for seeds that produce cooking oil, (and in some places still is). It was initially a plant 2 to 3 feet tall that looked like a mutant head of Romaine. Lettuce spread quickly, courtesy of the Greeks and Romans, and by the first century AD, had taken root across the known world. China leads world cultivation these days, by leaps and bounds in fact – And yes, it’s still grown in Egypt. There are six major cultivars – Leaf, Cos (Romaine), Crisphead (Iceberg), Butterhead (Boston or Bibb), Celtuce (Stem), and Oilseed. From those big branches stem hundreds of varieties, many of which are imbued with marvelous taste and texture – And you can grow many of them, so do – Make a salad from lettuces out your own garden, and you’ll know it’s wonderful stuff.

Common Lettuce Varieties

Lettuce, (and plenty of other leaves), have played a part in cooking and eating pretty much since us apes went bipedal – Food has been cooked in, plated on, served with, and wrapped in them – and still is. Little bites of meat, fish, poultry, or starchy vegetables wrapped in leaves, especially lettuce, is ubiquitous throughout Asian cuisines. I love such things, because you get a purer taste of what you’re eating than you would with something starchy, like bread, tortillas, pancakes, masa, or any of the other myriad sandwich wrappers employed – it’s also generally pretty darn healthy and remarkably tasty.

Celtuse, or Stem Lettuce

The challenge comes in finding lettuce strong and tasty enough to do the job. Romaine will work, but it usually tastes like cardboard. What you want is something from the Butterhead cultivar – a lovely head of Butter, Boston, or Bibb lettuce. These are robust enough to handle being stuffed, are far prettier than most other varieties, and taste great. They can be a bit pricier than simpler stuff, but if you get 12+ wrappable leaves out of a head, it costs about the same as dozen tortillas.

Butterhead Lettuce, AKA Butter, Boston, or Bibb

Chicken is a great protein for doing up an Asian inspired wrap dish, but so would fresh, firm tofu, fish, pork, or beef. If you use meat, it doesn’t have to be fancy – there’s a marinating step in this recipe, so even tougher cuts will get some time and help toward breaking down tougher tissues. A lot of the chicken lettuce wrap recipes out there advocate breast, but I do not – that is about the most expensive piece you can find, and the standard American white meat chicken breast hasn’t much flavor – yes, a marinade will help fix that, but why not use something that has some? Skin on, bone in thighs are the trick – Lots of flavor, cheap, and easy to prep – and a lot more authentic to boot.

As for that marinade – Rather than go for something point specific, I built a reasonably faithful mashup that holds true to regional cuisines and is a bit exotic to us Americans. Thai, Vietnamese, Japanese, Chinese, and Korean cuisines all use soy sauce, albeit they have specific variations they prefer – those are worth checking out, as they’re quite distinct. Hoisin sauce also crosses several borders, it’s often thought of as a generic Asian barbecue sauce. Rice wine and sesame oil are ubiquitous as well.

Notes –

1. Since this is a marinating recipe, you’ll need to allow time for that.

2. I pickled or dressed some of the veggie filling options, because we like that sort of thing- you don’t have to if it doesn’t float your boat – I included recipes just in case, as well as for peanut sauce.

Urban’s Asian Inspired Chicken Thighs

Chicken and Marinade:

1 1/2 to 2 Pound Chicken Thighs (Bone in, skin on – if you go boneless/skinless, a pound is plenty)

1/2 Cup Light Soy Sauce, (as in, light versus dark, not ‘lite’ as in abomination)

1/4 Cup Hoisin Sauce

2 Tablespoons Rice Vinegar

1 Tablespoon Sesame Oil

1 Tablespoon Agave Nectar

1-3 fresh Serrano Chiles

1” chunk fresh Ginger Root

2 fat cloves fresh Garlic

1/2 teaspoon Fish Sauce

Rinse, stem and dice chiles – you can field strip the membranes if you’re a heat weenie.

Peel and mince the garlic and ginger.

Combine everything but the chicken in a non-reactive mixing bowl, whisk to incorporate, and allow to marry at room temp while you prep the chicken.

Bone in, skin on chicken thighs – where the flavor is.

Remove skin and extra fat from thighs, then debone – the skin will pull off easily from one side, and the bones are mostly loose – a little careful paring will free them.

Field stripped chicken thighs

Toss your bones and skin into 6 cups of water with a little onion, celery, and carrot and you can simmer up some stock to have on hand for whatever – Most of the fat in chicken skin is unsaturated, BTW.

Cut the chicken into roughly 1/2” slices across the short side of each thigh.

Pack the sliced chicken into a bowl or storage container and pour the marinade over it – work it in so that everything is well coated. Marinate refrigerated for at least 2 hours, and 4 to 6 is even better.

Lettuce and Fillings –

10-12 leaves Butter Lettuce

1 Cup Mung Bean Sprouts

1 packed Cup Savoy or Napa Cabbage

1/2 Cup Carrot

1/2 Cup Sweet Onion

1 Cup cooked Thai cellophane noodles

1/2 Cup Roasted Peanuts, rough chopped

1/2 Cup Cilantro, rough chopped

Rinse and pat dry sprouts.

Slice cabbage into roughly 1/2” shreds. If you like this dressed, add 1 tablespoon of roasted sesame oil, and 2 teaspoons of rice vinegar, and toss to coat.

Slice carrot into roughly 2” matchsticks, and onion into 2” pieces

Pour boiling water over noodles in a mixing bowl and steep for a minute or so, until they’re al dente. Pour out hot water and rinse noodles with cold water, then drain. Place in a bowl with a teaspoon of avocado oil and mix by hand to coat the noodles.

Put the onions and carrots in a small non-reactive bowl, and add

1 Cup White vinegar

1/2 teaspoon Celery Seed

1/2 teaspoon Coriander

1/2 teaspoon Turmeric

Whisk with a fork to incorporate and let the mix marinate at room temperature

If you like peanut sauce, here’s my fave version –

1/2 Cup smooth natural, unsweetened Peanut Butter

2 Tablespoons Light Soy Sauce, (See above, not ‘lite’)

1 Tablespoon Rice Vinegar

1 Tablespoon Agave Nectar

1 Tablespoon fresh Lime Juice

1-2 teaspoons Sriracha Sauce

2-3 Cloves fresh Garlic

1 Tablespoon fresh lime juice

1/2” fresh Ginger Root

1-3 Tablespoons Warm Water

Peel, trim, and fine grate ginger and garlic.

Combine everything but the water and whisk with a fork to incorporate.

Add water, about a tablespoon at a shot, until you each the sauce consistency you like.

Allow to marry for 30 minutes prior to serving.

Sautéing Asian marinated chicken thighs

When you’re ready to eat, set all the fillings out in bowls so folks can load up at the table.

Separate lettuce leaves, then gently wash in cold water and pat dry with a clean towel. Arrange on a platter.

Pour out most of the marinade, but leave the chicken well coated, and some of the goodies too.

In a large skillet over medium high heat, sauté the chicken until fully cooked, stirring and flipping steadily, about 4-6 minutes. This is also a great thing to stir fry in a wok, if you’re of a mind.

Urban’s Asian Chicken Lettuce Wraps

Transfer chicken to a serving platter, top with a few chopped nuts and some cilantro, and dig in.

Beef Stroganoff, or should I say, Stroganov?


The weather is atrocious, we’re on vacation, I cooked up some extra beef last night, and it’s time for serious comfort food – We did up Hungarian Gulyás recently, so why not cover its Russian Cousin?

Beef Stroganoff, or should I say, Stroganov, is what I’ve got in mind, and I’m willing to bet that merely reading those words has already gone to work on you, too. I’m talking authentic beef stroganoff here, which raises an important question – What exactly is authentic, in this regard? Let’s find out.

If you’re a student of food history you’ve heard some version of the origin story for beef stroganoff. Count Alexander Grigorievich Stroganov was the Minister of Internal Affairs of Russia under Czar Alexander III, in the early 19th century. He was also the president of the historical society, a famous and wealthy man, and a bit of a gourmand.

The rest of the story goes that he collaborated with his French Chef to invent Beef Stroganov, which took Russia by storm, winning awards throughout the country, and is still with us today. While the modern dish is surely named Stroganoff, the origin story is frankly bollocks.

first off, the dish attributed to the Stroganov family is an age old Russian favorite – sautéed beef in sour cream sauce. Secondly, the upper crust during Czarist times loved all things French – Many spoke French at home and sent their kids to French schools, and French cuisine was considered especially à la mode – families who could afford to hire a genuine French Chef would do so in a heartbeat. Third, many Russian cooks were also French trained

There is evidence to support the belief that at least one Stroganov Count had a French Chef, though I’ve yet to read anything definitive as to which one. While most popular versions tap Count Alexander Grigorievich Stroganov as the creator, there are rival claims for Counts Pavel Alexandrovich and Sergei Grigorievich as well. The first published recipe that specifically called the dish Beef Stroganov I’m aware of appeared in a cookbook written by Elena Molokovhets in 1861, (A Gift For Young Housewives).

It’s also true that, thirty years later, in Saint Petersburg, a French Chef named Charles Briere was awarded a blue ribbon for a dish he called Beef Stroganov. But at that point, Alexander Grigorievich Stroganov had been dead for almost 75 years, and the youngest candidate, Sergei, had died in 1882. Nothing I read definitively tied Briere to the Stroganovs either – Clear as mud, right?

In any case, it’s certainly plausible that a French Chef might tweak either a rustic Russian favorite, (or for that matter, a French fricassee de boeuf), making it more suitable for refined Russian palates. And it’s still most likely, for my mind, that the dish came to fame with Count Alexander, who reportedly was a serious party hound. Certainly the French-Russian twist is evident in the truest version of the dish – sautéing beef, and then whipping up a pan sauce flavored with mustard is absolutely French, while beef in sour cream defines Russian fare to a T.

When the Communist Revolution engulfed Russia and buried the last of the Czars, many who were able fled their home country. Naturally, they took their favorite dishes with them. Beef Stroganov migrated first to China, where Shanghai was known as The Paris of the East – There is where it likely was first pared with rice, and where soy or fish sauce of some kind would have been introduced as well. The dish also worked its way through what would become the soviet block countries, and eventually to America – There, in New York City in 1927, the Russian Tea Room opened, with Beef Stroganoff on the menu. It was around this time and through these gyrations and upheavals that the name apparently changed from Stroganov to Stroganoff.

Enough of the history – Onward to the stuff commonly associated with beef Stroganov that, frankly, shouldn’t be – Please note, I’m not saying you can’t do these things – I’m merely pointing out that, if authentic is important, this stuff won’t be in the mix. Pretty much the entire no-no list came from American ‘improvements’ to the dish.

Mushrooms – Russian purists say unequivocally that mushrooms in beef stroganoff is not authentic. You can do it if you dig it, but try it at least once without. Mushrooms are potent – They add a number of elements of taste and texture that can easily overwhelm what should be a delicate balance of flavors. So if you do add them, make them good ones, and pay attention to proportion – half to a loose full cup is plenty – And for the record? Yeah, I add them – Shiitakes from our tribe in Minnesota, along with a half cup of steeping liquid.

Served on Noodles – Never done in Russia. Served over mashed or roasted potatoes, or accompanied by fried potatoes are the ways it was done, and later, over rice as well. Don’t get me wrong, freshly made egg noodles are great with Stroganoff, but you owe it to yourself to try the more authentic accompaniments – And doing so gives you a built in excuse to make several batches…

Adding canned cream of mushroom soup. Please, just don’t, ever. That stuff is just so wrong, I shouldn’t need to elaborate further. I don’t care if your mom and aunt Sally used it – Just don’t.

Adding ketchup/catsup. While I found, (and endorse), the use of tomato paste and honey in the seasoning mix, ketchup ain’t the way to get there. The balance is way off, and frankly, even good store bought ketchup doesn’t taste much like tomatoes. The idea is to get a little sweet note and a little msg umami feel into the recipe, and there’s much better, more balanced ways to do that, as you’ll see shortly.

Ground beef, or cheap stew cuts. Remember what I said last week about choosing beef? You certainly can make Stroganoff with these cuts and grinds, but to do it right, what you need is a nice quality, lean cut. Top sirloin, eye of the round, tenderloin will all do a great job. Stroganoff, done right, is fork tender, almost melt in your mouth, and it doesn’t require long stewing or braising time, so a good quality cut is mission critical to achieving that end. Again, you can use that other stuff in a pinch, but if you want to make the version fit for a Count, you need pretty good beef.

What you certainly can do is use a protein other than beef. While some hard cores claim only kow is korrect, plenty of genuine Russian history and recipes I chased down indicated that pork, lamb, and chicken all were used from time to time in the old country, and you can too. And for that matter, tofu sautéed to a nice crispy crust, with a soft, cream interior, is also pretty spectacular, if I do say so myself.

This recipe is an amalgam of several authentic versions. Those recipes varied from absolutely simple to quite complex. I took the common ground from all of them, as well as a couple of my favorite tweaks from the dish’s travels, to arrive where I did. I encourage you to dig in deeper and come up with one of your own – But try mine first. That said, whatever version you make, pay attention to the technique I’m showing here. I guarantee you it’ll make the most incredible Stroganov you’ve ever tasted, or your money back!

Beef Stroganov a la UrbanMonique

1 Pound Beef Sirloin or Tenderloin
1 small Sweet Onion
1 Cup Sour Cream
1/2 Cup Beef Stock
1 Tablespoon Wondra Flour
1 Tablespoon Unsalted Butter
1 Tablespoon Avocado Oil (Olive Oil is fine)
1 Tablespoon Dijon Mustard
1 Tablespoon Tomato Paste
2 teaspoons Honey
1 teaspoon Soy Sauce
2 drops Fish Sauce
Sea Salt
Ground Pepper

Trim all fat and connective tissue from beef, and reserve that stuff.

In a cast iron skillet over low heat, add a pinch of salt and all the trimmed fat, etc. cook on low, stirring occasionally, until the fat is rendered out of the trimmings, about 15 minutes.

Peel, trim, and slice onion into thin 1/8″ thick rings, then cut those into quarters.

Remove the trimmings from the skillet, and bring heat up to medium. If your beef trimmings didn’t render enough fat to coat the pan, add a little oil.

Add onions to the skillet, stir to coat with the rendered fat, and season lightly with salt and pepper.

Reduce heat to medium low and sweat the onions – This is done with the heat initially fairly high, then reduced – Its a quick process, 2 or 3 minutes, with steady stirring. The onions will look glossy and wet, but do not brown them.

Add the beef stock and butter to the skillet and stir, add another pinch of salt and a twist or two of Pepper. If you’ve been good and made demi glacé, pull a cube or two from the freezer and add it to the pan as well. Stir to incorporate, and reduce heat to low.

With a meat hammer, pound the trimmed beef lightly to tenderize. If you have a decent meat hammer, then the trick is to let the tool’s weight do the work – Don’t add muscle to the pounding, just guide the tool – You want your beef to end up about 1/2″ thick.

Cut the beef into strips about 1 1/2″ long and 1/2″ thick. Transfer to a non-reactive bowl.

Check your onions and stock. Give them a stir, and keep the heat low enough that they do not simmer.

Add flour, mustard, tomato paste, soy sauce, honey, and fish sauce to the beef and mix by hand until thoroughly and evenly coated.

Transfer onions and stock to a mixing bowl.

Increase heat to medium high and add a tablespoon of avocado oil to the skillet. When the pan is nice and hot, add the beef and sauté quickly, turning constantly. Cook for about 2 minutes until the beef is lightly browned.

Turn the heat under the skillet off, and add the onions and stock to the beef. Stir to incorporate. Cover the pan and allow the dish to sit for at least 30 minutes, and an hour is better yet.

When you’re about ready to eat, uncover the skillet and turn the heat to medium low. Allow the Stroganov to heat through, stirring occasionally. Do not allow the dish to boil or simmer vigorously – Nice and easy does it on the reheat. This will take about 15 minutes to heat the dish through.

When your Stroganov has 5 minutes of reheating left, add the sour cream, taste and adjust salt and pepper as desired. Stir gently to incorporate, and every minute or so thereafter – Again, do not allow the dish to boil, or you’ll break the delicate sauce.

Serve over rice, or mashed potatoes, with a salad or green vegetable. Garnish with parsley, cilantro, or basil, and chopped tomato if you like.

Na Zdorovie!

Chile Relleno Casserole for Christy


Tribal Sister and avid follower Christy sent me this a while back –

Can you enlighten me about ratios/proportions in a dish I make? I frequently make a chile rellenos casserole because I have lots of poblanos and it’s an easy dish that can be spicey or mild. Every time I look at various recipes I can never decide what I should do about ratios in the egg-milk part. Basically, it’s a layer of poblano, topped with a protein, cheese and then covered with a mix of eggs, milk, and flour. Sometimes baking powder is added and usually additional cheese is added to the mixture before pouring over. I am looking for that sweet spot where it’s not too eggy–not a quiche or frittata–but not too watery. The poblanos need to shine through. Maybe you can explain the dynamics of this to me so I can fix some proportions in my mind – an inquiring mind wishes to know!

Chris further related that the ratios she’d found varied from 1/2 cups to 2 cup of milk, anywhere from 2 to 8 eggs, and 2 tablespoons to 1/2 cup of flour – She happens to be a Phd Archeologist and a hell of a fine cook, so no wonder that wild a statistical swing rocked her boat a bit!

I gave her letter another read, and doing so revealed more problems with this potential recipe than just the egg/milk ratio. I’ve made plenty of rellenos in several regional styles, but had never tackled relleno casserole, so naturally, I was hooked. What followed was an interesting lesson in recipe development that I thought would be fun to share here.

The exercise begins with the problem Chris wants fixed – 1. what ratio of egg/milk/flour will yield a relleno casserole that most closely duplicates a solo relleno, and 2. One that’s not too watery, and 3. one that lets the chile be foremost in the taste profile.

Next comes the further issues I identified in her notes, namely – 1. Why are some cooks adding baking powder, and 2. Why is the egg/milk/flour mixture being added last? Those two things needed to be thought out and addressed as well.

A look at a bunch of recipes revealed exactly what frustrates Chris – All over the place, and generally very eggy – way more of a frittata/quiche-like thing than any relleno variant I’m aware of. Why that happens is anyone’s guess – either preference or an assumption that things need to be done that way to work out, is mine.

To decide what to do took some reflection on the parent dish, the noble chile relleno. While there are variations in filling and coating, one thing remains true – Virtually all variations honor the chile and make it forward in the overall taste profile of the dish. Fillings might be anything from just cheese, to meat, meat and cheese, veggies, and combinations thereof.

Rellenos are shallow fried, and coatings vary from none to fairly fluffy mixes reminiscent of tempura. In between, you might find just egg and cornmeal, egg and flour, and the well known three stage dredge of egg/milk/flour. The fluffy coating variants explain where the baking powder option in some casseroles comes from – it’s deployed to help produce a light and airy coating – as such, it really has no place in a casserole – it’s not going to do what it’s intended to in this dish.

Next question for me was, is some form of egg/milk/flour mix necessary? My immediate answer was yes, because there is a place for the flavor note, and maybe just a hint of crunch that a proper mix and volume would offer, if deployed properly – and pouring whatever coating mix is used on top of a casserole is not the right place to deploy it. What that leads to is permeating everything throughout the casserole with an eggy mix, yielding exactly what Chris and I don’t want.

The coating mix should be on the bottom of the dish, where direct and latent heat will allow a thin layer to crisp up a bit, emulating the solo relleno. And the rest of the mix should go atop of the poblano layers, right where it should be for taste and effect, and about midway through the casserole. Finally, the volume of coating mix shouldn’t be excessive – it should be just enough to coat the poblanos.

As for watery casserole, the culprit there is going to be meat and veggies that don’t get properly prepared to work in the dish – the poblanos need to be thoroughly blistered, which does take appreciable moisture out of them without drying them out. Any other veggies need to be sautéed long enough to reduce their moisture content as well. I think milk of any kind will add too much water to the mix, so issued cream. Eggs needs to be fresh, or they too will add excess moisture. Finally, crappy chorizo and/or cheese will add water to the mix, so avoid those outright.

So, what else to put in there? To me, just meat, cheese and chiles is kinda pedestrian in a casserole – I want veggies, too. I settled on onion, garlic, some hot chiles, and tomato – all of those show up in various relleno recipes, so they’re spot on here, too.

Initially, I told Chris I was going to think of the proper ratio as a gravy, and as fate would have it, that was wrong. Working this recipe up to the point where everyone in the house said ‘damn,’ and the leftovers were better than the first night took three tries to get right.

The first swing suffered from too much batter, and lousy chorizo. The second one was OK, but watery – it suffered from old poblanos, and too much water in the veggie mix. All this was solved in v. 3.0 with fresh, local chorizo seco, proper pre-sautéing of most of the veggie mix, and physically squeezing excess juice out of the fresh tomatoes.

For chorizo seco, (the drier, often spicier cousin of the regular stuff), and good Mexican cheeses, (I used a 50%-50% blend of Oaxaca and Asadero cheeses for the dish), I’ll bet dimes to dollars there’s a good Latin grocery or two near you. If that’s not the case, I’ll recommend 90%-10% ground beef with homemade chorizo seasoning, (also provided herein) – that’ll give you the flavor without excess grease. For cheese, I’d go with 50%-50% Monterey Jack and Sharp Cheddar. Finally, your poblanos gotta be fat and sassy – a thick, juicy chile is an absolute must for this dish.

Urban’s Chile Relleno Casserole

5-6 large, fresh Poblano Chiles

1 Pound fresh Chorizo Seco (or alternative- see above)

1 Pound Melting Cheese Blend, (see above)

1 small yellow Onion

2-3 hot Chiles (Jalapeño, Fresno, or Serrano)

3 cloves fresh Garlic

1 teaspoon Mexican Oregano

2 Roma Tomatoes

1/2 Cup 1/2 & 1/2

2 Eggs

2 Tablespoons All Purpose Flour

1 Tablespoon Avocado Oil

Kosher Salt

Ground Black Pepper

Place poblanos on a baking pan under a broiler, 2 rack spots from top.

Blister poblanos, turning regularly to make sure they’re evenly seared.

Remove from oven and allow to cool enough to handle.

Peel, end trim and dice 1 packed cup of onion and the hot chiles.

Peel, end trim and mince garlic.

Slice tomatoes in half, end trim, gut, and dice.

Uncase chorizo, or prep alt. beef (see below for seasoning)

Grate cheeses and combine.

Combine cream, eggs and flour in a small mixing bowl, and whisk vigorously to fully incorporate.

In a sauté pan over medium heat, add a tablespoon of avocado oil and allow to heat through. Add onion, hot chiles, garlic, and oregano, a pinch of salt and a few twists of pepper.

Sauté until onions start to turn translucent, about 3-4 minutes. Remove veggie mix from heat and transfer to a small mixing bowl to cool.

Gently remove blistered skins from poblanos, then cut poblanos in half down the natural sides, leaving nice big slabs of chile.

In sauté pan over medium heat, add chorizo or beef and sauté, stirring steadily, until roughly 3/4 cooked through. If you’re using beef, add 2-4 tablespoons of chorizo seasoning to 1 pound of beef and cook. Transfer to a mixing bowl, discarding any excess liquid.

Set up your mise en place in prep for assembly.

Preheat oven to 350° F and set a rack with a baking sheet in the middle slot.

In a large casserole dish (9” x 11” or thereabouts), pour a thin layer of the coating mix, and swirl to evenly cover the bottom of the dish.

Lay down a solid layer of poblanos over the coating mix.

Add the chorizo or beef and spread in an even layer.

Add about half the cheese blend and spread evenly.

Add second layer of poblanos, covering completely.

Pour the rest of the coating mix onto the second poblano layer, to even;y cover the filling.

Add the sautéed veggies and spread evenly.

Hand squeeze any excess juice out of the diced tomatoes, and spread evenly.

Add the rest of the cheese blend and spread evenly.

Bake at 350° for 45 minutes, until topping cheese is bubbling and nicely browned.

Remove from oven and allow to rest for 10 minutes.

Serve over a bed of cabbage and lettuce, and maybe a few other renegade veggies, with ice cold cerveza Mexicana, and maybe some fresh tortilla chips to chase the naughty bits with.

Urban’s Go To Mexican Chorizo Seasoning

2 Tablespoons Granulated Garlic

2 Tablespoons Red Hatch Chile Powder

1 Tablespoon Smoked Paprika

2 teaspoons Sweet Paprika

2 teaspoons Mexican Oregano

2 teaspoons Smoked Salt

1 teaspoon Cumin Seed

1 teaspoon ground Black Pepper

Grind any and all whole spices to a smooth powder, then combine all ingredients.

Store in clean glass with a airtight lid, out of direct sunlight.