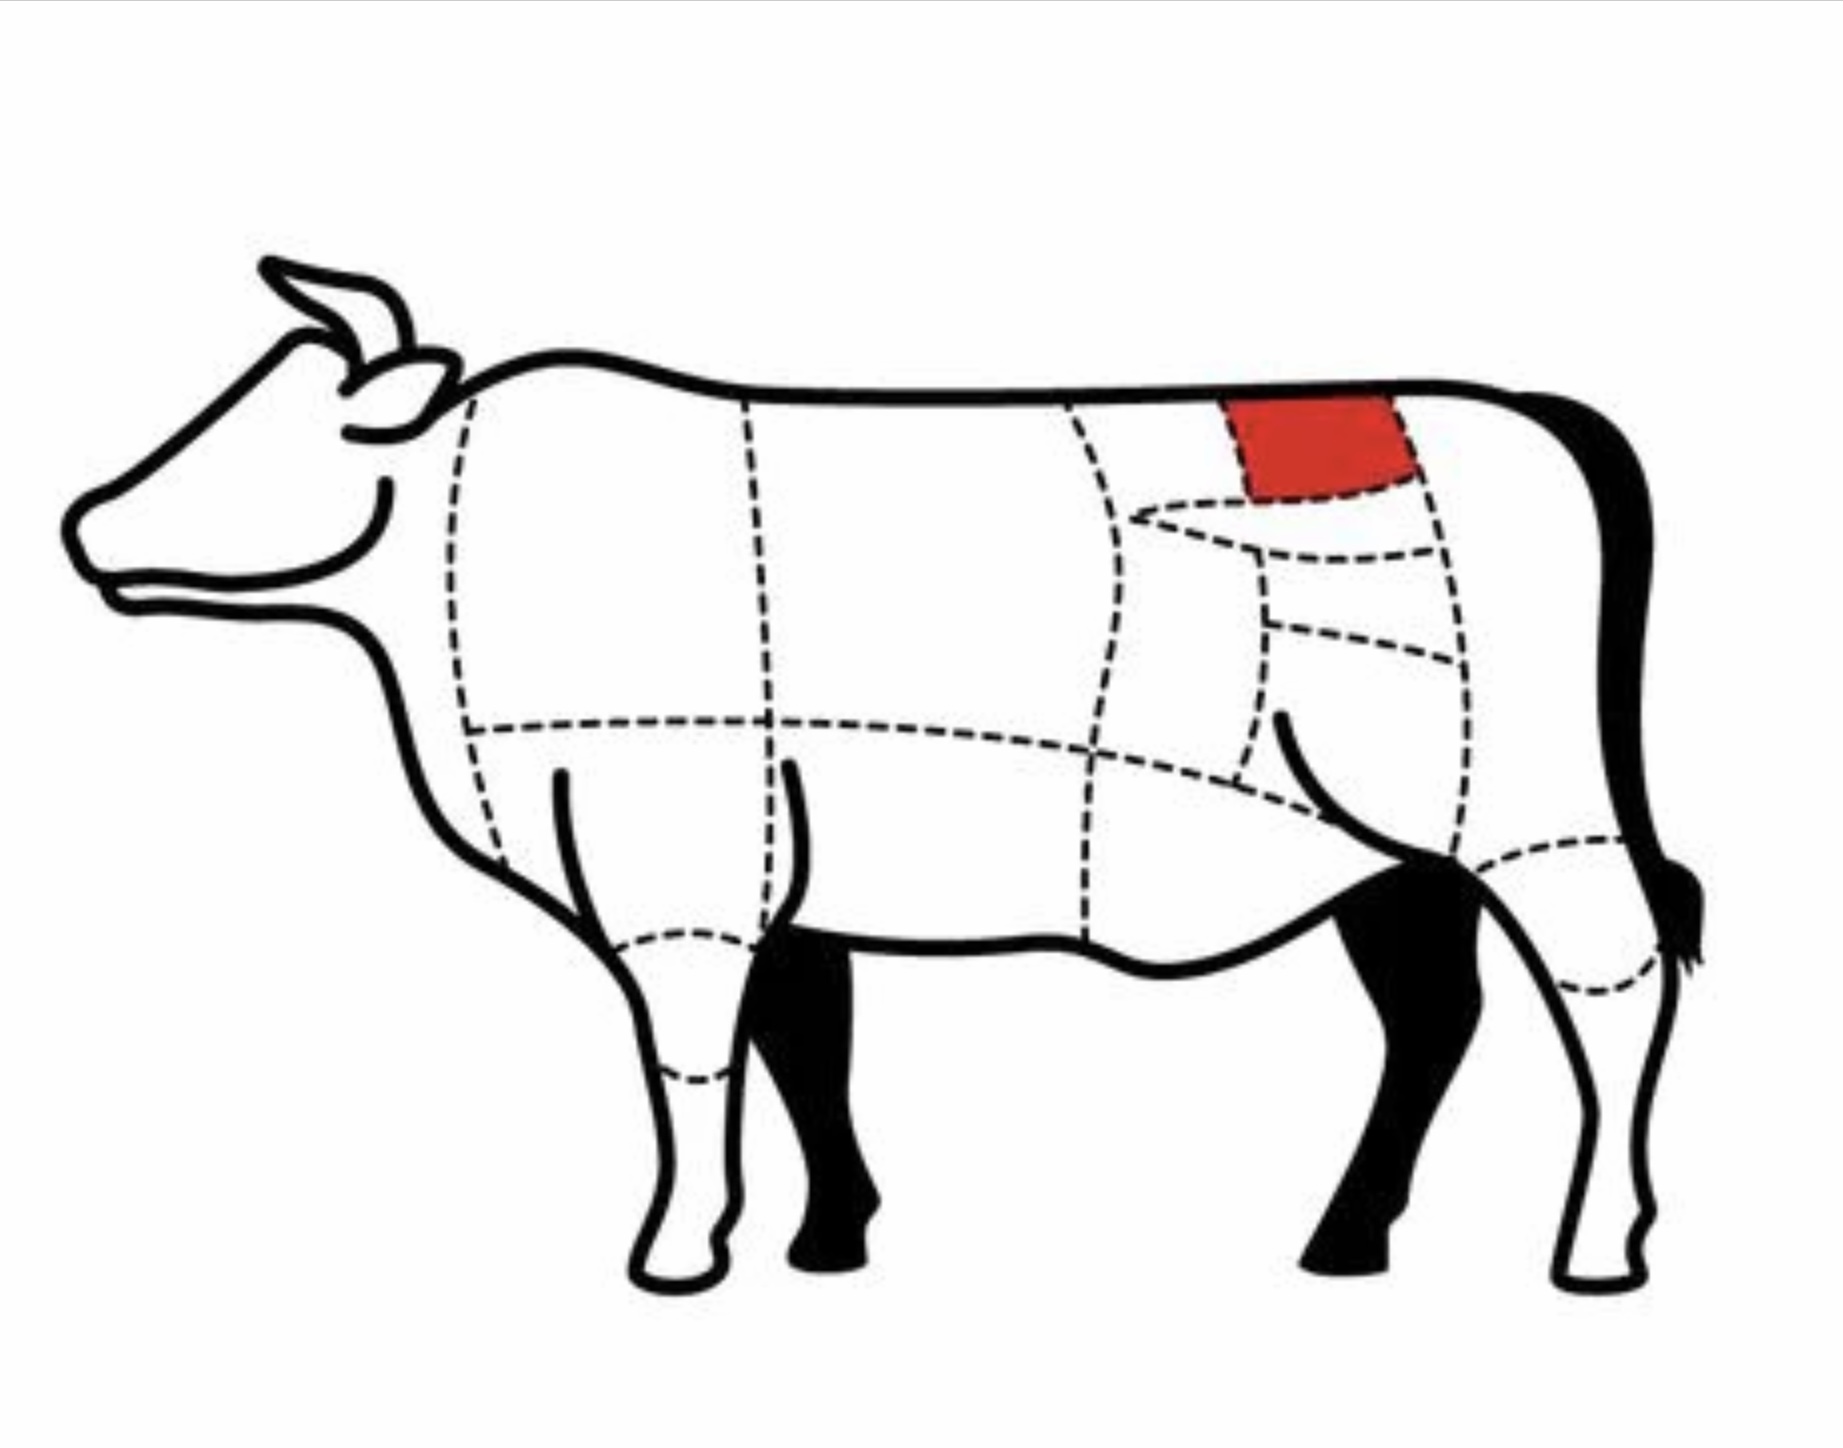
Picanha – that sounds so much sexier than sirlion cap, rump cap, or rump cover, doesn’t it? And if the Portuguese doesn’t grab you, there’s always the French term, Coulotte. Picanha likely stems from picana, a Spanish word meaning the pointed stick vaqueros used to herd cattle. Whatever you choose to call it, believe me when I tell you that, if you love great beef, you want this.
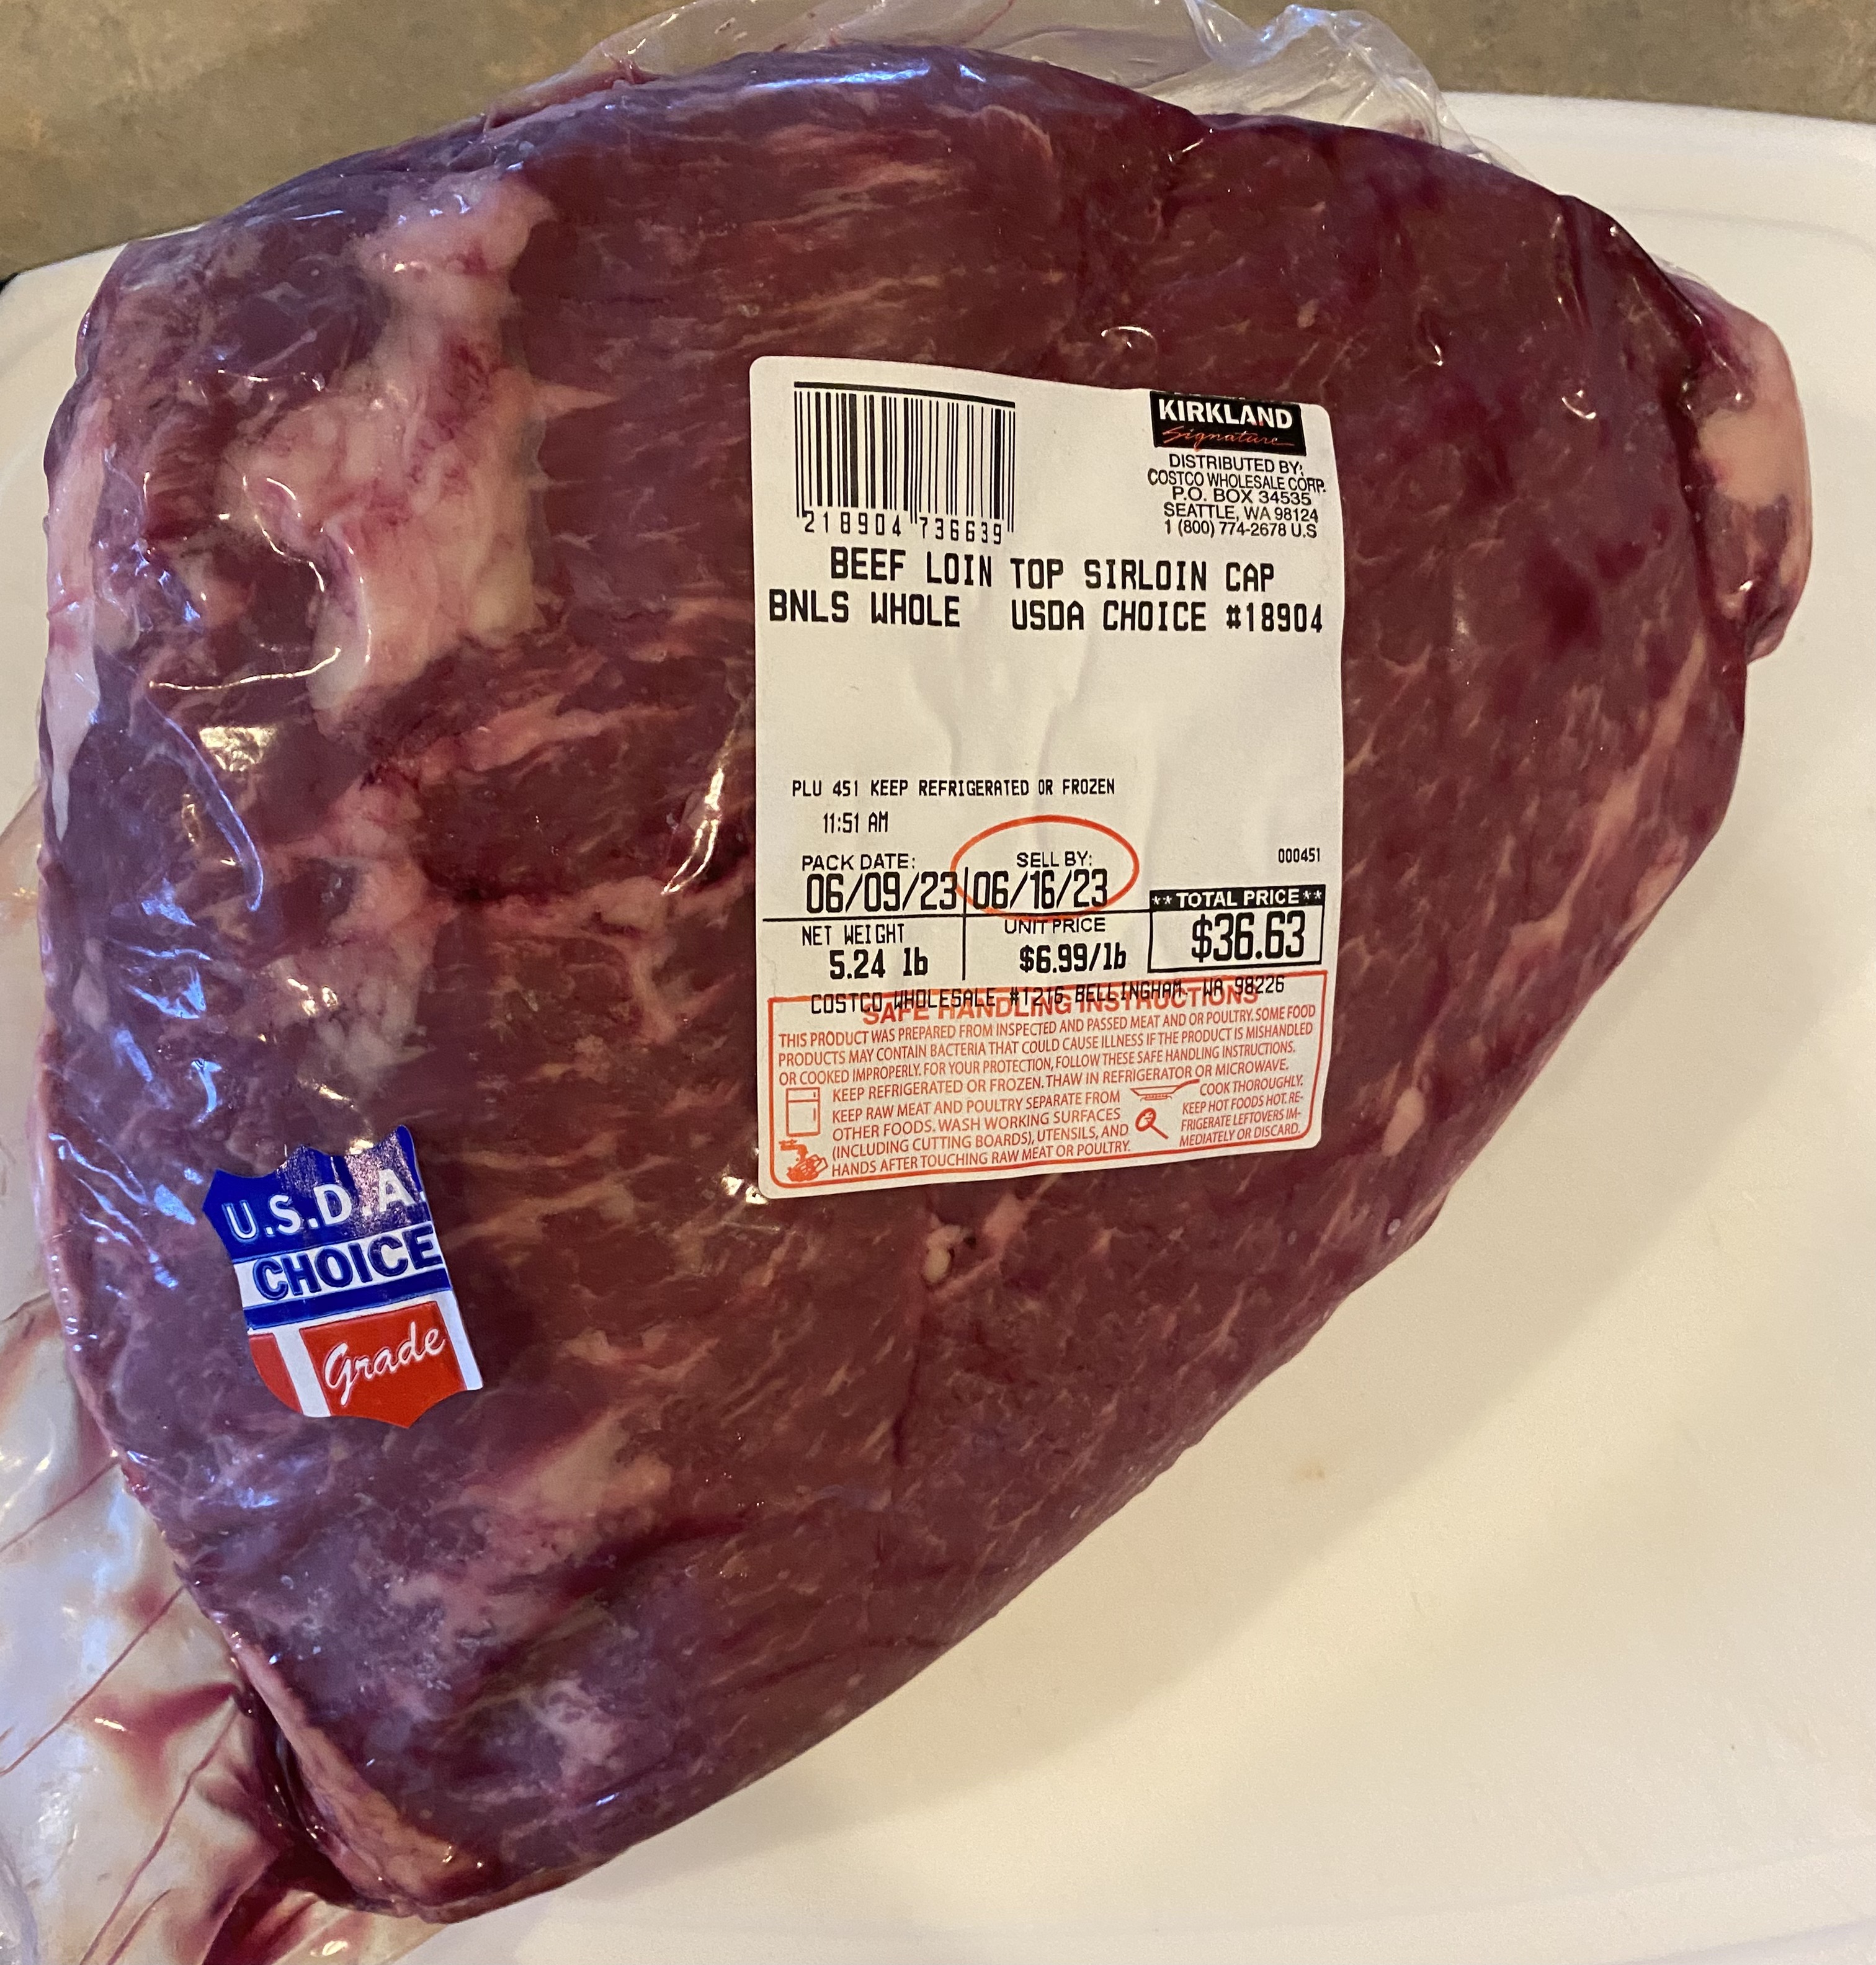
Picanha is a triangular shaped muscle derived from the primal loin cut. It’s not well known here because American butchers usually turn this into rump, round, and loin. But down in Brazil, they know better, and they leave the Picanha whole – just as they do in France, and also in Portugal. Picanha compares favorably to ribeye for tender, juicy, flavorful steaks and roasts, and for far less money. If you’ve got a real butcher shop near you, you should be able to score this cut – and Costco counts in this regard – they call it a sirlion cap, but they cut it right.
Even better, I got a couple USDA Choice beauties for $6.99 a pound yesterday – compare that to choice ribeye at $12.99 a pound and you get it. Picanha is also pretty close to brisket in price, and much easier to find in the 2-3 pound per cut range.
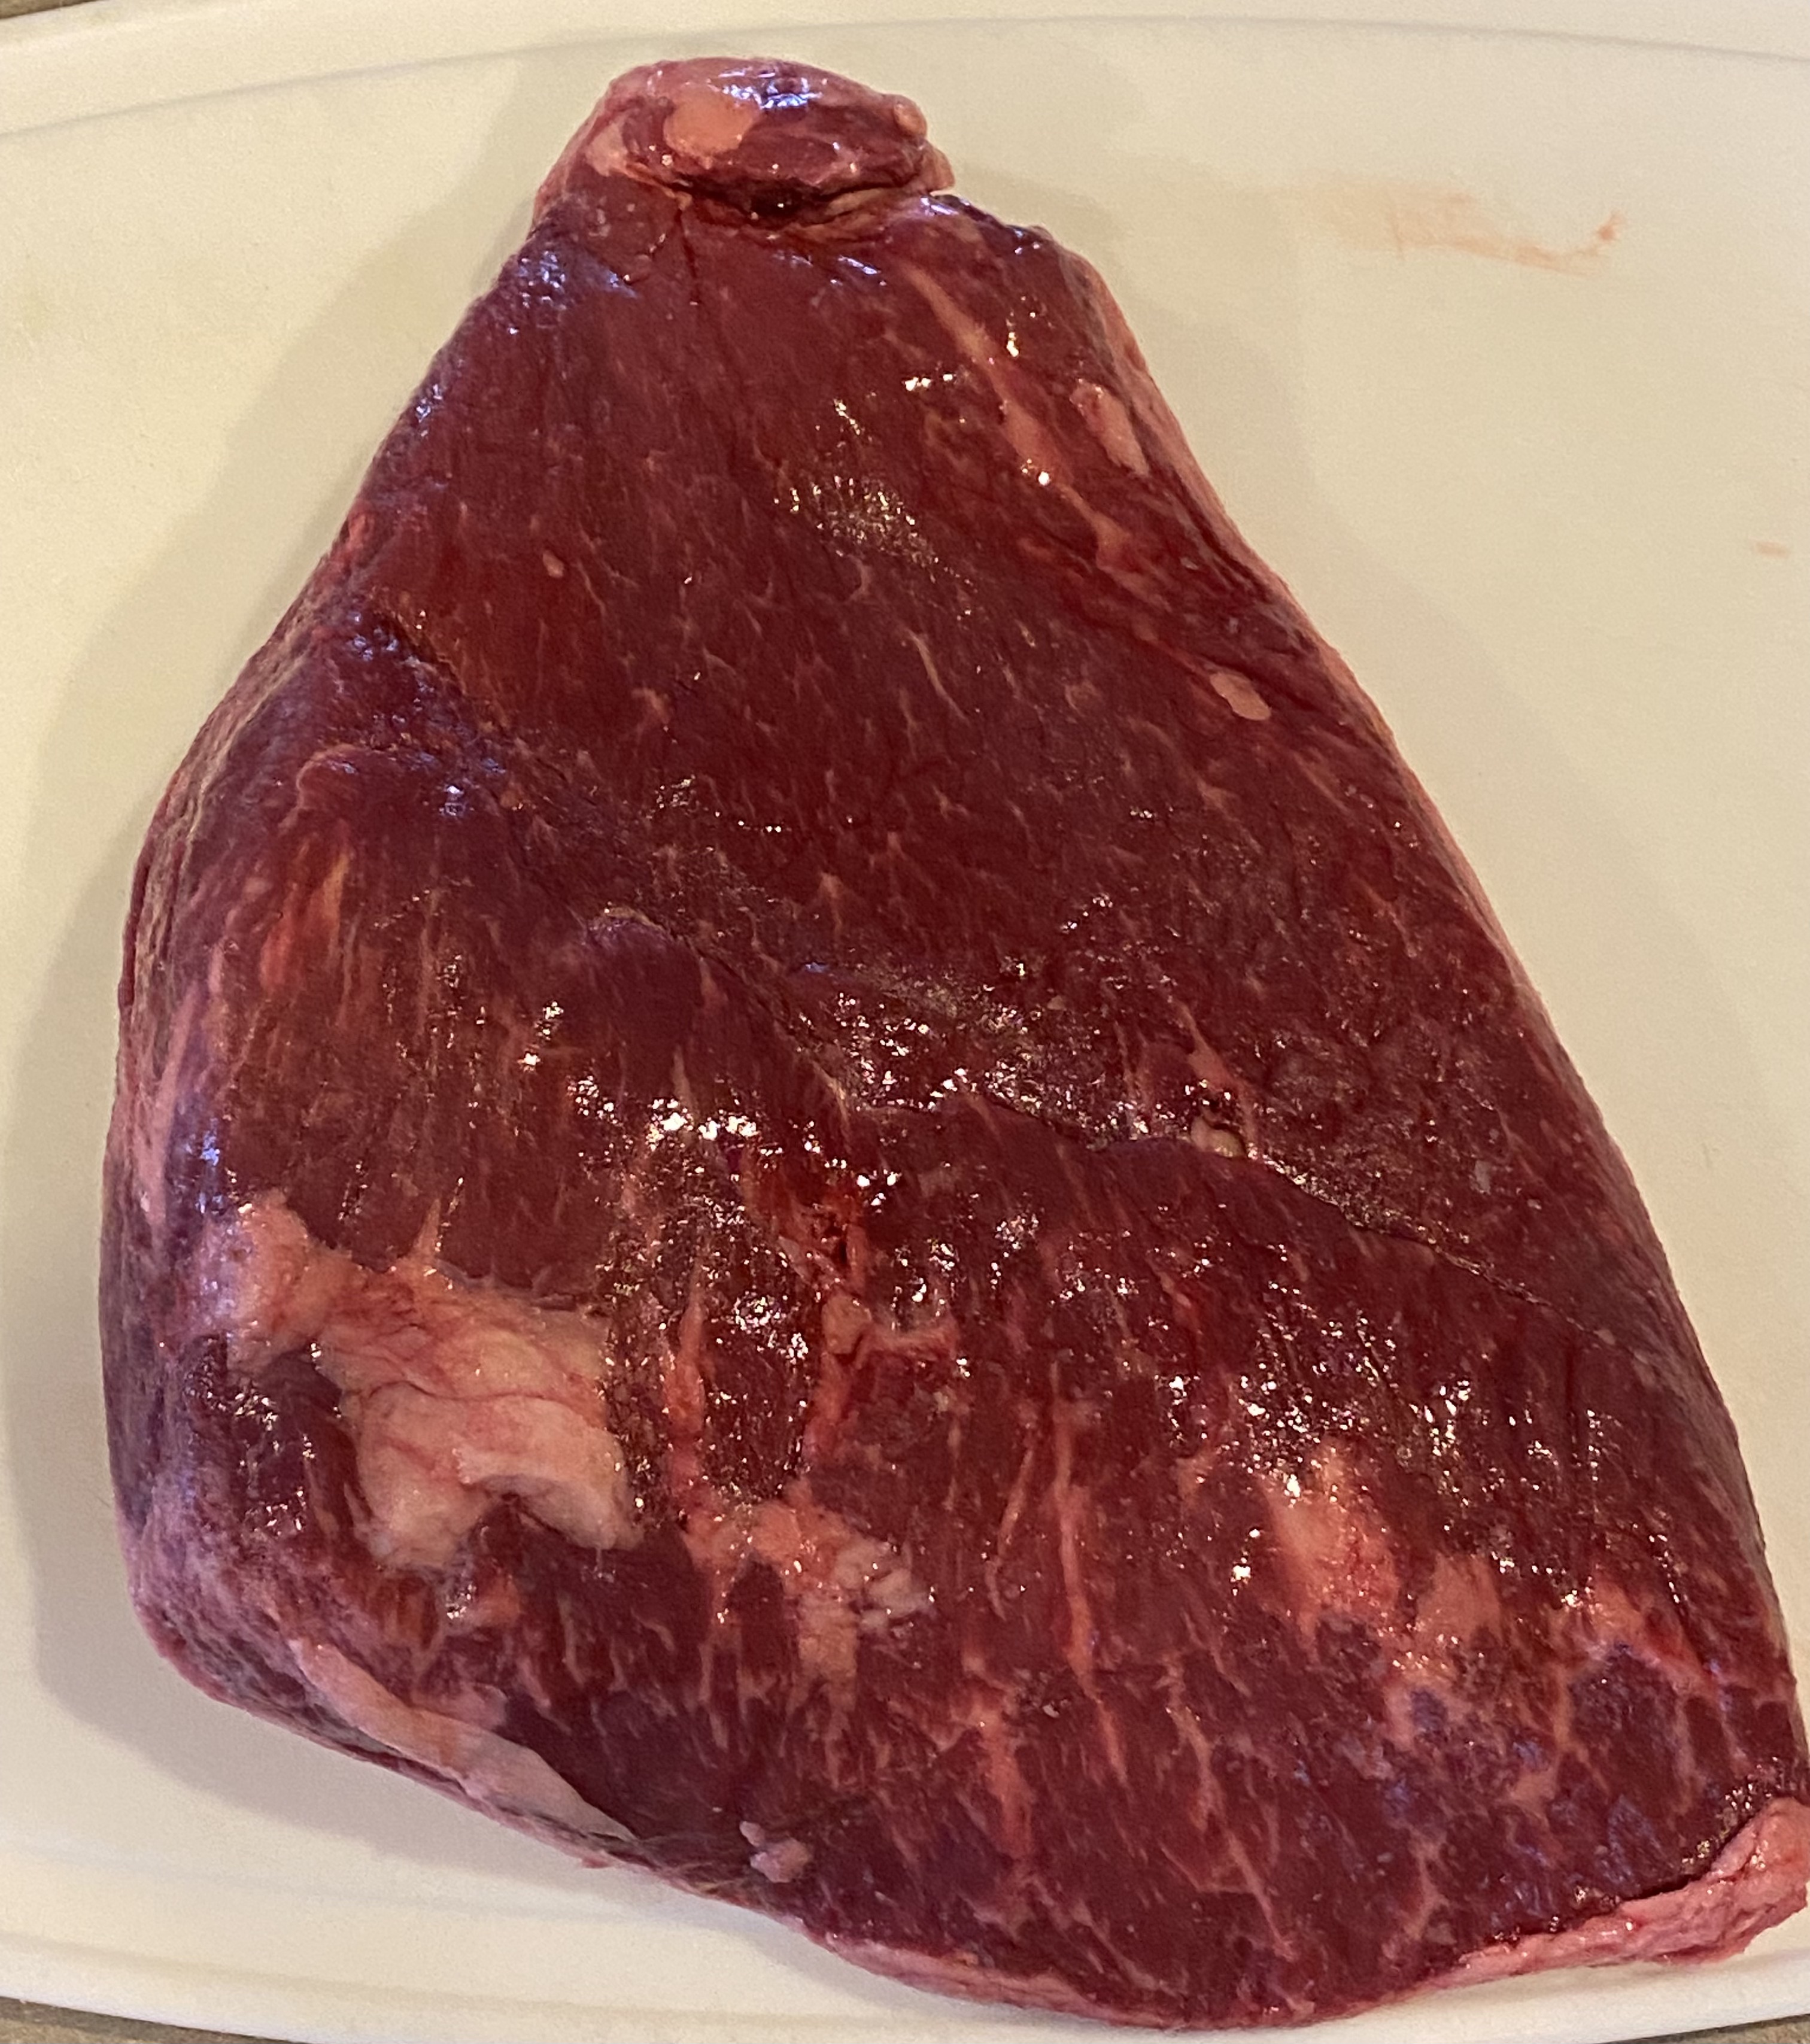
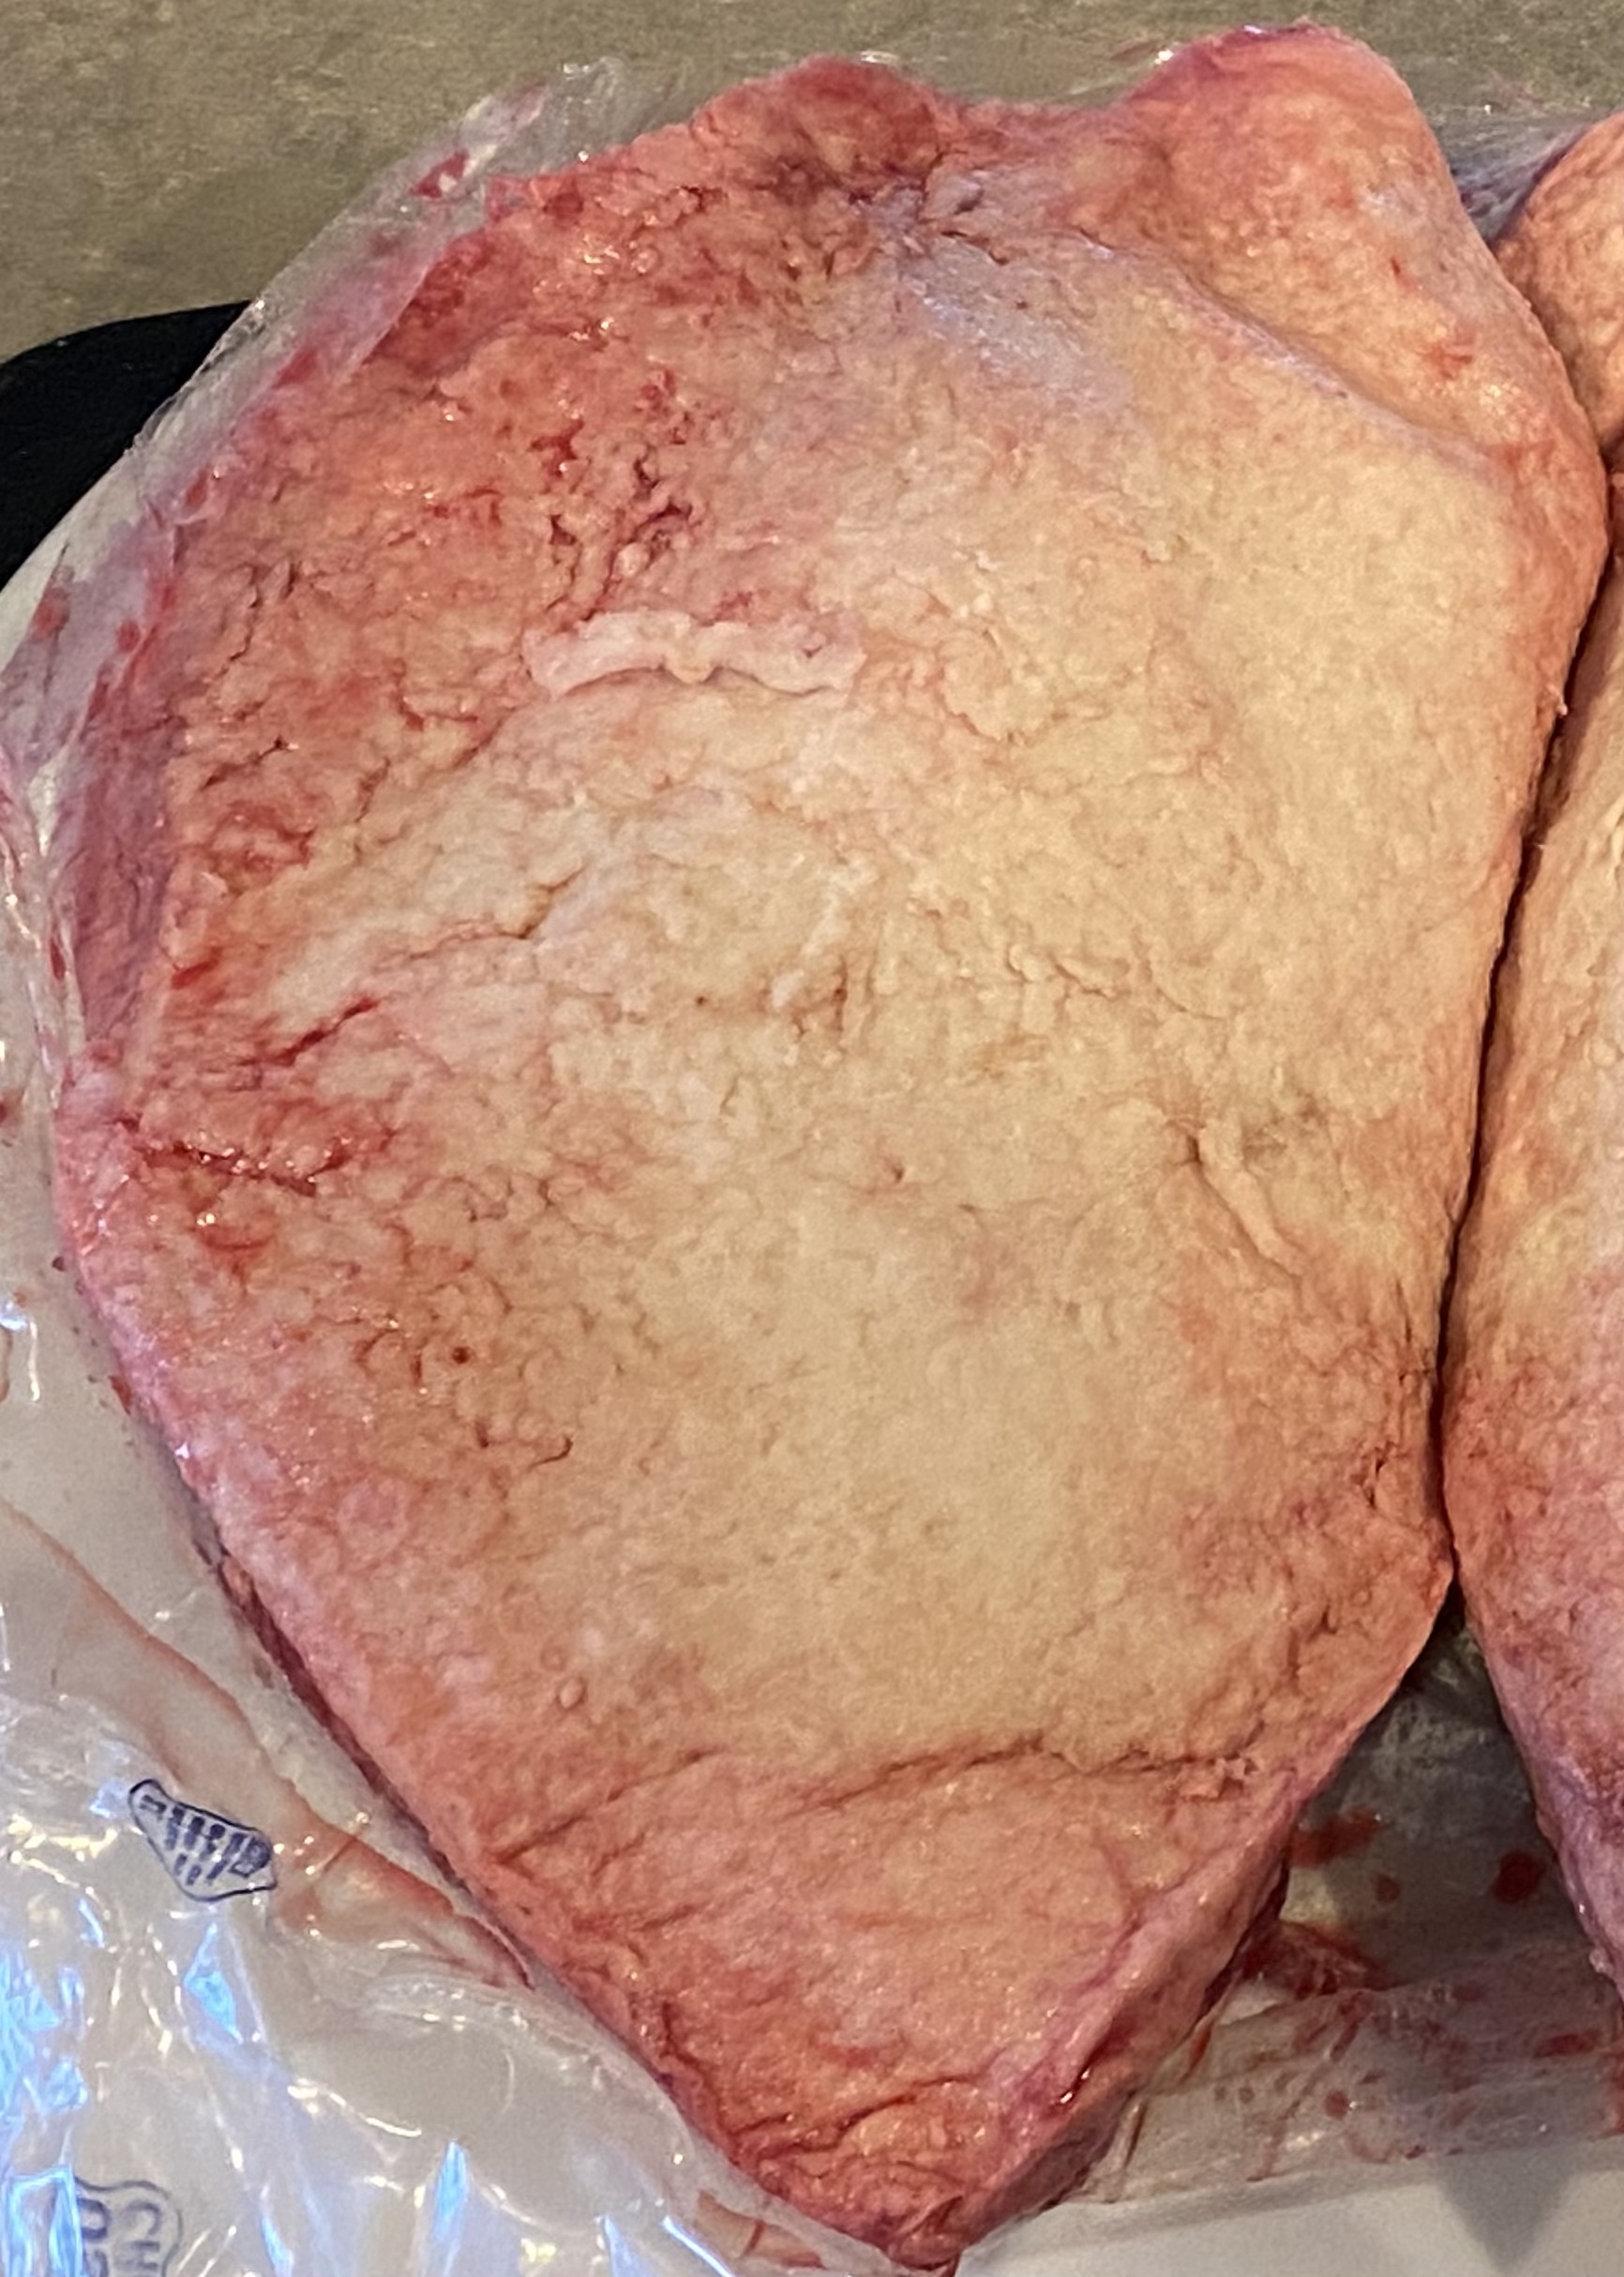
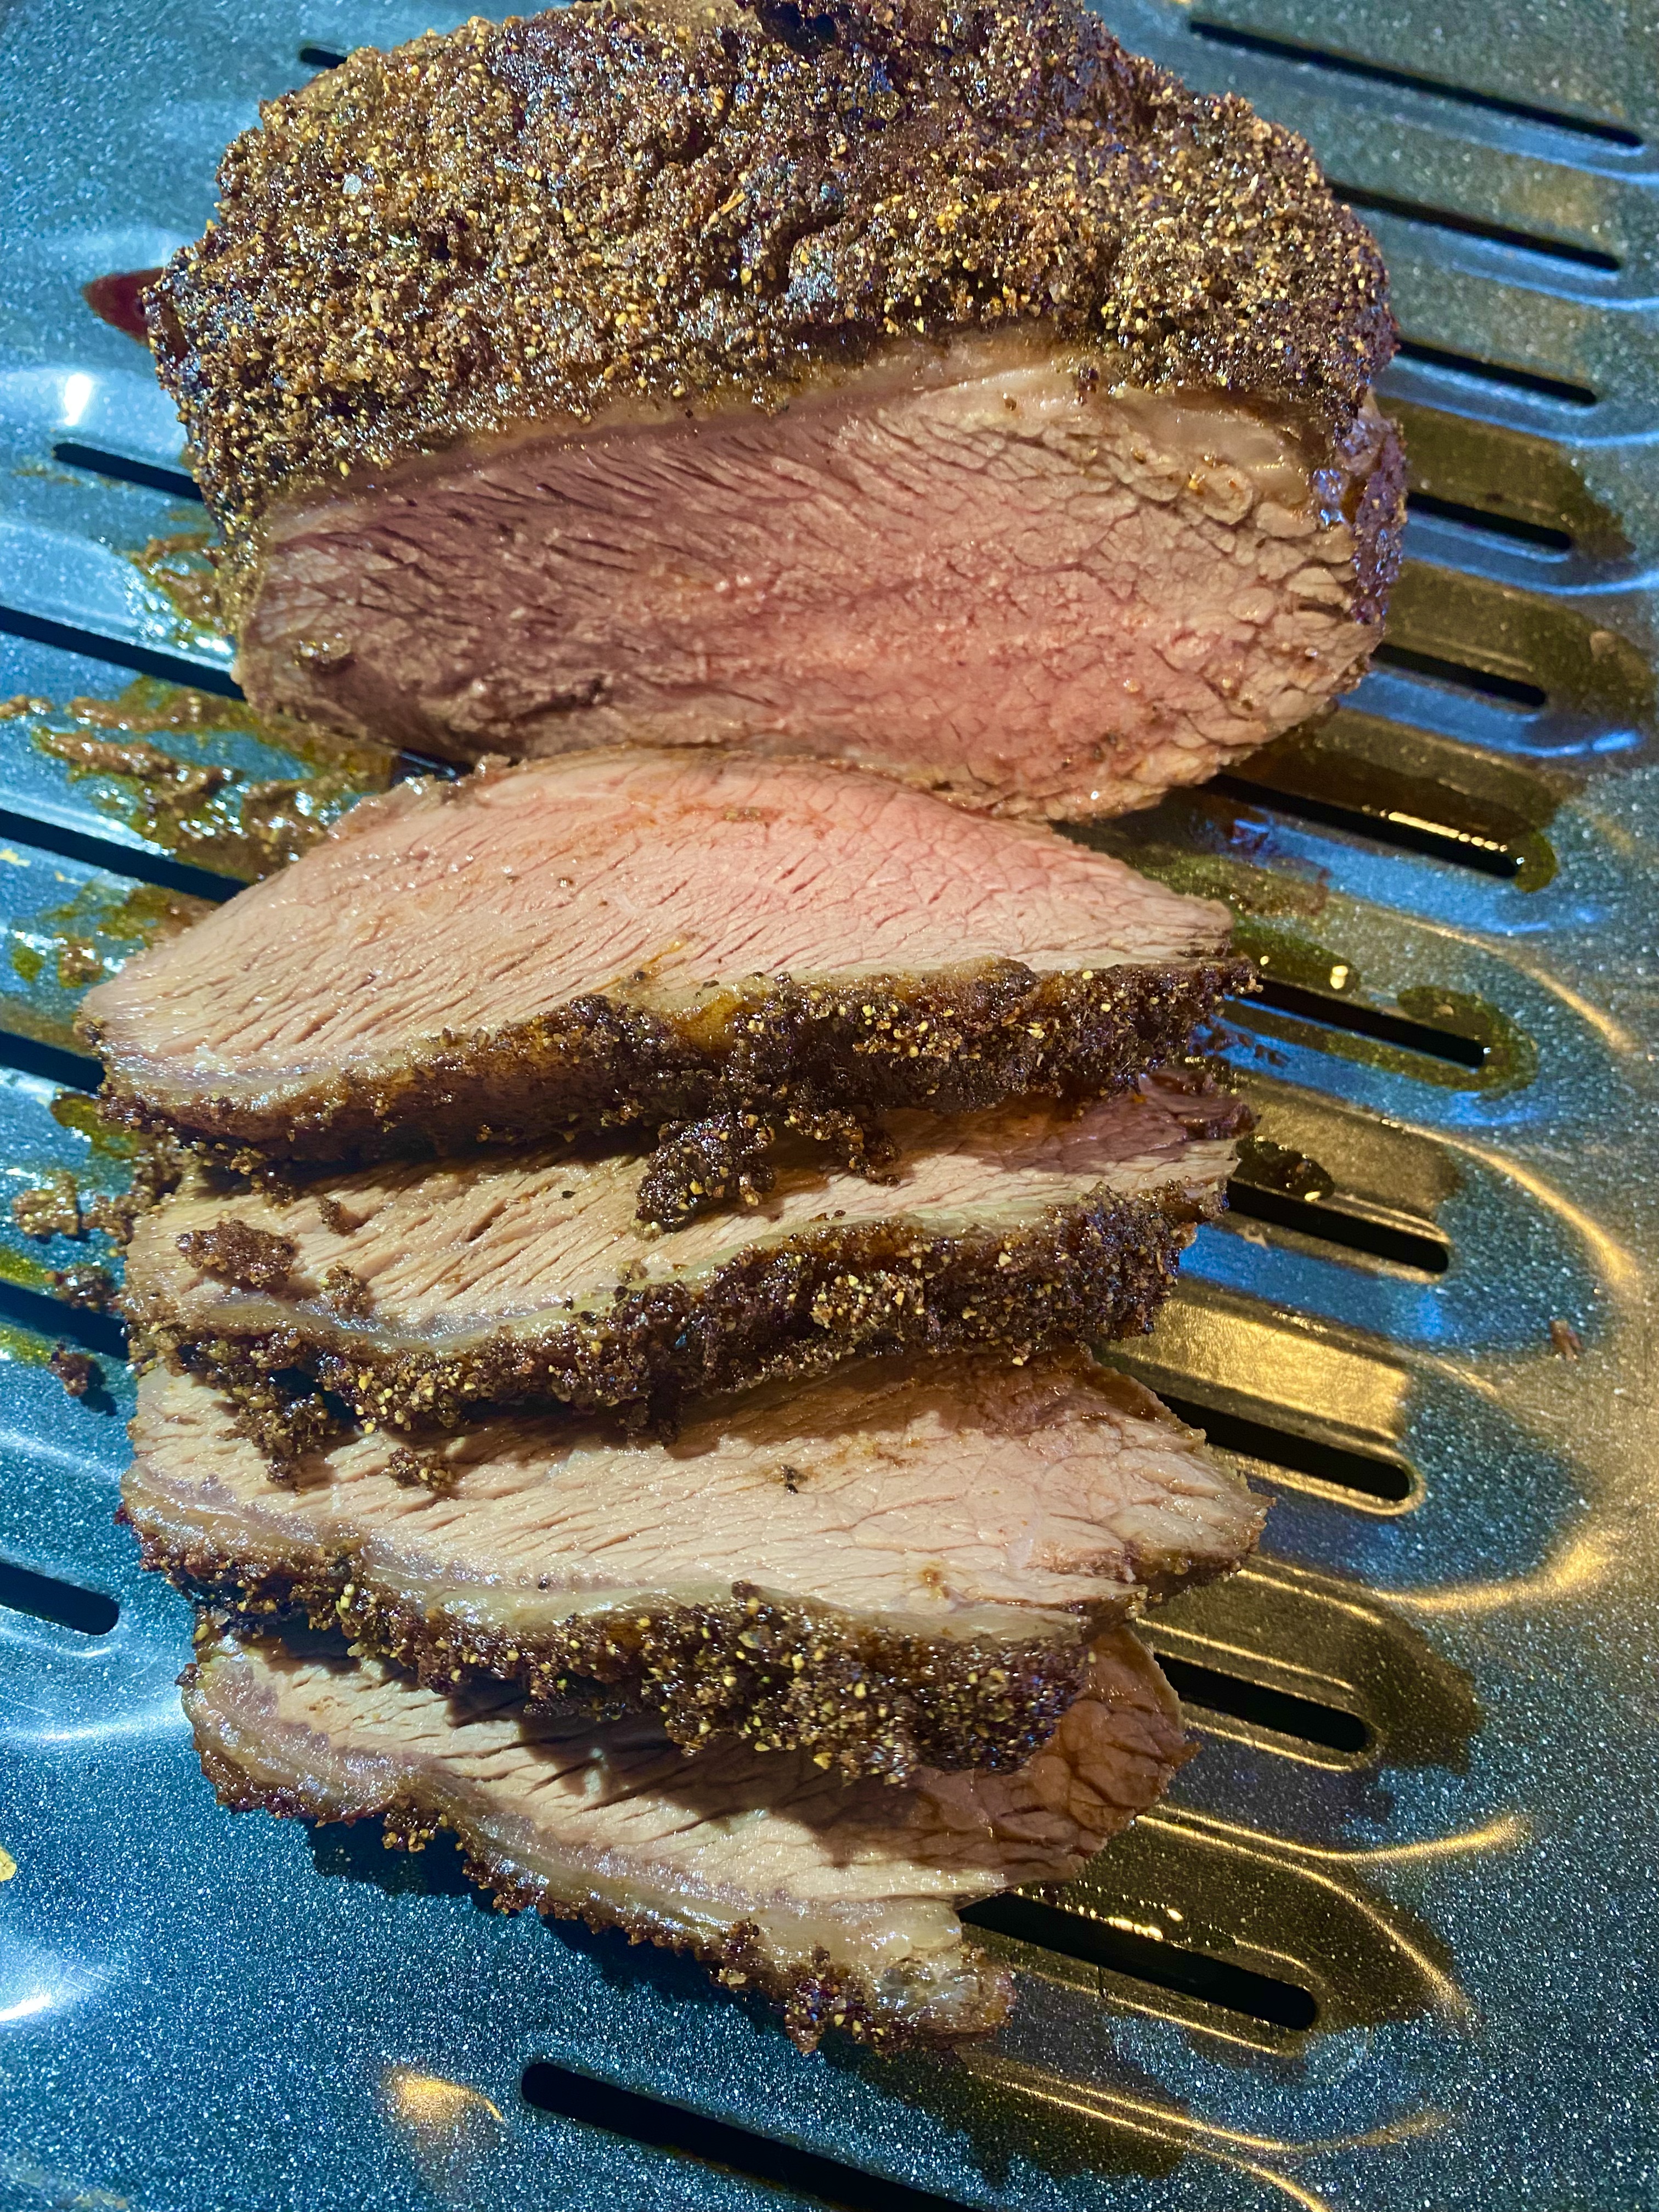
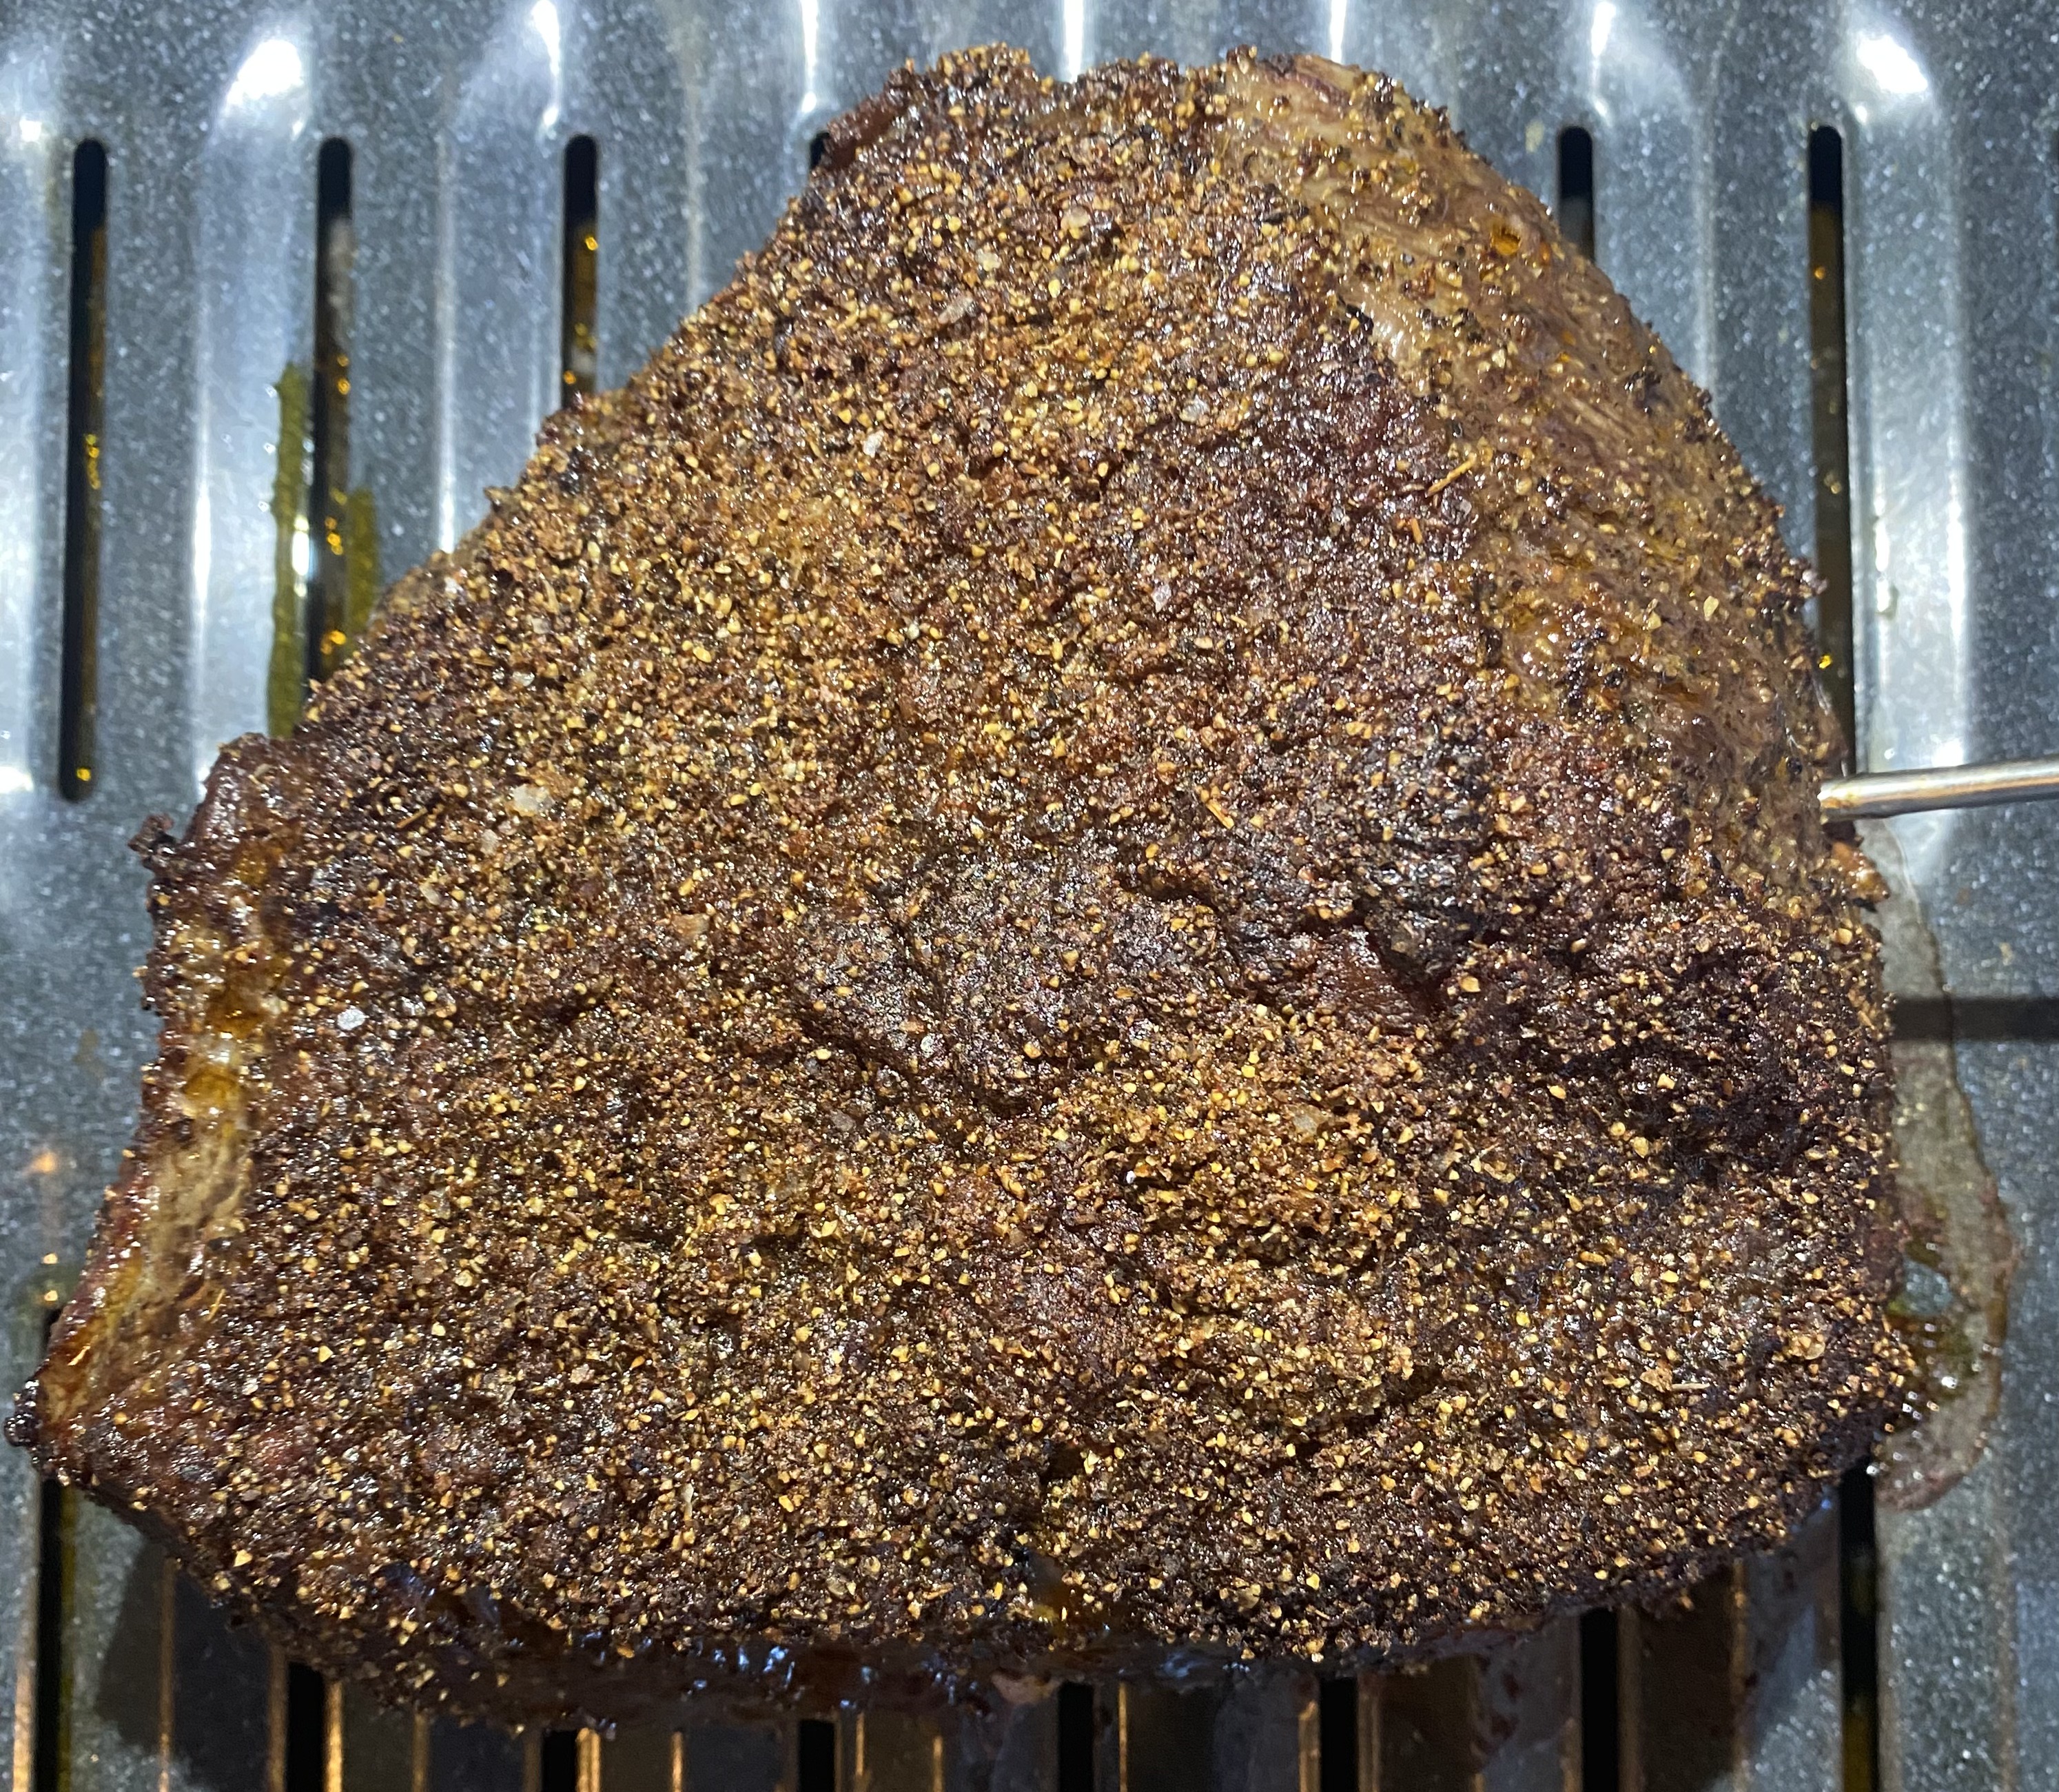
Above and below you see images of a proper picanha. That fat cap is the real secret of this cut’s fantastic properties. Cooked right, that cap melts, basting your steaks or roast and culminating in fork tender meat with incredibly silky mouth feel.
So, once you score a picanha, what to do with it? It’s a relatively thin roast, maybe 3” to 4” thick. In Brazilian Churrascaria, the traditional preparation is to cut the picanha into steaks, skewer them, and cook them quickly over charcoal or wood. You can treat it like tri-tip and grill it whole, or braise, roast, or go low and slow in a grill or smoker like a brisket – picanha will shine through any of those methods.
Whatever you do, see that you keep that glorious fat onboard until cooking is done, after which you can trim off any remaining if you wish. Some do, and some don’t – it’s a personal preference and either way is fine. Seasoning is up to you as well. Picanha is a bold, flavorful cut, so not much is truly needed. Brazilians tend to use only coarse salt, but there’s nothing wrong with applying your favorite wet or dry rub.
My advice is to leave your picanha whole. Steaks may be easier and faster to cook, but again, this is not a thick cut, and it does not take long, unless you purposefully opt for low and slow. The magic here is a flavorful, not particularly heavily marbled cut that relies on that fat cap to really flourish. While you can lean toward well done if you do it up brisket style, picanha really shines when fairly rare.
If you do prefer steaks, then roast whole first and then cut steaks – that takes full advantage of the fat cap. You can make them as thick as you like, and you can have them relatively rare, or sear them more if you like.
Speaking of searing, my advice is don’t. Let’s let Harold McGee, from On Food and Cooking, explain what searing may do for us, ‘Food scientists who have studied the subjective sensation of juiciness find that it consists of two phases: the initial impression of moisture as you bite into the food, and the continued release of moisture as you chew. Juiciness at first bite comes directly from the meat’s own free water, while continued juiciness comes from the meat’s fat and flavor, both of which stimulate the flow of our own saliva. This is probably why well-seared meat is often credited with greater juiciness despite the fact that searing squeezes more of the meat’s own juice out.’
Note that McGee wrote ‘probably,’ not ‘is’. It probably is true that searing can help in this regard, however with a picanha, I’ll tell you that you don’t need the additional cooking steps – roasting this beast with the fat cap up will give you all you could desire, and then some.
Roasted Whole Picanha
2-3 Pound Picanha Roast
Coarse Kosher Salt or
Dry or Wet Rub of your choice
Bring the roast out to room temperature and pat dry with clean toweling.
Trim the fat cap to roughly 1/2” thickness, and then score through about half of that in a large X pattern.
Rub the roast generously with salt and allow to sit at room temp for an hour prior to cooking.
Preheat oven to 350° F and set a rack in a middle slot.
Add about 1/2” of water to a clean broiling pan and set your roast on that, fat side up.
Use an active oven safe probe to closely monitor meat temperature.
Roast until internal temperature reaches 122° F.
Remove from oven, leave in the broiling pan, cover loosely with foil, and allow to rest for 15 minutes.
Cutting at 90° to the grain, carve slices or steaks and serve.
Brisket Style Grilled or Smoked Picanha
Note: this is a true low and slow cook that will take a good few hours, so be prepared!
2-3 Pound Picanha Roast
Coarse Kosher Salt or
Dry or Wet Rub of your choice
Bring the roast out to room temperature and pat dry with clean toweling.
Trim the fat cap to roughly 1/2” thickness, and then score through about half of that in a large X pattern.
Rub the roast generously with salt and allow to sit at room temp for an hour prior to cooking.
Use an active oven safe probe to closely monitor meat temperature.
Set up grill or smoker at 250° F – if you’re grilling, set it up two-zoned, and you’ll place the picanha on the cool side.
Add smoking wood if you like that – wet or dry is up to you.
Prepare a mop of 50% water-50% apple cider vinegar.
After 90 minutes of cooking, mop the picanha lightly.
Keep mopping lightly about every hour until your bark has set – it’ll look like this.
Once bark is set, (likely around 3 hours) wrap the picanha snugly in foil and return to the grill or smoker.
Continue cooking until your internal temperature reaches 200° F.
Pull the picanha and let it rest for at least an hour, and two is fine.
It’s a sure bet that, if you eat enough Mexican, Tex Mex, Caribbean, or South American food, you’ve enjoyed some form of carne asada. Certainly then, you’ve swooned over the rich and pungent blends of flavors presented by something that looks so simple, but tastes so complex. The answer lies in Mojo, the marinade that made carne asada famous.
The literal translation of the South American name for the dish is roasted meat, which tells us right away that the cooking side of things isn’t complex. All that magic comes from the mojo, and fortunately for us, it’s not only easy to make, it’s downright a gas.
Carne asada de UrbanMonique
Before we dive fully into Mojo, let’s spend a few looking at the history of carne asada – It’s as old as fire and cooking vessels, really. No one can lay claim to originating the dish, (although that hasn’t stopped many from trying). In addition to straight asada, there are popular variants that have much to do with how the meat is handled for service – Shredded or ground, as opposed to cooked whole and sliced, for instance.
Shredded or pulled beef is found in American barbecue, ropa vieja in the Caribbean, and carne deshebrada in Mexico. The versions most Americans are accustomed to stem from northern Mexican cuisines, although there are popular southern variants as well.
Mojo de UrbanMonique, a great all purpose marinade
Specific cuts of beef are commonly associated with carne asada, and they’re not exactly the rock stars. These include skirt, flank, and flap steak, the stuff the folks doing the boogie up on the hill certainly did not buy for themselves. That stuff was considered refuse, and the genesis of great meals formed around such marginal cuts is another example of the disenfranchised making due. Yet here in the 21st century, popularity has turned all that on its head – Some of these lesser cuts have reached the big time cost-wise.
The moral of the story is to be flexible – When we spied eye of the round cut thin as steaks for $5 a pound, it was game over, and ‘authenticity’ be hanged – It’ll all eat just fine – Boneless chuck, the bargain basement of beef cuts, makes perfectly wonderful carne asada.
Now, on to that mojo. If you have a carniceria nearby, you can bet they offer carne asada, either in whole steaks, sliced, or chopped. You’ll likely find it either preperada, (marinated) or not, and if you get their marinade, what you’ll get can run the gamut from simple salt and oil, to quite complex mixes that rival a mole – The marinade is where the real poetic license lives with carne asada. What you create is up to you, (and we’ll provide plenty of options herein to get ya started.)
As common and as diverse as spaghetti sauce, there are dozens of popular, commercial mojo variants, let alone the tens of thousands rendered by home cooks everywhere. The Spanish word Mojo derives from the Portuguese, Molho, which simply means sauce – a clear indicator of its ubiquity.
There is general agreement that mojo originated in the Canary Islands, the archipelago off the northwest coast of Africa. Canarian cuisine is a fascinating amalgamation of the native islanders, (sadly, now largely extinct), Spanish, Portuguese, and African roots. Their cooking emphasizes freshness, simplicity, and powerful flavors, many of which derive from various mojos. Literally every Canarian family has at least two signature mojos, passed down from generation to generation.
The signature island dish, Papas Arrugadas, (wrinkly potatoes), is demonstrative of all that. Whole potatoes boiled in salt water, and served with red and green mojo – And in an interesting twist of serendipity, the potato isn’t native to the Canaries – They came from South America, of course.
Canarian Mojo with Papas Arrugadas
In its simplest form, mojo contains olive oil, chiles (pimienta in the Canaries), garlic, paprika, coriander (either fresh or seed), and cumin. As mentioned, there are two primary branches of Canarian mojo, red and green. The red, fueled by dried or fresh chiles and paprika, is most often paired with meat, while the green, made with green peppers, cilantro, or parsley, compliments fish courses.
There are many other iterations, some using local cheese, (mojo con queso), garlic, almonds, and fresh herbs – Check out that almond Mojo recipe and you’ll see what I mean about rivaling moles. One could easily spent a happy year working through all these lovely things, and one of these days, I just might.
The flow of humanity in the 16th through 19th centuries, both forced and chosen, brought mojo to Europe, then South America, the Caribbean, and eventually, North America. Mojo not only thrived, it grew in leaps and bounds. Were I forced to define a generic, accurate version that we here in the Estados Unidos are familiar with, it would certainly include chiles, citrus, garlic, oil, and vinegar – A Mexican vinaigrette, in essence.
Established Mexican, Caribbean, and South American variants also run the gamut from super simple to dizzyingly complex. What this means to the home cook is that in all honestly, you can’t go wrong – Combine stuff you love and that plays well together, and you’re in like Flynn. I’m going to offer several variants, including fairly faithful renderings of styles you’ve probably tried and liked – As I always note, use these as a springboard for personal creativity, and know that you’ll likely never do the exact same thing twice.
The real beauty of Mojo is as a last minute inspirational meal – You’ve got this, that, and the other thing in your stores, so what do you do with them? You do this.
The basics for a Mexican style mojo
NOTE ON WHAT TO MAKE: Tacos, burritos, chimis, or taco salads, with fresh pick de gallo and warm tortillas, are almost a must for your first meal if you’re marinating proteins, but keep in mind, this stuff has North African and Iberian roots, so get bold and go that direction if you feel so inspired. And you can always sauté the meat with something new, change the spicing, and make something totally different.
Carne Asada Hash, the perfect next morning leftover
NOTE ON MARINATING: Any marinade containing citrus, other acids like Vinegar, or other fruits like papaya, kiwi, pineapple, fig, or mango will break down the connective tissues in proteins as they marinate – There’s an enzyme called protease, (papain in papaya), that does the trick. That’s great for tenderizing tougher cuts, and it’s the secret as to why marginal stuff like skirt stake or flank steak can come out so tender. That said, be careful with the duration – There are a lot of recipes out there that advise marinating overnight, and that’s taking things too far – Going over 6 hours risks mushy meat, and nobody likes that texture. Marinate proteins for at least an hour, and as long as 4 or 5, and you’ll get great flavor infusion and a proper degree of tenderization.
Tacos Carne Asada
NOTE ON GRILLING: Anything you marinate in Mojo will taste best grilled. And if you can, do so with wood or charcoal, although gas works just fine too. With the thinner cuts or proteins commonly used for carne asada, you’ve got to keep an eye on things – We’re talking a 2 minute punk rock song per side, as opposed to the common, classic rock 3-4 minutes a side measure. A lot of restaurants grill carne asada to well done, but you do not need to do that. Grill to medium rare, then allow a good 5 to 10 minute rest before you carve. If you use the more rustic cuts of beef, like skirt, flank, or flap steaks, carve 90° to the grain, at a 45° angle for each slice.
NOTE ON OIL: You’ll see I call for Avocado Oil on several Mojo recipes. I like it for it’s rich, buttery feel and neutral taste, as well as its exceptional smoke point. You can certainly use Extra Virgin Olive Oil in any of these recipes, but you really owe it to yourself to try avocado oil in the near future.
First, the classic Mojo roots.
Canarian Green Mojo
1 Bundle fresh Cilantro
3/4 Cup Extra Virgin Olive Oil
1 fresh Lime
3 cloves Garlic
1 teaspoon Sea Salt
1/2 teaspoon Cumin
1/2 teaspoon Black Pepper
Rinse and dry all produce.
Remove long stems from Cilantro, discard and mince the leaves.
Peel and stem garlic, and mince.
Juice lime, and set aside.
If you’re using whole spices, add salt, pepper, and cumin to a spice grinder and pulse to an even consistency, (3 or 4 pulses should do it.)
Combine all ingredients in a non-reactive bowl and mix thoroughly. You can leave the sauce rustic, or process it with a stick blender for a smoother consistency.
Allow sauce to marry for 30 minutes prior to use. Serve with fresh crusty bread, potatoes, fish, or veggies.
Canarian Red Mojo
1 large Red Sweet Pepper
2-4 fresh hot chiles, (chef’s choice, they don’t have to be red – Jalapeño, Habanero, Serrano, and Cayenne all work)
3 cloves fresh Garlic
2-3 Tablespoons Extra Virgin Olive Oil
1 Tablespoon Cider Vinegar
1 teaspoon Sea Salt
1/2 teaspoon Cumin
Rinse all produce and pat dry.
Stem, seed, and devein the Pepper and chiles, (leave veins in chiles if you want more heat.)
Fine dice Pepper and chiles.
Mince Garlic.
Process Cumin to a powder if you’re using whole.
Combine all ingredients in a non-reactive bowl and mix thoroughly. You can leave the sauce rustic, or process it with a stick blender for a smoother consistency.
Allow sauce to marry for 30 minutes prior to use. Serve with fresh crusty bread, chicken, pork, or beef.
UrbanMonique Signature Mojo – This is a great all purpose Mojo, with a couple of our signature twists.
Prep for making mojo is simple and quick
2 small Limes
1 navel Orange
1-3 Jalapeño Chiles
1/2 bunch fresh Cilantro
1/2 Cup Avocado Oil
2 Tablespoons Live Cider Vinegar
Pinch of Sea Salt
3-4 twists fresh ground Pepper
Rinse and pat dry all produce.
Zest and juice the citrus, and reserve both.
Peel, stem, and mince the garlic.
Stem, de-seed, and devein the jalapeños, (leave the veins if you like more heat).
Remove long stems from Cilantro and mince the remainder.
Combine all ingredients in a non-reactive bowl and mix thoroughly. You can leave the sauce rustic, or process it with a stick blender for a smoother consistency.
Makes a fantastic marinade for chicken, pork, or beef. Also does great with tofu, veggies, or fish.
And finally, here are a few Mexican and South American variants.
Quick Cervesa Mojo – Great for folks that don’t like heat.
1 bottle Negra Modelo Beer
1 small lime
1 bunch Green Onions
3 cloves fresh Garlic
Pinch of Sea Salt
A few twists fresh ground Pepper
Open beer and pour into a bowl, allowing it to loose its fizz and flatten somewhat, (About 5-10 minutes)
Zest and juice lime, set both aside.
Peel, stem and mince garlic
Trim and peel green onions, then leave them whole, as trimmed.
Combine all ingredients in a non-reactive bowl and mix thoroughly. Leave the sauce rustic, do not process it.
Allow sauce to marry for 30 minutes prior to use. Makes a fantastic marinade for chicken, pork, or beef. Marinate proteins for an hour, then remove the steaks and the onions and grill both as desired. Goes great with the rest of the Negra Modelo six pack.
Taco Truck Mojo – There is no standard recipe, but this will put you in the running…
2 small Limes
2-4 hot Chiles of your choice
3 cloves fresh Garlic
1/2 Cup Avocado Oil
1 Tablespoon dark Soy Sauce
2 teaspoons Smoked Sweet Paprika
1 teaspoon Sea Salt
1/2 teaspoon Cumin
1/2 teaspoon Oregano
1/4 teaspoon Black Pepper
1/4 teaspoon White Pepper
Rinse and pat dry produce.
Zest and juice Limes, set both aside.
Stem, seed, and devein chiles, (leave veins in if you want the heat). Fine dice chiles.
Peel and stem Garlic, then mince.
Process spices to a consistent rough powder if you’re using whole.
Combine all ingredients in a non-reactive bowl. Process with a stick blender to a smooth, even consistency.
Makes a fantastic marinade for chicken, pork, or beef. Marinate proteins for at least an hour, and as many as 5 hours. Grill proteins as desired, and baste with the marinate as you’re grilling.
Garlic Papaya Mojo
1 fresh Papaya
1 small Green Bell Pepper
3-4 Green Onions
1 small fresh Lime
3 cloves Fresh Garlic
1 Tablespoon Avocado Oil
1 Tablespoon live Cider Vinegar
1/2 teaspoon Lemon Thyme
Pinch of Sea Salt
A couple twists fresh ground Pepper
Peel, seed and rough chop papaya.
Zest and juice Limes.
Stem, seed and devein green pepper, then dice.
Peel, stem green onions, then cut into 1/4″ thick rounds.
Peel, stem, and mince garlic.
Combine all ingredients in a non-reactive bowl. Process with a stick blender to a smooth, even consistency.
Makes a fantastic marinade for chicken, pork, or beef. Marinate proteins for at least an hour, and as many as 3 hours – don’t exceed that too much, as the papain enzyme in papaya is formidable stuff. Grill proteins as desired, and baste with the marinate as you’re grilling.
Before us anglos brought big love for wheat to the Americas, corn was the undisputed king of the cereals, (the grass family grains like wheat, corn, rice, millet, rye and a raft of others.) So it may surprise Norte Americanos to learn that corn still rules. While American wheat cultivation is less than 8% of world production, we grow slightly over 37% of the world’s corn – Far more than than all of South America. When it comes to cooking delicious things with corn however, (and despite our contributions of corn bread and hush puppies), Mexico and South America got it all over us for the tastiest goods – From tortillas and tamales to gorditas and pupusas, there’s a bunch of wonderful stuff down there. Today, we’ll take a look at arepas, the signature corn cake of Columbia and Venezuela.
Arepas are plump little corn cakes that might be baked, fried, grilled, steamed, or boiled. They’re eaten plain or loaded with various fillings, depending on which meal they’re accompanying – Anything from beans to eggs and shrimp. They’re an old food, certainly pre-Spanish invasion – Archeologists have found the tools used to make them all over Columbia and Venezuela. The name Arepa most likely derived from the Caracas word erepa, meaning maize (corn). Their antiquity and tastiness makes them vitally important to the cuisines of both countries, and there’s serious rivalry as to where they might have originated. It’s a sad fact that, for the last few years, Venezuelans have been largely denied this staple of their diet due to the country’s serious economic woes.
Ridiculously simple in ingredients and construction, arepas are nothing more than corn flour, salt, a little oil, and water, mixed by hand and then cooked – That’s it. The only caveat is the kind of corn flour used. Trust me when I tell you that corn meal or plain old masa will not work. What you need is called masarepa, (or masa de arepa, harina precocida, or masa al instante). This is precooked corn flour, meant to make a delicious handful of regional dishes like arepas, hallacas, bollos, tamales, empanadas and chicha. As such, you’ll find it predominantly from makers in Columbia and Venezuela. Think of it like Wondra flour and you get the picture.
Traditional arepa flour was prepared by lengthy soaking of dried corn. The resulting mash was then pounded to remove the germ and shell. That stuff was subsequently boiled, ground finer, and made into arepas. The one major change in arepa making in the modern age is the industrialization of that whole process, (thank the Corn Gods). Masarepa is what you absolutely need to make these guys, and it’s widely available from your local Latin food store, or online. The brands Harina PAN, Goya, and Harina Juana all come from Venezuela, and Areparina from Columbia. Arepas are freakin’ seriously delicious, and the flour is not pricy – You’ll want this stuff in your pantry.
As mentioned, there are a bunch of ways these guys are made, but I’ll steer you to a dual process of frying and baking that’ll give you delicious, consistent results with a minimum of fuss. As you’ll see, the entire construction process is done by hand, as it’s always been done, and should be.
Quite a few online recipes recommend mixing white and yellow masarepa, which folks seem to feel provides a lighter texture and a more pleasant taste profile, but frankly, I’m not buying the claims – It appears almost all that sentiment stems from one restaurant that makes great deep fried arepas and shared their recipe – I don’t deep fry, and I like yellow just fine, so that’s what I use – you do what floats your boat. Our recipe isn’t really Venezuelan or Columbian, (although it leans toward the latter, which in general has far less fat than the former), but it will make a tasty arepa simply and quickly. You can research the traditional methods of each country on your own and explore later.
Arepas de UrbanMonique – Makes 6-8
2 Cups Water (warm to the touch, about 90° F)
2 Cups Yellow Masarepa
3 Tablespoons Avocado Oil
1 packed teaspoon Salt
Preheat oven to 450° F and set a rack in the middle position. Make sure your oven is fully preheated before you load arepas into it.
Line a baking sheet with parchment or a silicone baking mat.
In a large mixing bowl, combine the water, oil, and salt, and whisk to thoroughly dissolve the salt.
Add about 1/8 cup of masarepa to the salt and water and stir it in by hand – You’ll clearly feel the masarepa incorporate.
Continue gradually adding masarepa and kneading – When you get to roughly half way, the dough will morph from very liquid to something more substantial – this is when you want to slow down and allow the masarepa to fully absorb water. Continue until you’ve got almost or all the masarepa in the mix – you want a dough that feels quite moist, almost wet, but is easy to work with and will not stick to your bare hands. If your dough feels dry, add a little water and work it into the mix – And vice versa for adding more masarepa if it’s too wet. When the dough is right, it should not feel grainy, and it will ball up nicely.
Once you’ve reached that consistency, cover the bowl with a clean, dry kitchen towel and let it rest for 5 minutes.
Heat a cast iron skillet over medium high heat, with 2 ounces or so of avocado oil therein.
After the rest, grab a handful of dough and roll it into a ball, then use your palms to form it into a patty roughly 1/2” and about 4” in diameter. Keep forming arepas until you’re out of dough.
When the skillet and oil are heated, add two or three arepas and fry them until they form a nice, golden crust – About 3 to 4 minutes per side.
Set the fried arepas on the lined baking sheet and slide them into the oven.
Bake for 12 – 15 minutes, until the arepas have risen slightly, and are a bit darker. When you think they’re done, slide the rack out and tap one in the center – If they sound kind of hollow, they’re done – I set my timer for 10 minutes to check, then let them go a bit longer as needed.
Transfer arepas to a cooling rack and let them rest for 10-15 minutes before slicing and going wild.
Almost anything is fair game for toppings, making arepas great for clearing out the fridge – Scrambled eggs, diced ham, pork, chicken, beans, cheese, tomato, onion, chiles, avocado, whatever floats your boat. For vegetarian and vegan folk, jack fruit done up with taco seasoning makes a killer meat substitute. that said, try one hot, with nothing at all, or maybe just a little butter. There’s a pure corn taste, a very satisfying chew, that really hits home.
If you have a good Latin market nearby, look for queso guayanes, paisa, or duro – If those aren’t available, queso cotija or fresco will work just fine.
If you want to prepare arepas and cook them later, they can hang in the fridge for a day or two and be OK – More than that and they’ll dry out. They can be frozen, uncooked, for up to 3 months as well.
Just got home from a brief biz trip to New Orleans. It was in the 70s and 80s, mostly sunny, humidity not too bad. And here, well… Let’s just say that the Great Pacific Northwet is living up to its name – It’s 44° F, raining heavily, and the next week’s forecast is for more of the same. As M headed for work, she gave me the lowdown, “There’s crack ham in the fridge, (AKA, honey baked – She worked there for a time back when, and she’s right – it is), so if you want to make split pea soup, go for it.” I do, and I am, but this kinda weather calls for serious comfort food reinforcements – In this case, Pão de Queijo – Brazilian cheese bread.
Our Split Pea soup
How I ended up here is lovely serendipity. I planned on making either biscuits or corn bread, but was plowing through some social media food groups I belong to, and in of all places, my favorite Vietnamese cooking group, somebody mentioned having made Brazilian cheese bread. One of the many reasons I love this group is that stuff like this shows up all the time – They’re incredibly talented Vietnamese cooks, but fearless and curious in any and every other cuisine that floats their boats. I was introduced to Pão de Queijo years ago at a churascaria down in Texas, and hadn’t thought of or made them in quite a while, so this was a pleasant reminder.
Pão de Queijo is part of a truly delicious branch of cheese breads fueled by cassava (AKA yuca) flour, rather than wheat. As we outlined pretty thoroughly in our post about Guarani Cuñapes, cassava is a dominant starch down south, and for good reason – It’s abundant, works well in place of wheat flour, and tastes great – For gluten intolerant folks, it’s a champ.
Påo de Quiejo – Brazilian Cheese Bread
The Pão variant differs from Cuñapes in recipe and construction. While they’re similar, the texture and flavored each is unique, so it’s genuinely worth adding both to your arsenal. To me, the pão de queijo is denser and chewier than a cuñape – More like Yorkshire pudding, for my mind. Best of all, they’re super easy to make – Maybe thirty minutes from start to finish, so they lend themselves to last minute inspiration, as any good side should.
I’ll share the simplest method of many for making these little gems. Like all signature foods, everybody’s Mom makes them, and their way is always best, naturally. Some folks use potato starch in lieu of yuca, and you can get very nice results that way. I’ve also seen these done up with the French pâte a choux method – They were delicious indeed, but really, those are gougères rather than pão de queijo. The method I’ll share is far less fussy and time consuming than that, especially in light of the cassava flour – That stuff behaves quite differently when employing the pâte method, and can be a handful if you’re not ready for it – It’s extremely fine, almost powdery, and when mixed with liquids, its, well, seriously glutinous stuff. Truth be told, my Brazilian cooking pals tell me that what I’ll share with y’all is the way they do it most of the time, because it strikes a perfect balance between taste, texture, and ease of preparation.
Påo de Quiejo – It’s a glutinous batter, even if it’s gluten free
Finally, we must discuss cheese as well, sim? Down south, the traditional choice is either a quiejo de Canastra, or a quiejo de Minas. Canastra is a yellowish, cows milk cheese, fairly soft when it’s fresh and ripening to semi-hard. It has a buttery base flavor with a nice acidic tang – Very much like high quality Monterey Jack. Quiejo de Minas is also a cows milk cheese. When fresh, (Minas Frescal), it’s soft and very subtle, like a queso blanco, and lends itself well to adding fresh herbs into the mix. Once it’s aged into a Minas Curado, it’s a whole ‘nother world – rich and subtle like a good Asiago. While the vast majority of pão de quiejo recipes you find use Parmesan, for my two cents worth, a good Jack or Asiago will fit the bill much better, in both authenticity and flavor. Down the line, you can and should experiment not only with cheese, but with herbs as well. Cilantro, fennel, spring onion, parsley, and dried chiles are all delicious and opções muito autênticas, (very authentic options).
This recipe is fairly large, for good reason. The batter is stable and stores well, so you can use half tonight, refrigerate the rest, and it’ll be good for a week or so in a clean, airtight container. If you prefer to let ‘er rip, you can make the whole shebang and refrigerate or freeze whatever you don’t eat right away, (but be forewarned – They’re addictive little beasties, and you’ll easily be tricked into chowing down.) The recipe will make about 16 muffins.
NOTES: It’s best to have your milk and eggs at or near room temperature, so plan ahead accordingly. You’ll also need a muffin pan or two – They come in various sizes, but you’ll fare much better with ‘mini’ sizes, (muffin or loaf), as these guys will come out very dense indeed if you use regular size pans.
Påo de Quiejo – Brazilian Cheese Bread
Påo de Quiejo, Brazilian Cheese Bread
3 Cups Cassava Flour
1 well packed Cup Monterey Jack or Asiago Cheese
1 1/2 Cups Whole Milk
1/2 Cup Avocado Oil
2 Eggs
2 teaspoons Sea Salt
Set a rack into a middle position and preheat your oven to 400° F.
Wet a paper towel with avocado oil and lightly wipe the insides of each muffin cup.
Add all ingredients to a blender or processor vessel, (either truly works fine, so use what you’re most comfortable with.)
Pulse the batter until it’s smooth and consistent, scraping batter down into the mix as needed. Allow plenty of mixing time, until you’ve got a consistent smooth batter – This also allows some air to get integrated into the mix, which is important for helping these unleavened breads rise.
Fill muffin cups to roughly 1/4” from the top.
Bake, undisturbed for about 20 minutes, until the muffin tops have visibly risen and are light golden brown. There’s no leavening agent, so steam plays a roll here – Opening the oven will screw with that, so don’t!
Påo de Quiejo – Perfect accompaniment to soups and stews
Remove muffins from oven and set on a wire rack to cool for 5 minutes, then chow down.
I have a favorite kitchen mantra that goes like this – Simple is always good, but not always easy. The implications are rife in that phrase – Simple is always good, but our inclinations sometimes work against it. And then as stated, simple just isn’t always easy, in fact sometimes it’s deceptively hard. Yet when we bow to the sublime, amazing things can happen. Salt potatoes are such a thing. Chances are you’ve never had them, and if you have, you’ve been given an origin story for the dish. It’s safe bet they’re far older than you were lead to believe, and more widely travelled to boot.
There are over 5000 potato varieties world wide
The potato, (most often Solanum tuberosum), is another gift from the Andes, specifically southern Peru and northwest Bolivia, where it was first domesticated somewhere around 8000 to 5000 BC – Yes, that means roughly 7000 to 10,000 years ago. Brought to Europe in the mid 1500s by, (yup, you guessed it), those marauding Spaniards, the spud is now cultivated worldwide, though of the roughly 5,000 varieties known around the globe, over 3,000 are still found in the Andes – Think about that the next time you’re picking between russet, gold, or reds at the store. If ever there was a crop begging to be expanded in your garden, this is it.
Initially, Europe wasn’t crazy about the potato, especially, and maybe most strangely, in the northern climes where potatoes do quite well. Part of the reticence may lie in their Solanaceae family roots, which includes some pretty dangerous plants, (and the leaves and green skins of potatoes exposed to light.) Over time, the nutritional punch made its way through the naysayers, and by the 1800s, potatoes were in heavy cultivation throughout most of Europe. A raw potato is 80% water, followed by 16% carbs, and about 4% protein, and are rich in vitamin B and C. While cooking degrades some of the nutrient value, they’re still a relatively good bang for the buck, which is why they’re the worlds forth largest food crop – And over 68% of those grown are eaten directly by humans, to the tune of an average of 72 pounds annually. These days, over 37% of world production happens in China and India.
And of all the myriad ways to cook a potato, who’d have thought to just boil them in brine? Turns out, pretty much everybody, although some lay heavier claims than others. Look up salt potatoes, and in this country, most of what you’ll find will claim that they were invented in Syracuse, New York. Now, that’s simply not true, but there is a reason that one of these far flung claims resides there – Syracuse was a major salt production and shipping center in the 19th century.
Syracuse New York, the American Venice.
In the fall of 1825, the last section of the Erie Canal was completed. Running east to west, the Erie connected to the north-south running Oswego canal at a little town called Syracuse. With canals running right through town, Syracuse picked up the moniker as the American Venice. The Erie Canal had been built to move Onondaga Salt to New York City and the world, and for a while, it worked really well. As fate would have it, bunch of those old Salt workers were Irish, and they truly loved their potatoes, and regularly cooked those and corn in brine, but they didn’t invent the dish.
Papas Saladas – Andean Magic
Who did remains shrouded in mystery, but it’s a good guess it started down in South America. There, among many local versions, you’ll find papas saladas, that hail from, of course, another salt mining town. In the Canary Islands, they’re papas arrugadas, (which we mentioned in our Mojo post), and in the Guérande salt producing region of France, they’re patate cuit au sel. And of course there’s many more – Chances are very good you’ll find a version in every country, and many will claim origination – imitation is the sincerest form of flattery, right?
Papas Arrugadas – Canary Island Magic
If you’ve never tried salt potatoes, trust me when I tell you it’s time. They’re a perfect summer accompaniment to grilled meats and veggies, and they’re delicious enough to stand alone. While the method and ingredients couldn’t be simpler, there is a bit of slightly complex chemistry going on under the hood of this one.
Right off hand, it’s not outrageous to question how good a potato boiled in brine will taste. The assumption is that way too much salt will get into that spud, making for an unpleasant, out of balance experience. Fortunately, that’s not what happens. Here’s the magic – One, cooking in a brine solution raises the boiling point higher than plain old water, (just as it lowers the freezing point when making ice cream), and two, the thin salt crust that forms on the spuds acts as a barrier, keep excess salt and water out. As a result, the potatoes effectively steam in their own skins, and you only end up with that thin layer of crystallized salt on the outside of the skins. That leads to an amazingly fluffy spud with a super tasty skin, just right for dipping in melted butter, gribiche, mojo, sauce diable, or chimichurri. As I mentioned, they’re stunningly good, good enough to eat as a meal, with little bowls of this and that to add as you please.
There are slightly different cooking methods around the globe – Some boil in brine and drain, (The Syracuse method), others boil the brine completely away with the spuds still in the pan, (I prefer the latter method.) They’re all worth trying, but this one will set you well for your first endeavor. As with all simple dishes, quality and freshness count – Freshly dug, local spuds from a farmers market deserve this dish – Old, soft, mealy, bulk spuds do not. Same goes for salt – This is the time to use something good – Sel de mere, Bolivian Sunrise, Himalayan pink, or Maldon – Whatever the unique signature the salt bears will play out beautifully. All salts do not have equal volume so you’ll be best served by weighing it out.
Perfect Salt Potatoes
Salt Crusted Potatoes
1 Pound fresh new or fingerling potatoes, (You want something in the 1″ to 2″ range, and pretty uniform in size)
1 Ounce really good Salt.
In a heavy sauce pan over high heat, add potatoes, salt, and just enough water to cover the spuds.
Once you reach a boil, reduce heat to maintain a steady simmer. Cook potatoes until fork tender, about 20 minutes.
Pour off all but about a half inch of water. Put the pot back on the burner and turn heat to high.
Use a wooden spoon to roll spuds through the remaining brine as it begins to boil off. You’ll see the salt crystalizing on your spuds as this occurs – It’ll take a few minutes for the brine to disappear.
Continue gently rolling the spuds in the dry pan for another couple of minutes, until the salt crust evenly coats each potato and the skins start to get slinky wrinkly.
Remove from heat to a serving bowl and serve promptly.
Raspberry Pico de Gallo – A slice of Heaven in a bowl
Open your fridge and look at the door side – Chances are good that what you’ll see there are condiments – in ours, you find mustards, relish, horseradish, harissa, ketchup, mayo, sriracha, and of course, salsa. Those last three illustrate big changes in what folks in this country like and buy most of, in the ever-changing condiment world. In 2011, mayo was King. By 2014, salsa had surpassed all, (for the second time – More on that later), and as of last year, sriracha topped regular old salsa for the win. Interesting, is it not? Think about it and it makes great sense. Sure, the old standbys still star on sandwiches, and as constituents in sauces, salads, and the like – but salsa can do much more than any of those, and, well, sriracha is good with damn near anything.
Of course, salsa is still king, because sriracha is, after all, exactly that – Salsa, and not very different from the predominantly Mexican varieties we’re used to here. I say varieties, but truth be told, us folks up here in El Norte are far from well schooled in the stunning pantheon that is Mexican salsa – And that’s just speaking of Mexico, let alone the rest of Central and South America. Trust me when I tell you that you’re really missing something spectacular if that’s the case for you. Today, we’re out to fix that.
I’ll provide links to several recipes that you’ll find here, and add a few new ones as well. The rest of this is kind of a primer, designed to hopefully show you something new, pique your interest, and get you digging for a variation you can call your own. You’ll also notice I’m not going to describe a whole lot of parings, and that’s done on purpose – What you like salsa on – what kind on what things – That’s your gig, and discovering for yourself is a hell of a lot more fun than reading what I think you should eat, yeah?
Many Americanos assume that the term salsa is purely Mexican, but it’s definitively not. Salsa means ‘sauce’ in Spanish, Italian, and Greek. The term derives from the Latin word ‘salsus’, meaning salted. I think it’s an interesting fact that, while touched with sweet, heat, herbs, and spices, it’s still that salty, savory bass note that defines the salsa rhythm section. Of course, sauces didn’t start out that way anywhere that lacked tomatoes – That makes the salsa we’re used to a true native of Mexico, Central, and South America. It wasn’t until the Spaniards caused all their mayhem in the new world that the tomato made its way over to Europe, and then basically conquered the world.
Salsa began with the Aztec, Inca, and Mayan peoples. The Spanish were intrigued, and termed the piquant blend of tomatoes, chiles, herbs, and spices ‘salsa’ as far back as the late 16th century – Then they took it back home with them. While those three legendary civilizations largely didn’t survive, their salsas did, and continue to flourish throughout the Americas. It’s these Mexican staples that largely flavor things up here in the north.
One version of the stuff, ubiquitously known as ‘hot sauce,’ ( Basically chiles, vinegar, and salt, AKA, what’s in sriracha), caught on quite early here in America – Maybe earlier than you’re aware of – That’s particularly interesting in light of the fact that, by the mid 20th century, a fair number of those chiles and brands were very hard to find, having been driving out by post WWII food homogeneity. Yet the first bottled hot sauce, powered by cayenne chiles, was offered for sale in Massachusetts, back in 1807. In 1849, Louisiana banker Colonel Maunsell White planted the first crop of Tabasco chiles north of the border – Ten years later, Maunsell marketed the first bottles of ‘Tobasco’ chile Sauce, and Edmund McIlhenny plants some seeds obtained from Maunsell on his property – Avery Island, Louisiana. In 1868, McIlhenny poured his aged sauce into used cologne bottles and sent it out as samples, resulting in thousands of orders. By the 1860s, you could buy bird chile powered sauce in New York City. By 1898, a former McIlhenny employee started up B. F. Trappey & Sons, and another legendary sauce was born.
¡Salsa Espectacular!
In 1917, Henry Tanklage introduced La Victoria Salsa Brava, a traditional Mexican style salsa still in production today. La Victoria’s red, green, and enchilada sauces, along with Old El Paso, (which was formed in 1917, but didn’t start making Tex-Mex stuff until 1969), are the stuff that introduced generations of gringos to Mexica and Tex Mex cooking. It’s reasonable to say that the full circle of originators can be closed with David and Margaret Pace’s introduction of his namesake salsa in 1947. Pace noted that, “In ’47, my sauce bottles exploded all over the grocery shelves because I couldn’t get the darned formula right.” Those were simpler time, without a doubt. By the mid 1980s, the salsa craze was in full swing, and by the early ’90’s, salsa outsold all other condiments for the first time.
Salsa, as most of us know it, is a play on Salsa Roja, a tomato based, cooked salsa, usually containing onion and chile, with hints of garlic and cilantro. It’s what you get when you sit down at damn near any Mex joint in the U.S. As simple as it is, the range of quality and taste is huge. I argue that you can reliably learn much about the restaurant you’re about to patronize by how good that first dish of salsa is – If it’s inspired – nuanced, with obvious care given to balance and the overall flavor palette, you’re about to eat good food. If it’s dull, lifeless, tastes old or made from crappy ingredients, well… I’ve been known to get up and go elsewhere. The lions share of American store bought salsa is salsa roja, regardless of how schmancy it may sound. Other popular roja derivatives include ranchera, taqueria, and brava. Many, many derivations on this theme have been made and are sold, most of which feature various levels of heat, (from mild to truly stupid), roasting of the constituents, or exotic additions. Those are all great, but if you find something you like, what’s far greater is for you to dissect that recipe and make one of your own – That’s what the folks who sell that stuff did, so why shouldn’t you?
Pico de Gallo – Delicious, whatever the root of the name
Probably the next most well known version is Pico de Gallo, which literally translates to ‘rooster’s beak.’ There are competing tales for the origin of the name, from the fact that serrano chiles kinda look like a birds beak, to the ‘chicken feed’ consistency of well made Pico, to the early propensity to eat it by grabbing a pinch between dialing finger and thumb – You get to decide on that one… Pico is a Salsa Cruda, raw salsas that need nor want cooking. From a straight mix of tomato, onion, chile, and cilantro, to blends made with corn, fruit, seeds, nuts, or more exotic veggies, they’re a delight and a must make. Our raspberry Pico is stunningly good, and illustrates why you see some kind of acid in most of them – Be it citrus, mango, berries, or a splash of vinegar, that slightly sweet counterpunch and bite makes amazing things happen.
Salsa Verde, is, of course, green. Verdes are usually cooked sauces made with tomatillos, that pre-Colombian Nightshade relative native to pretty much everywhere in the Americas except the far north. Tomatillos have a bunch of pectin, so they gel up nicely and form a rich Sauce that sticks to what you put it on. Mixed with chiles, onion, garlic, and cilantro, they have a sublime, early flavor that goes well with many things.
Salsa Ranchera is a roasted red sauce made from tomatoes, chiles, and a spice blend. It’s typically blended to a smooth consistency and served warm. If you’re making huevos rancheros, it’s a must have.
Salsa Negra
Salsa Negra is not well know up here, but it should be. A combination of chiles, garlic, spices, and oil, it’s pungent and delightful, more like a Mexican style harissa or sambal than a salsa roja, and is much more potent. See our recipe below.
Farther south, there are many iconic salsas, some of which we’ve covered, and some you need to check out.
Chimichurri, that delightfully pungent mix of parsley, onion, garlic, and chiles in oil and vinegar, is the most popular thing in Argentina and Uruguay, and for good reason. Here’s a recipe for you to try.
Salsa de Lazano – Costa Rican gold
In Costa Rica, the ubiquitous table condiment is Salsa Lizano, a smooth, delicate brown sauce that is, frankly, highly addictive. There’s a recipe below.
In Peru, the go to is Peri Peri. Its more like harissa than most South American salsas, mainly because the most fiery and traditional version is powered by African birds eye chiles, which truly do pack a wallop. You can make it with less incendiary stuff, and many folks down there do. Recipe down below for you.
And then, from the Caribbean, Cuba, and the Yucatán, there’s mojo, the heavenly marinade that powers great carne asada – You’ll find that over on this page.
So, there you have it, a salsa map to go wild with. Tonight, I’m gonna do pork tenderloin tacos, with two fresh picos, one corn, one berry – What are you making?
Carrot Salsa
1 Pineapple
1 large Carrot
1/2 small Sweet Onion
1-2 Jalapeño Chiles
1/4 small Red Bell Pepper
5-6 sprigs fresh Cilantro
1/2 fresh small Lemon
1 teaspoon Lemon Thyme
Sea Salt and fresh ground Pepper to taste
Peel, core, trim pineapple, and dice 2 Cups.
Peel, trim and grate 2/3 Cup of the carrot.
Peel, trim and fine dice the onion and pepper.
Trim, devein and de-seed the Jalapeño, (or leave all that if you like the heat, and you can always use hotter chiles – I should write this into every recipe, just for David Berkowitz – The DB Rule ?)
Mince the Cilantro.
Throw all that into a non-reactive mixing bowl. Add the lemon thyme, lemon juice, and zest. Season lightly with Salt and Pepper.
Refrigerate covered for at least an hour, then remove, remix and taste – Adjust seasoning as needed.
Salsa Negra
EThis stuff was born to power rice and beans, as far as I’m concerned, but it’s incredible on a whole lot more than that – Put this on roasted Brussels sprouts and suddenly, you live Brussels sprouts…
8-10 cloves Black Garlic (Readily available at many Asian groceries and online, this aged Garlic is more intense, sweeter, and notably darker, hence the name – It is basically slowly caramelized over a long period of time, and it’s amazing. If you don’t have that and the jones hits you, see below)
8-10 cloves fresh Garlic
2-4 fresh Chiles, (Guajillo, Serrano, or Árbol if you can get them, if not, use 1 ounce of guajillo and árbol each, reconstituted)
3/4 Cup Avocado Oil
1 Tablespoon distilled White Vinegar
1 Tablespoon Agave Nectar
1 teaspoon Cumin seed.
Sea Salt
* If you don’t have black garlic, in a heavy sauté pan over medium heat, add a couple Tablespoons of avocado oil and allow to heat through. Stem and peel a whole head of garlic, and slice big cloves in half. Pack a nice, solid layer of garlic onto the pan and reduce heat to medium low. Keep an eye on things and stir occasionally. Let the garlic cook until it’s deeply browned, aromatic, and soft, then use that for the recipe.
Peel, trim and mince black and fresh garlic.
Stem, seed, and devein chiles, (Or apply the DB rule)
Pulse the Cumin seed in a spice grinder until their roughly broken up, but not powdered.
In a heavy sauce pan over medium heat, add the oil and allow to heat through. Add the chiles and cook for 5 to 7 minutes, until the chiles start to brown and and are quite fragrant.
Remove from heat and pour into a non-reactive jar or bowl. Add the garlic, vinegar, agave, cumin, and a teaspoon of salt. Mix well, then allow to cool, covered, to room temperature.
Will last for a couple of weeks in clean glass, refrigerated.
Salsa Lizano
1 1/2 Cups Vegetable Broth
1-2 Chiles, (Guajillo or Serrano are both good)
1/2 small Sweet Onion
2-3 Baby Carrots
1 Tablespoon Agave Nectar
1/2 fresh Lemon
1 Tablespoon distilled White Vinegar
2 teaspoons Blackstrap Molasses
2 teaspoons pickling Salt
1/2 teaspoon ground Cumin
Peel, trim, and fine dice carrot and onion.
Stem chiles, cut in half, then devein and deseed.
In a heavy skillet over medium high heat, add the chiles and pan roast for 3-5 minutes until they start to blister and get quite fragrant.
Add the veggie broth, onion, and carrot. Allow to heat through until it simmers, then reduce heat to medium low and simmer for about 5 minutes. Remove from heat and allow to cool for a few more minutes.
Zest lemon half.
Strain the cooked veggies, reserving the broth. Add veggies to a large mixing bowl.
Add Agave Nectar, vinegar, lemon juice and zest, molasses, cumin, and salt to the mix.
Add 1 cup of the reserved broth to the bowl.
Process with a stick blender, (use your regular blender if, gods forbid, you don’t have a stick). Blend to a smooth, even consistency. If you want super smooth, run the processed sauce through a single mesh strainer, otherwise just leave it rustic.
It’ll last a good two weeks in clean glass, refrigerated.
Peri Peri Sauce – Peruvian Rocket Fuel
1/2 Cup African Birds Eye Chiles, ( árbol, birds beak, cherry, or red serranos will work fine too)
1 Red Onion
8 cloves Garlic
2 small Tomatoes
1 small Red Bell Pepper
1 large Lemon
3 Tablespoons Cider Vinegar
2-3 Tablespoons Avocado Oil
1 Tablespoon Agave Nectar
2 teaspoons Smoked Paprika
2 teaspoons Sea Salt
1 teaspoon Mexican Oregano
1/2 teaspoon ground Black Pepper
2 Bay Leaves, (Turkish or California, as you prefer)
Place whole chiles, onion, bell Pepper, chiles, and peeled garlic on a rimmed baking sheet under a high broiler. Broil for 2-3 minutes, until veggies start to blister, then turn – Repeat until all sides are done, remove from heat. Once the veggies are cool enough to handle,
Stem, seed, and devein chiles and bell pepper, mince garlic, fine dice onion, chiles, and pepper.
Set up to blanch tomatoes- One pot of boiling water, with an ice water bath next to that. Pop the tomatoes in for about 30-45 seconds, then remove with a slotted spoon and immerse them fully into the ice water bath until fully cooled.
Remove tomatoes, peel of skins, and rough chop.
Zest and quarter the lemon.
In a heavy sauce pan over medium heat, add all prepped veggies, agave nectar, paprika, salt, pepper, oregano, and bay leaves. Mix well, bring to a simmer, then reduce heat to just maintain that, and cook for 25-30 minutes.
Remove from heat and allow to cool for about 10 minutes.
Add cooked ingredients to a blender vessel, then add lemon juice, and vinegar, then process blender until the sauce is nice and smooth.
Finally, while processing add a slow drizzle of oil, allowing the sauce to take it up at its preferred rate.
You may run it though a single mesh strainer, or leave it rustic.
It’ll last a good week refrigerated in clean glass.