Ever made your own enchiladas, including the sauce? If not, it’s quite easy and a great opportunity to make something you love exactly as you love it. I made these for my Minnesota tribe and got some requests to share, so here we go.
Now, while the word ‘authentic’ gets tossed around way too much, there’s usually no tomato at all in what can arguably be called authentic enchilada sauce. The tomatoey version is a Tex-Mex thing – doesn’t mean that’s bad, just that it’s done to please the Gringo palate. Seriously though – either way is fine if that’s what you dig, but you really should try a tomato-free version if you’ve not done so yet.
That said, frying enchiladas before they’re finished in the oven is done to avoid the dreaded SES – Soggy Enchilada Syndrome – That’s a thing you don’t want in your kitchen. Happily, you can achieve the same thing in the oven and still end up with top notch enchiladas.
You’ve probably noticed that when you cut into a great enchilada at your favorite restaurant, there isn’t much of anything inside other than meat and maybe cheese – that too is done to avoid SES. When you’re building this dish, leave the vegetables in the salsa or the pico de gallo, and keep the enchiladas simple.
You can fill enchiladas with anything you want – from chicken, beef, or pork, to shrimp, fish, extra firm tofu, crunchy veggies, or fresh heirloom potatoes. Just make sure whatever you stuff with isn’t wet.
You can make the sauce with any number of dried chiles, either whole or ground. Ground chiles can make the sauce a bit grainier than whole dried, but if you give them enough time working in the roux, you’ll overcome that, and they’re much faster to prep.
Use whatever chiles you like best – Guajillos have great flavor and not much heat, chipotles have a nice smoky note and medium heat, arbols have great flavor and plenty of punch, and anchos and negros both add nice complex flavors without too much heat. If you use whole dried, soak them in boiling water for 15-20 minutes, remove the seeds and stems, and either mince or blend as you see fit. You’ll likely want to strain the results to keep things smooth, but you can go rustic too.
Urban’s Chicken Enchiladas with Red Enchilada Sauce
For the Enchiladas
1 pound Chicken – Breasts are super easy, thighs are more flavorful.
1-2 Cups Shredded Cheese – Queso Asodero or Oaxaca for authenticity, Jack is a fine sub.
6 Flour or Corn Tortillas – 7” to 9” work best for a standard 8”x8” or 9”x9” baking pan.
For the Sauce
2 Cups Chicken or Veggie Stock
3 Tablespoons Dried Chiles
1 Tablespoon Smoked Paprika
1 teaspoon Cumin
1 teaspoon Mexican Oregano
1/2 teaspoon granulated Garlic
2 Tablespoons AP Flour
1 Tablespoon Butter
1 Tablespoon Avocado Oil – Any neutral oil will sub fine
Salt and Pepper to taste
Portion chicken into roughly 1/2” chunks.
Grate cheese.
Combine chiles, paprika, cumin, oregano, and garlic and mix well.
In a heavy skillet over medium heat, add a tablespoon of oil and heat through.
Add the chicken and sauté until all visible rawness is gone from the chicken, about 3-5 minutes.
Remove chicken from heat and let cool.
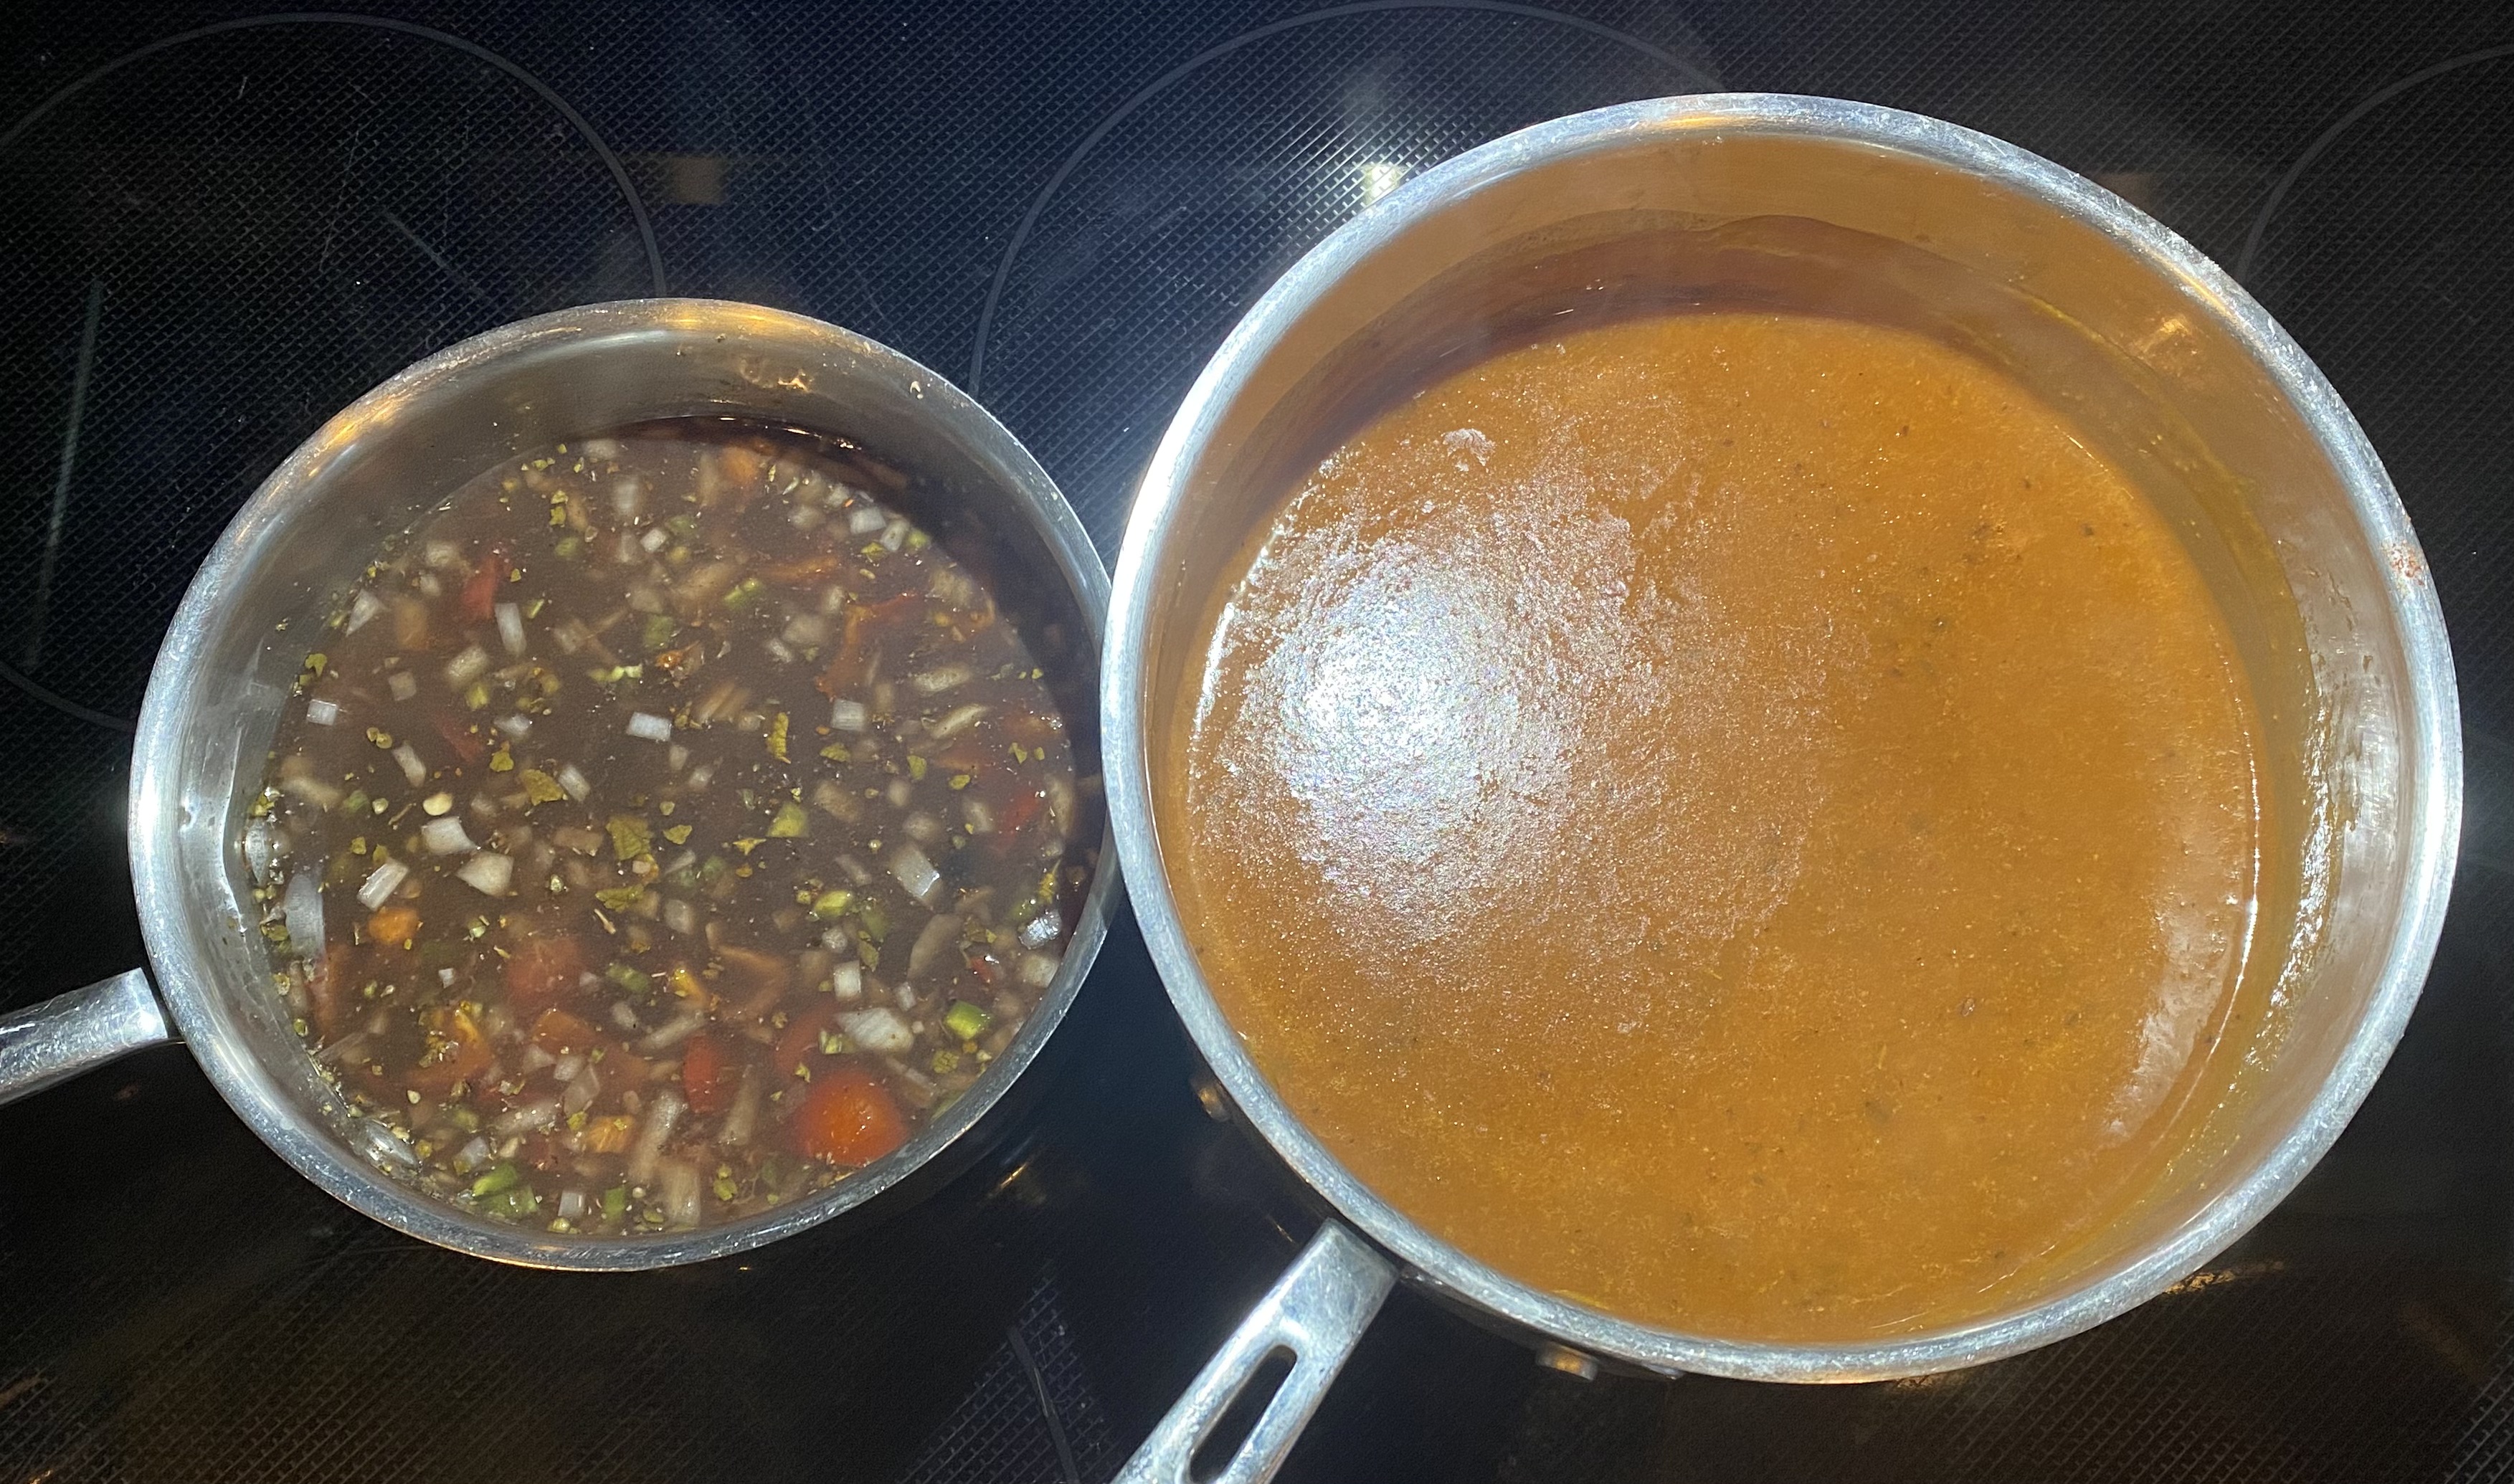
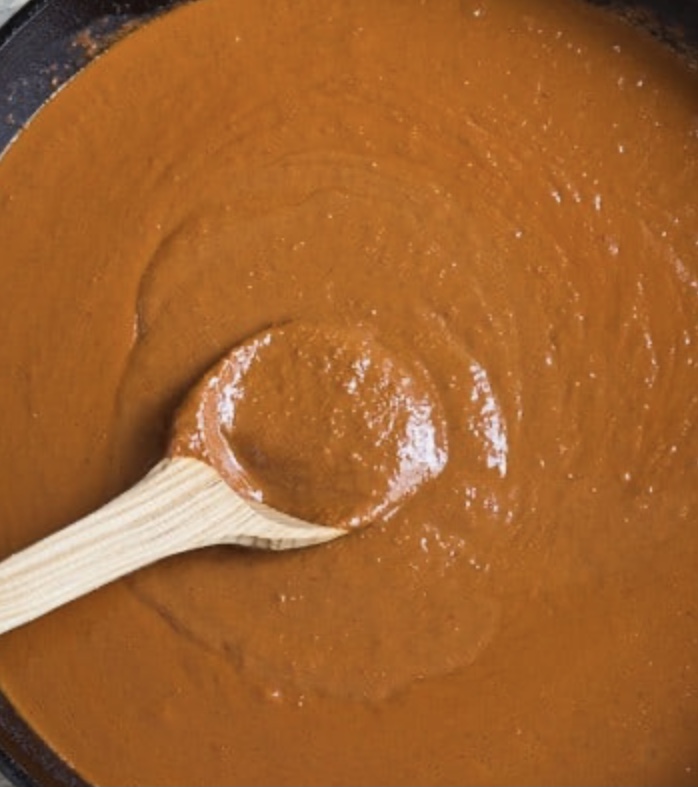
In a heavy pot over medium-low heat, add the oil, butter and flour and whisk with a fork to incorporate.
Allow the roux to heat through, about 2 minutes.
Add the chile blend and whisk into the roux thoroughly.
Let the sauce base cook for 2-3 minutes, whisking constantly, (As in, don’t walk away…)
Gradually add stock, about a quarter cup at a time, gently but thoroughly whisking each time to let the sauce stretch without breaking the roux. Things will look like real dirty mashed potatoes until you get to around 1 cup of stock – that’s what you’re after, so be patient. Allow the sauce to return to full heat before adding each additional dose of stock.
Turn heat to low and allow sauce to barely simmer for 10-15 minutes, until it has thickened a bit.
Taste and add salt and pepper as desired.
Turn the heat off and leave the sauce on the stovetop.
Preheat oven to 325° F and set a rack in the middle slot.
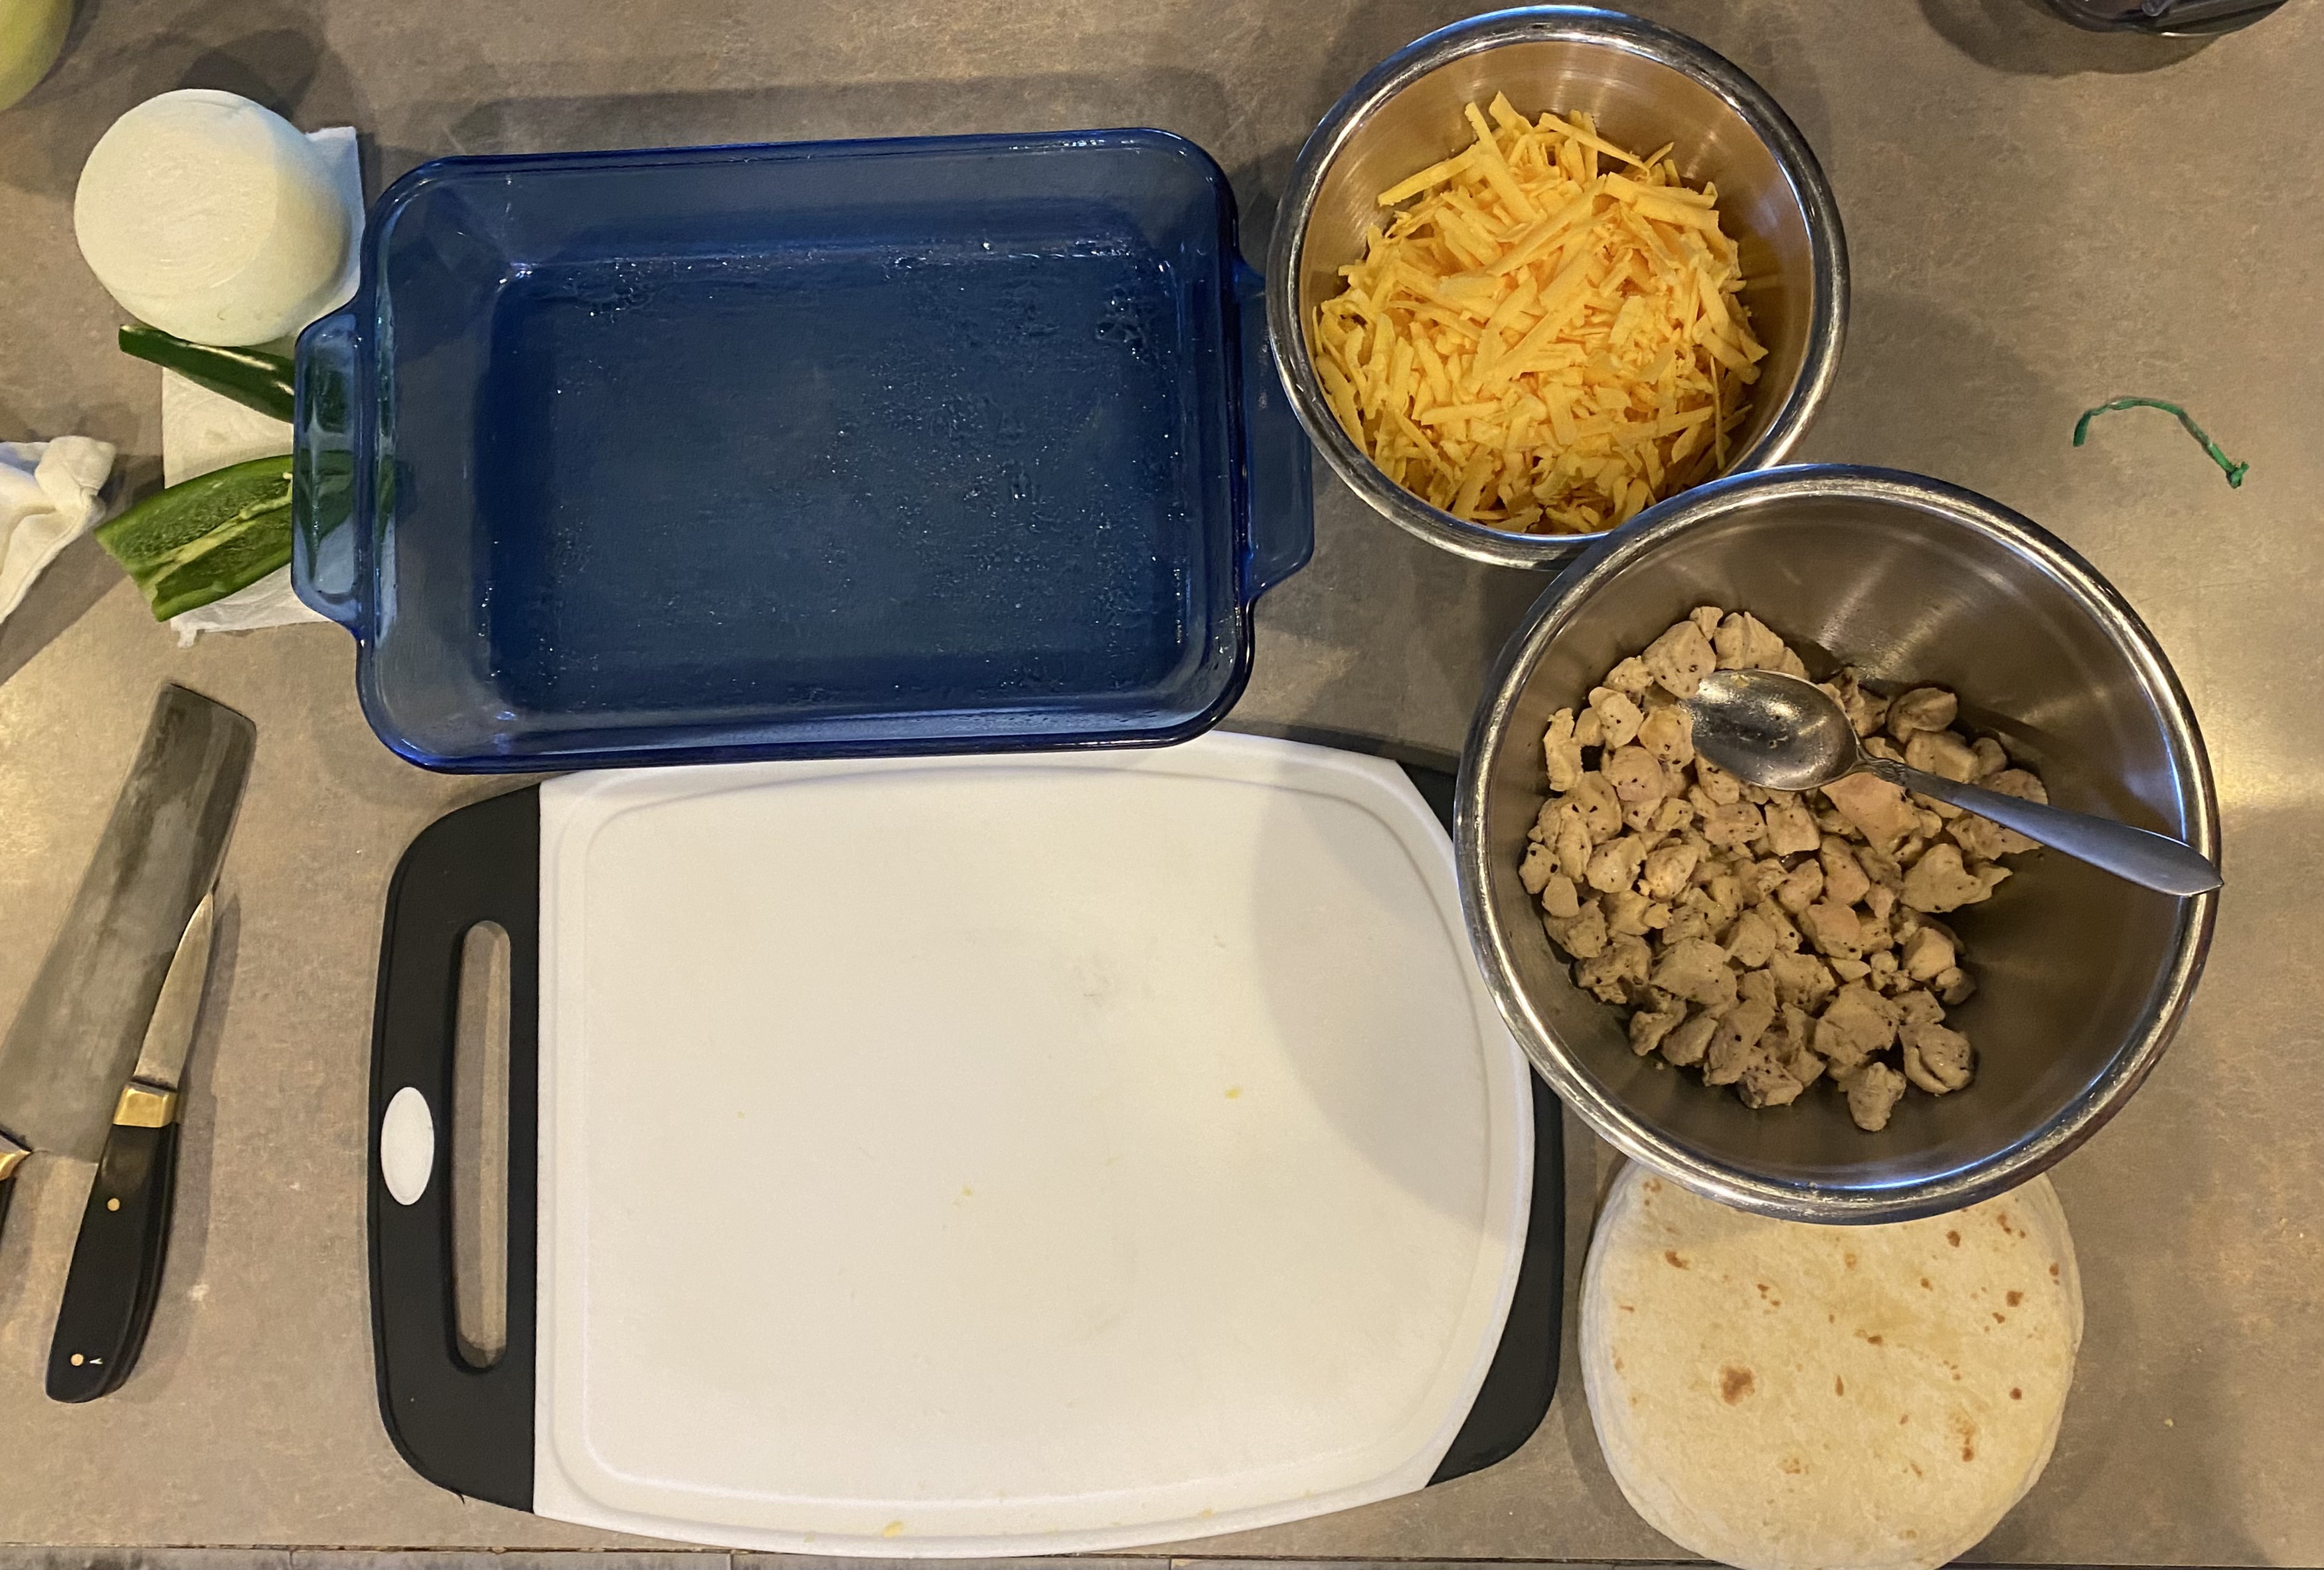
Set up assembly area for the enchiladas, (chicken, tortillas and baking pan), and very lightly grease your baking pan.
Eyeball the chicken and grab about 1/6 of the total. Holding a tortilla in your off-hand palm, add an even layer of chicken to the middle of the tortilla, then gently roll the long edges over each other. Place the enchilada seam side down in the baking pan. Repeat with the other five enchiladas.
Bake bare enchiladas for about 5-7 minutes, until the outsides of the tortillas are lightly browned.
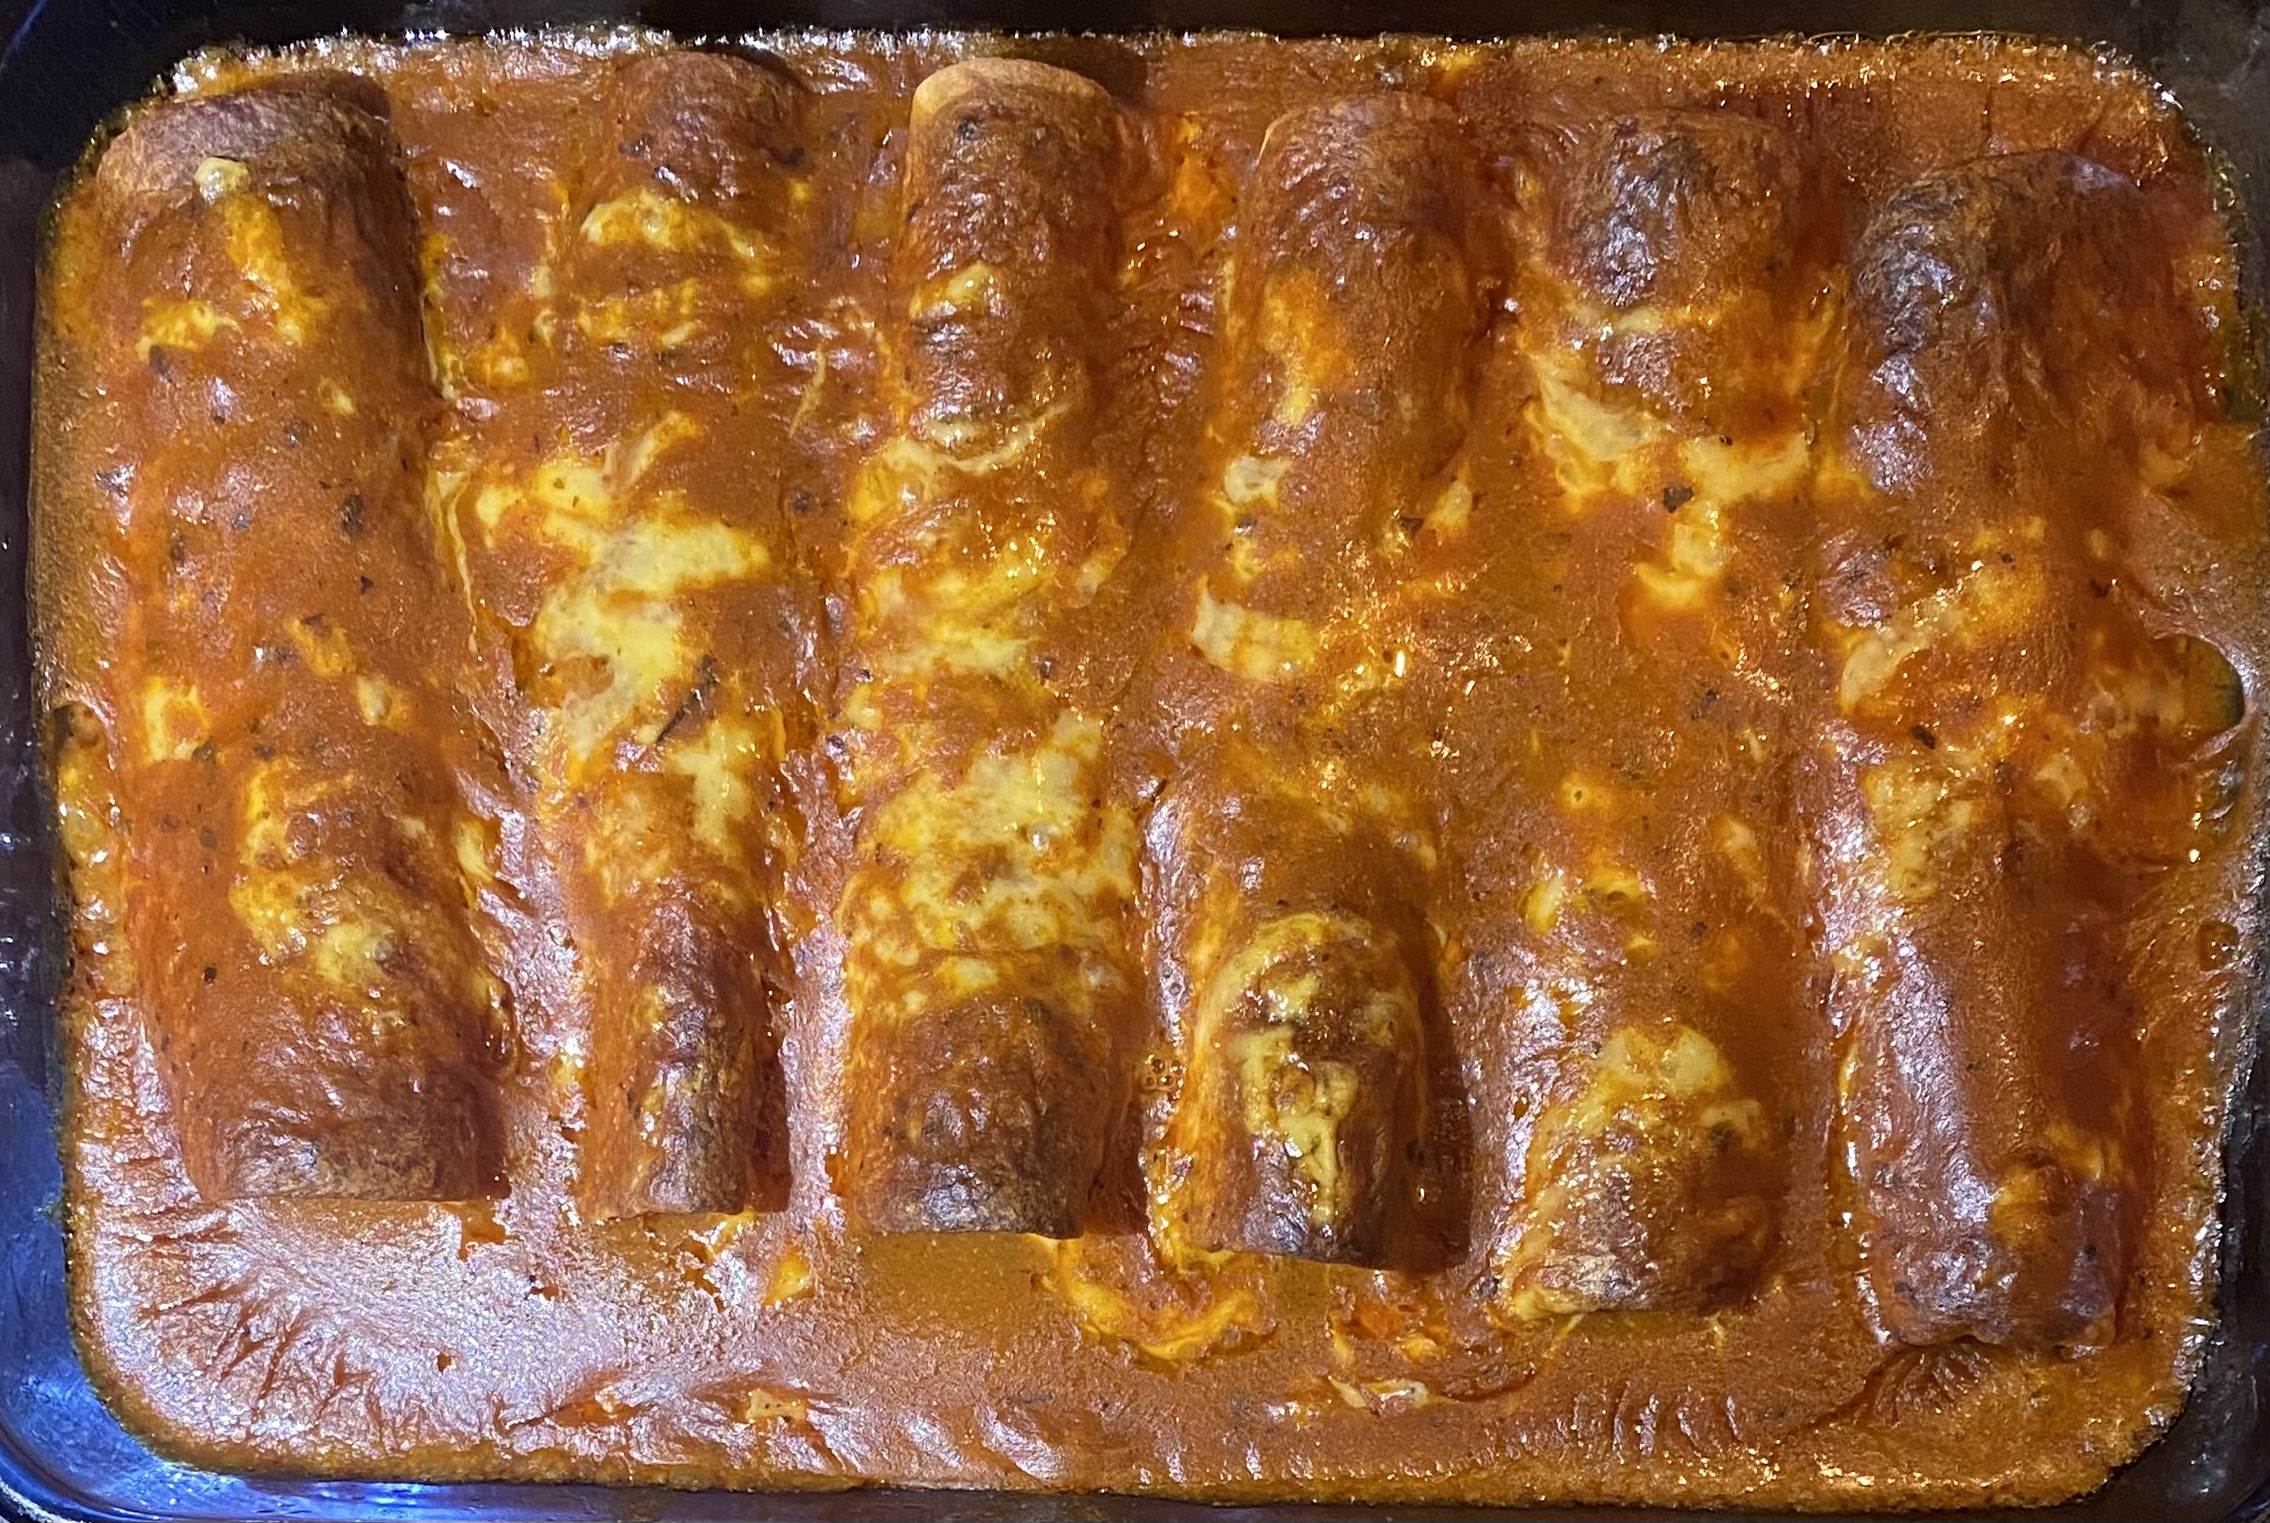
Remove baking pan from oven and top the enchiladas with an even layer of grated cheese. Return the pan to the oven for about 2-3 minutes to let the cheese melt – this step helps a lot to avoid SES.
Remove pan again and top the enchiladas with sauce – you don’t need to drown them, just make sure they have a nice, even layer that coats them thoroughly.
Return to oven and bake for about 15 minutes, until the pan is bubbling nicely and the cheese has melted into the sauce.
Serve right away with rice, beans, salsa or pico and devour with abandon.
It’s impossible to say where exactly adobada, (or sometimes, adovada), comes from. Generally, it’s a safe bet that northern Mexico, past and present, is the source. Adobada in Catalan means marinated, which doesn’t give a whole bunch of clues at to what we’re supposed to marinate with. As it turns out, that’s OK though, because however you make it, carne adobada is 100% delicious.
Adobada is popular all over Mexico. In its simplest form, adobada marinade might just include red chiles (powdered or minced), vinegar, and Mexican oregano, while more involved iterations can approach mole in their complexity. It’s arguably most popular in the coastal states south of Puerta Vallarta – Jalisco, Colima, and Michoacan. There the chile power is likely to be a mix of guajillo, ancho, pasilla, or chipotles. Adobada is also wholly embraced by New Mexican cuisine. There, the chile in question will undoubtedly be New Mexican red, AKA Hatch, (varying in power from fairly mild to nuclear, depending upon one’s proclivities.)
Back in the days before refrigeration, the cut up pork most commonly used for the dish might be tossed into a pot with the lactobacillus acidophilus that generates yoghurt. Doing so would aid in preservation, and impart a subtle sour note to the finished dish – That’s likely why modern iterations call for citrus or vinegar in the mix. Ditto for the reason most cooks prefer their adobada chiles con pellejo (with skins) – the chiles either blistered by roasting or, if using dried, toasted during the cooking process – This adds a subtle bitter note that many folks insist is absolutamente necesario for authentic taste.
Truth be told, a lot of marinating came into play because the meats it was working on were less than stellar in quality or condition, (and that’s still true in much of the world.) Here, where we’re privileged to have amazing proteins available pretty much any time, it’s done to add things to the mix, not hide them. Even if we’re building a complex palette of flavors, we want the true flavor of beef, pork, chicken, tofu, or beans to remain notable – That’s achieved by balance in the marinade, and paying attention to the way we cook.
look up adobada on a search engine and you’ll see myriad ways to cook suggested, or even insisted upon. What I believe is necessary is this – The finished product must have a distinct outer crust, almost burnt, (as you’d generate when making great chili or beef stew), while the inside of each chunk needs to be tender and juicy. While some places offer adobada that’s more like a stew, to me that’s just chile colorado – Another thing altogether, really.
Many cooks think there’s only one way to do this, (theirs), but it ain’t necessarily so – You can get there by stove top, or grill, or baking, as you please. For M2¢W, I think a multi-stage cook is in order. Specifically, a relatively low and slow primary cook, followed by a quick, hot seat just prior to serving. That is, in fact, what a fair share of restaurants that offer adobada as I’ve described do. It works great, and it gives you flexibility when you’re short on time.
You can do adobada with any protein you like, (and you should), but you aught to start with pork – That’s the holy grail of the dish. For that, you’ll want around 3 pounds of fresh, boneless shoulder. And for those of you who don’t eat meat, I’m here to tell you this will rock with fresh, firm tofu, or great beans.
So, what I’ll offer here is an amalgam of some Mexican and New Mexican ingredients and techniques that will deliver the goods, and it’s a gas to make too. With this marinade, you can go as long as overnight, but at the very least, let it bathe for a good 4 hours prior to cooking. If you don’t have a slow cooker, you can certainly do this in a 325° F oven, (but why would you not have a slow cooker?)
The chiles I used were picked to feed the hybrid theme. None of them are particularly hot, because to me, this dish isn’t designed to burn your face off – It’s meant to provide a pleasant chile buzz as a top note of the marinade. You can use more, or sub hotter varieties as you please, (David Berkowitz? I’m talking about you, Pal.) The same goes for garlic, as you can certainly find adobada so laden with ajo that it’ll be your signature scent for days to come, but to me, that’s not the point – Balance is.
Urban’s Carne Adobada
3 – 3 1/2 Pounds Boneless Pork Shoulder
2-3 Cups low sodium Chicken Stock
1 Cup chile soaking water
1-2 dried Ancho Chiles, seeded
2-3 dried Guajillo Chiles, seeded
1 dried Chipotle Chile, seeded
1-3 dried New Mexican Red (Hatch) Chiles, seeded
3-5 cloves fresh Garlic
1/2 medium Onion (roughly 1 cup)
1/2 Cup fresh Orange Juice
1/2 Cup Raisins
1/4 Cup live Cider Vinegar
3 Tablespoons Avocado Oil
1 teaspoon Agave Nectar
1 teaspoon Mexican Oregano
1 teaspoon Lemon Thyme
1 teaspoon Salt
1/2 teaspoon ground Cumin
2 Bay Leaves
NOTE: in the images here, you’ll see I used some ground, some flake, and some whole chiles – That’s what I had, so that’s what I used. Certainly, the more whole dried you use, the more of that smoky, bitter con pellejo flavor you’ll get into the mix.
Allow a cast iron skillet over high heat to get truly hot.
Remove seeds from chiles, but leave the stems on, (it makes them easier to handle and flip)
Toast chiles, flipping regularly until they start to smoke a bit.
Transfer chiles to a bowl, add bay leaves, and cover well with boiling water. Allow to steep for 30 minutes, until they’re nice and soft.
Put raisins in another small bowl and cover with about 1” of boiling water. Let them steep for the time remaining on the chile soaking clock.
Add unpeeled garlic cloves to the skillet and reduce heat to medium. Toast the garlic, flipping regularly, until the skin is scorched and the cloves are notably soft, about 5-8 minutes. Set aside to cool.
While that’s going on, cut your pork shoulder into roughly 1” steaks and trim excess fat. Shoulder has plenty of interstitial fat, so remove any really big hunks and obvious silver skin, but don’t go overboard – Pork fat is good.
When your chiles are ready, drain them, and reserve the soaking water – Just make sure you check the heat level so you know what you’re dealing with. You can chuck the bay leaves.
Remove the stems from your reconstituted chiles, mince them, then toss them into a blender vessel.
Peel the garlic and add that, along with 2 cups of the chicken stock, the orange juice, the drained raisins (don’t need to save that soaking liquid), the vinegar, a tablespoon of avocado oil, a pinch of salt, the agave nectar, and the ground cumin.
Cover and pulse all that until you get a nice mix. There will be some chunks of this and that still, which is just fine.
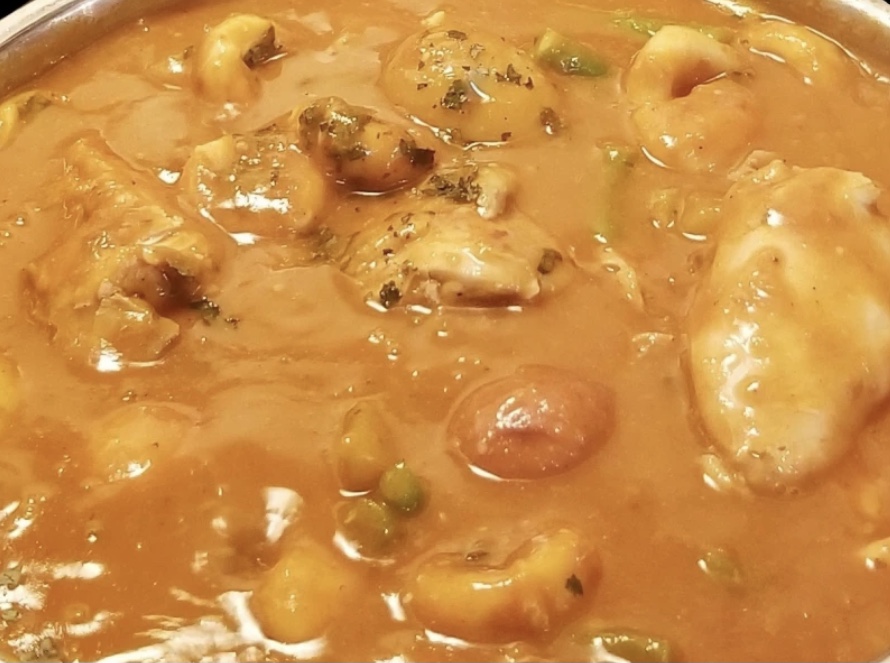
Arrange your pork in a baking dish and pour in all the marinade. Lift each piece of pork to make sure you get marinade on the undersides of each piece.
Cover the pan with metal foil and refrigerate for at least 4 hours and up to overnight.
When you’re ready to cook –
Peel and trim and dice onion.
Remove pork from baking dish and arrange in slow cooker – Leave the lion’s share of the marinade in the baking dish.
Add the reserved chile soaking water to the marinade, along with a pinch of salt, the oregano, and lemon thyme. Stir all that to incorporate, and then pour it all into the slow cooker. Add the diced onion on top and cover.
You can cook on low, medium, or high as you’ve got time for – Lower and slower is better, but they’ll all do just fine. Cook until the pork is fork tender, which on our pot means anywhere from 4 to 8 hours.
When you’re ready to serve, heat 2 tablespoons of avocado oil in a cast iron skillet over high heat.
Add as much pork as you want for the meal to the skillet and let it cook, unflipped, until it develops a nice dark crust, about 3-5 minutes. Flip once to get the other side.
Transfer pork to a serving platter.
Serve with fresh, warm tortillas, pico de gallo, pickled onions/chiles/radishes, crema, lime wedges, and maybe some queso fresco or cotija, and cold, cold Mexican beer.
Postscript:
Monica had two quotes after this meal that I’ll share here –
‘This is better than anything we’ve ever had a Mexican restaurant,’ and
‘You’ve bested me in slow cooker pork.’
Coming from her, that’s fairly amazing, so – Just sayin’…
This post is dedicated to the late, great food writer Jonathan Gold. There’s a guy who knew how to write about food. His love, passion, humor, and vast knowledge always shown through, and damn, could he write great last lines. Thanks man, you’re missed, but never forgotten.
A couple of things, for the record – I know Megan Heberlein through social media, and this post is written with her blessing – albeit she wanted to make sure that I did not refer to her as ‘any kind of expert,’ so I ain’t.
I connected with her through the Rancho Gordo Bean Club Members group, a gang of folks who share recipes, questions, techniques and all things bean-loving over on FB. Unlike a lot of social media in broad strokes and FB in particular, this group is fun, friendly, supportive, and ridiculously wholesome – I love it to pieces.
What drew my attention to her was a well thought out piece of advice on making and storing molé – one of those why didn’t I think of that cooking moments that you instantly want to adopt and turn others on to.
Her molé strategy is nothing short of brilliant, far as I’m concerned. As she notes below, this sauce is ubiquitous in Mexican regional cookery, and every family really does have their own fave – just like pasta sauce in Italy or bourguignon in France. I couldn’t say it any better than she does when she exhorts us to try a bunch and make a fave or three ours. So without further ado, here’s Megan’s stellar advice.
1. Make a big batch – a really big batch – as big of a batch as you are willing to deal with. It doesn’t take much longer, and mole freezes really well.
2. Use gloves for the chili handling. If you’re not already, it really does help keep the burn down!
3. Once everything is together and run through the blender to smooth it out, don’t pour it back into the pan. Set the oven for 250, and pour the mole into a roasting pan, or something similar that is size appropriate. It will take longer to cook down, but you don’t have to hover over it. Just walk away from it, give it a stir every couple hours – or even set your oven lower, and go to bed! The other great thing about this method is that you don’t have to worry about cleaning mole splatters off your walls and ceilings for months. 🙄
4. Cook it down. Cook it way down, and turn it into a paste. This will take up less space in your freezer, and is easy to turn into a sauce with the addition of stock.
5. Glass jars are your friends for storage. I usually pack mine into pint jars, and 1 pint jar plus stock is plenty to use on a family size package of chicken thighs. Come time to use, you can either thaw on the counter (if you’re one of those people who actually plan ahead), or stick in the microwave without the lid (if you’re me). I haven’t tried it, but if you’re good with liquids in vacuum seal bags, that would probably store really well, and just throw it into warm water to defrost.
6. Freeze, don’t can! I’ve got it on very good authority that canning mole at home is right out, even with a pressure canner – Apparently it’s too dense to be safe.
7. Every region of Mexico has it’s own style of mole, and every family has their own recipe. Try various recipes, and find the style(s) you like! One of the most fun things about mole is that, because they are so varied, you can change up recipes as you’d like. Change up the peppers, the amounts of onion/garlic/tomato/tomatillo, the fruits, the nuts/seeds, whatever.
8. Know that every pepper has it’s own flavor profile, and playing with the peppers can change up the flavor. Ancho is fruity, chipotle is smoky, etc.
There you have it, with big thanks to Megan. What I love about her strategy is how demonstrative it is of the innovative capability of us home cooks – and it’s a great reminder to always be on the lookout for better ways to do stuff in your busy home kitchen – now y’all go have some fun!
My friend Mike is a retired dentist, who spent most of his working life in New England. Born and raised in California, this is likely why he and his wife beat feet for Oaxaca every winter. He is a wonderful observer, lover, and sharer of that vibrant corner of the world, and his super simple Choco-Chile blend is one of the favorite things he’s shared with me. For anything that you think would be great with a black molé on board, this is a fantastic option that can be made and deployed in no time – something you definitely cannot do with most dark molés.
The only thing I’ve changed from the recipe Mike sent me is specifying chocolate de mesa, Mexican table chocolate. This stuff is prepared in a manner much closer to the old indigenous ways than bar chocolate is – it’s often stone ground – you may find it labeled chocolate de metate or chocolate tradicional. The best stuff comes from small fincas (farms) around Oaxaca, Chiapas, and the Yucatán. Look for the darker varieties.
Since there are so few ingredients in this blend, the quality matters greatly – that doesn’t mean expensive, it means tasty and to your liking. Something as simple as changing the chile you use, or the chocolate, will yield a whole new profile – it’s pretty wondrous. Give it a try and you’ll be hooked as I am.
Choco-Chile base
Mike’s Choco-Chile
Makes about 1 cup (enough to sauce four entrées)
2 Ounces dried Pasilla or Ancho Chilies
1 clove Garlic
1 to 2 Ounces Mexican Table Chocolate, (or any least 70% cacao chocolate you like)
1 teaspoon Honey
Zest and juice of 1⁄2 Lime
1⁄2 teaspoon Salt
Choco-Chile fixins
Stem and seed the chilies.
Place chiles in a small, non-reactive bowl and cover them with boiling water. Let sit for at least 15 minutes.
Peel, end trim and mince garlic.
Finely chop chocolate.
Zest and juice the 1/2 lime.
Drain the chilies, reserving the soaking liquid.
In a food processor, purée all ingredients, adding a teaspoon or so of chile soaking liquid as needed to achieve a paste that blends smoothly.
Adjust lime and/or salt as desired.
Mike notes, ‘The sauce will keep for at least a week (possibly forever; I’ve never tested its longevity) and its flavor will actually improve after a day or so.’
You can enjoy the sauce a bunch of ways – I have three favorites.
One is to sauté whatever protein or veggies you’re wanting, then deglaze the pan with good, homemade chicken, or veggie stock, scraping the fond from the pan bottom. Add choco-chile, whisk to thoroughly incorporate, then add back the protein or veggies and heat everything through before serving.
Second is to thin choco-chile with straight stock and use it as enchilada sauce.
But the best, hands down, is Mike’s fantastic Poor Man’s Molé.
Mike’s Poor Man’s Molé
4 Cups shredded or cubed Meat (chicken, Turkey, or Pork), or veggies.
1 medium Yellow Onion
1 14 ounce can diced Tomato
1 Cup toasted Pumpkin Seeds (Pepitas)
1 Cup Choco-Chile sauce
1 Tablespoon Avocado Oil
1/2 to 1 Cup Stock (Chicken, Veggie)
Salt to taste
In a large skillet over medium heat, add oil and heat until shimmering.
Add onion and cook, stirring steadily, until softened, about 4 minutes, then remove from heat.
In a blender or food processor, add tomatoes, pepitas, choco-chile, and onions. Process until fairly smooth as you like and a little texture is fine. Thin with stock as needed to make this happen.
Return skillet to heat over medium low and add the sauce.
Cook sauce until it begins to simmer, about 5 minutes, whisking constantly to keep the sauce from sticking.
Add meat or veggies and stir to thoroughly coat and incorporate.
Reduce heat to low and simmer for 10 to 15 minutes more until everything is heated through. Sauce thickens as it cooks, so add stock as needed to end up at a consistency you like.
It’s a sure bet that, if you eat enough Mexican, Tex Mex, Caribbean, or South American food, you’ve enjoyed some form of carne asada. Certainly then, you’ve swooned over the rich and pungent blends of flavors presented by something that looks so simple, but tastes so complex. The answer lies in Mojo, the marinade that made carne asada famous.
The literal translation of the South American name for the dish is roasted meat, which tells us right away that the cooking side of things isn’t complex. All that magic comes from the mojo, and fortunately for us, it’s not only easy to make, it’s downright a gas.
Carne asada de UrbanMonique
Before we dive fully into Mojo, let’s spend a few looking at the history of carne asada – It’s as old as fire and cooking vessels, really. No one can lay claim to originating the dish, (although that hasn’t stopped many from trying). In addition to straight asada, there are popular variants that have much to do with how the meat is handled for service – Shredded or ground, as opposed to cooked whole and sliced, for instance.
Shredded or pulled beef is found in American barbecue, ropa vieja in the Caribbean, and carne deshebrada in Mexico. The versions most Americans are accustomed to stem from northern Mexican cuisines, although there are popular southern variants as well.
Mojo de UrbanMonique, a great all purpose marinade
Specific cuts of beef are commonly associated with carne asada, and they’re not exactly the rock stars. These include skirt, flank, and flap steak, the stuff the folks doing the boogie up on the hill certainly did not buy for themselves. That stuff was considered refuse, and the genesis of great meals formed around such marginal cuts is another example of the disenfranchised making due. Yet here in the 21st century, popularity has turned all that on its head – Some of these lesser cuts have reached the big time cost-wise.
The moral of the story is to be flexible – When we spied eye of the round cut thin as steaks for $5 a pound, it was game over, and ‘authenticity’ be hanged – It’ll all eat just fine – Boneless chuck, the bargain basement of beef cuts, makes perfectly wonderful carne asada.
Now, on to that mojo. If you have a carniceria nearby, you can bet they offer carne asada, either in whole steaks, sliced, or chopped. You’ll likely find it either preperada, (marinated) or not, and if you get their marinade, what you’ll get can run the gamut from simple salt and oil, to quite complex mixes that rival a mole – The marinade is where the real poetic license lives with carne asada. What you create is up to you, (and we’ll provide plenty of options herein to get ya started.)
As common and as diverse as spaghetti sauce, there are dozens of popular, commercial mojo variants, let alone the tens of thousands rendered by home cooks everywhere. The Spanish word Mojo derives from the Portuguese, Molho, which simply means sauce – a clear indicator of its ubiquity.
There is general agreement that mojo originated in the Canary Islands, the archipelago off the northwest coast of Africa. Canarian cuisine is a fascinating amalgamation of the native islanders, (sadly, now largely extinct), Spanish, Portuguese, and African roots. Their cooking emphasizes freshness, simplicity, and powerful flavors, many of which derive from various mojos. Literally every Canarian family has at least two signature mojos, passed down from generation to generation.
The signature island dish, Papas Arrugadas, (wrinkly potatoes), is demonstrative of all that. Whole potatoes boiled in salt water, and served with red and green mojo – And in an interesting twist of serendipity, the potato isn’t native to the Canaries – They came from South America, of course.
Canarian Mojo with Papas Arrugadas
In its simplest form, mojo contains olive oil, chiles (pimienta in the Canaries), garlic, paprika, coriander (either fresh or seed), and cumin. As mentioned, there are two primary branches of Canarian mojo, red and green. The red, fueled by dried or fresh chiles and paprika, is most often paired with meat, while the green, made with green peppers, cilantro, or parsley, compliments fish courses.
There are many other iterations, some using local cheese, (mojo con queso), garlic, almonds, and fresh herbs – Check out that almond Mojo recipe and you’ll see what I mean about rivaling moles. One could easily spent a happy year working through all these lovely things, and one of these days, I just might.
The flow of humanity in the 16th through 19th centuries, both forced and chosen, brought mojo to Europe, then South America, the Caribbean, and eventually, North America. Mojo not only thrived, it grew in leaps and bounds. Were I forced to define a generic, accurate version that we here in the Estados Unidos are familiar with, it would certainly include chiles, citrus, garlic, oil, and vinegar – A Mexican vinaigrette, in essence.
Established Mexican, Caribbean, and South American variants also run the gamut from super simple to dizzyingly complex. What this means to the home cook is that in all honestly, you can’t go wrong – Combine stuff you love and that plays well together, and you’re in like Flynn. I’m going to offer several variants, including fairly faithful renderings of styles you’ve probably tried and liked – As I always note, use these as a springboard for personal creativity, and know that you’ll likely never do the exact same thing twice.
The real beauty of Mojo is as a last minute inspirational meal – You’ve got this, that, and the other thing in your stores, so what do you do with them? You do this.
The basics for a Mexican style mojo
NOTE ON WHAT TO MAKE: Tacos, burritos, chimis, or taco salads, with fresh pick de gallo and warm tortillas, are almost a must for your first meal if you’re marinating proteins, but keep in mind, this stuff has North African and Iberian roots, so get bold and go that direction if you feel so inspired. And you can always sauté the meat with something new, change the spicing, and make something totally different.
Carne Asada Hash, the perfect next morning leftover
NOTE ON MARINATING: Any marinade containing citrus, other acids like Vinegar, or other fruits like papaya, kiwi, pineapple, fig, or mango will break down the connective tissues in proteins as they marinate – There’s an enzyme called protease, (papain in papaya), that does the trick. That’s great for tenderizing tougher cuts, and it’s the secret as to why marginal stuff like skirt stake or flank steak can come out so tender. That said, be careful with the duration – There are a lot of recipes out there that advise marinating overnight, and that’s taking things too far – Going over 6 hours risks mushy meat, and nobody likes that texture. Marinate proteins for at least an hour, and as long as 4 or 5, and you’ll get great flavor infusion and a proper degree of tenderization.
Tacos Carne Asada
NOTE ON GRILLING: Anything you marinate in Mojo will taste best grilled. And if you can, do so with wood or charcoal, although gas works just fine too. With the thinner cuts or proteins commonly used for carne asada, you’ve got to keep an eye on things – We’re talking a 2 minute punk rock song per side, as opposed to the common, classic rock 3-4 minutes a side measure. A lot of restaurants grill carne asada to well done, but you do not need to do that. Grill to medium rare, then allow a good 5 to 10 minute rest before you carve. If you use the more rustic cuts of beef, like skirt, flank, or flap steaks, carve 90° to the grain, at a 45° angle for each slice.
NOTE ON OIL: You’ll see I call for Avocado Oil on several Mojo recipes. I like it for it’s rich, buttery feel and neutral taste, as well as its exceptional smoke point. You can certainly use Extra Virgin Olive Oil in any of these recipes, but you really owe it to yourself to try avocado oil in the near future.
First, the classic Mojo roots.
Canarian Green Mojo
1 Bundle fresh Cilantro
3/4 Cup Extra Virgin Olive Oil
1 fresh Lime
3 cloves Garlic
1 teaspoon Sea Salt
1/2 teaspoon Cumin
1/2 teaspoon Black Pepper
Rinse and dry all produce.
Remove long stems from Cilantro, discard and mince the leaves.
Peel and stem garlic, and mince.
Juice lime, and set aside.
If you’re using whole spices, add salt, pepper, and cumin to a spice grinder and pulse to an even consistency, (3 or 4 pulses should do it.)
Combine all ingredients in a non-reactive bowl and mix thoroughly. You can leave the sauce rustic, or process it with a stick blender for a smoother consistency.
Allow sauce to marry for 30 minutes prior to use. Serve with fresh crusty bread, potatoes, fish, or veggies.
Canarian Red Mojo
1 large Red Sweet Pepper
2-4 fresh hot chiles, (chef’s choice, they don’t have to be red – Jalapeño, Habanero, Serrano, and Cayenne all work)
3 cloves fresh Garlic
2-3 Tablespoons Extra Virgin Olive Oil
1 Tablespoon Cider Vinegar
1 teaspoon Sea Salt
1/2 teaspoon Cumin
Rinse all produce and pat dry.
Stem, seed, and devein the Pepper and chiles, (leave veins in chiles if you want more heat.)
Fine dice Pepper and chiles.
Mince Garlic.
Process Cumin to a powder if you’re using whole.
Combine all ingredients in a non-reactive bowl and mix thoroughly. You can leave the sauce rustic, or process it with a stick blender for a smoother consistency.
Allow sauce to marry for 30 minutes prior to use. Serve with fresh crusty bread, chicken, pork, or beef.
UrbanMonique Signature Mojo – This is a great all purpose Mojo, with a couple of our signature twists.
Prep for making mojo is simple and quick
2 small Limes
1 navel Orange
1-3 Jalapeño Chiles
1/2 bunch fresh Cilantro
1/2 Cup Avocado Oil
2 Tablespoons Live Cider Vinegar
Pinch of Sea Salt
3-4 twists fresh ground Pepper
Rinse and pat dry all produce.
Zest and juice the citrus, and reserve both.
Peel, stem, and mince the garlic.
Stem, de-seed, and devein the jalapeños, (leave the veins if you like more heat).
Remove long stems from Cilantro and mince the remainder.
Combine all ingredients in a non-reactive bowl and mix thoroughly. You can leave the sauce rustic, or process it with a stick blender for a smoother consistency.
Makes a fantastic marinade for chicken, pork, or beef. Also does great with tofu, veggies, or fish.
And finally, here are a few Mexican and South American variants.
Quick Cervesa Mojo – Great for folks that don’t like heat.
1 bottle Negra Modelo Beer
1 small lime
1 bunch Green Onions
3 cloves fresh Garlic
Pinch of Sea Salt
A few twists fresh ground Pepper
Open beer and pour into a bowl, allowing it to loose its fizz and flatten somewhat, (About 5-10 minutes)
Zest and juice lime, set both aside.
Peel, stem and mince garlic
Trim and peel green onions, then leave them whole, as trimmed.
Combine all ingredients in a non-reactive bowl and mix thoroughly. Leave the sauce rustic, do not process it.
Allow sauce to marry for 30 minutes prior to use. Makes a fantastic marinade for chicken, pork, or beef. Marinate proteins for an hour, then remove the steaks and the onions and grill both as desired. Goes great with the rest of the Negra Modelo six pack.
Taco Truck Mojo – There is no standard recipe, but this will put you in the running…
2 small Limes
2-4 hot Chiles of your choice
3 cloves fresh Garlic
1/2 Cup Avocado Oil
1 Tablespoon dark Soy Sauce
2 teaspoons Smoked Sweet Paprika
1 teaspoon Sea Salt
1/2 teaspoon Cumin
1/2 teaspoon Oregano
1/4 teaspoon Black Pepper
1/4 teaspoon White Pepper
Rinse and pat dry produce.
Zest and juice Limes, set both aside.
Stem, seed, and devein chiles, (leave veins in if you want the heat). Fine dice chiles.
Peel and stem Garlic, then mince.
Process spices to a consistent rough powder if you’re using whole.
Combine all ingredients in a non-reactive bowl. Process with a stick blender to a smooth, even consistency.
Makes a fantastic marinade for chicken, pork, or beef. Marinate proteins for at least an hour, and as many as 5 hours. Grill proteins as desired, and baste with the marinate as you’re grilling.
Garlic Papaya Mojo
1 fresh Papaya
1 small Green Bell Pepper
3-4 Green Onions
1 small fresh Lime
3 cloves Fresh Garlic
1 Tablespoon Avocado Oil
1 Tablespoon live Cider Vinegar
1/2 teaspoon Lemon Thyme
Pinch of Sea Salt
A couple twists fresh ground Pepper
Peel, seed and rough chop papaya.
Zest and juice Limes.
Stem, seed and devein green pepper, then dice.
Peel, stem green onions, then cut into 1/4″ thick rounds.
Peel, stem, and mince garlic.
Combine all ingredients in a non-reactive bowl. Process with a stick blender to a smooth, even consistency.
Makes a fantastic marinade for chicken, pork, or beef. Marinate proteins for at least an hour, and as many as 3 hours – don’t exceed that too much, as the papain enzyme in papaya is formidable stuff. Grill proteins as desired, and baste with the marinate as you’re grilling.
Well, it’s fall, the garden is cranking out the last of the year’s bounty, there’s playoff baseball on the boob tube, and sticking tortilla chips into gooey cheese is never a bad thing.
It’s a safe bet that, for as long as humans have been eating cheese, they’ve been doing so by melting the stuff and scooping up the results with something else that’s tasty. That’s done in some form or another all over the world, but for my mind, the most sublime and delicioso dish in this regard comes from Mexico – Esto es Queso Fundido.
It’s always appropriate to highlight the wealth of all great things cheesy that comes from Mexico. This is also a good time to discuss what’s a genuine Mexican dish and what’s purely Tex Mex.
So, let’s swing for the fence right off the bat – Anything made with some version of American cheese, (Velveeta, Super Melt, Extra Melt, whatever), is not Mexican food in any way, shape, or form. Yes, a lot of restaurants use this stuff, (even ones that say they make Mexican food – Keep in mind who they’re feeding…) Yes, in Texas queso really is widely made with it. Yes, after a beer or three, queso made of nothing but Velveeta and a can of Rotel diced tomatoes and chopped green chiles tastes pretty damn good – But it’s not Mexican food, and that’s that.
consider as well that it is not just cheese variety that speaks to authenticity – it’s the volume, or proportion, per dish. Generally speaking, Mexican cooking uses cheese as a balanced part of a dish or meal – It’s not something buried under half a pound of molten goo – That’s a purely American affectation.
What is the Real Deal, then? Queso fundido, or sometimes queso flameado, would be it. Fundido means melted, flameado means flambé. Both are genuinely served down south in taquerias and restaurants. Fundido is pretty common, often in play at home for using up this and that from fridge or pantry, while flameado is done more for show or special occasions, (and it is spectacular – Go to Benito’s in Fort Worth and you’ll see what I mean.) Fundido in restaurants is probably more popular up in the northern part of Mexico.
Typically, you’ll see a blend of cheeses mixed with chorizo, chiles, tomato, onion, maybe cilantro and garlic, depending on what’s good or needs to get used. Traditional preparation calls for the cheese and the adjuncts to be cooked separately and mixed just prior to serving. Chorizo and veggies are most often sautéed, while the cheese might be prepared via stove top, oven, or broiler. Fundido or flameado are most often served with fresh tortillas as an appetizer, or as a condiment for primary dishes.
There’s somewhere around 40 unique varieties of Mexican queso down there, and they’re every bit as nuanced and delicious as cheese from anywhere else. Sure, cheese came to Mexico because of invading Spaniards and their cows, sheep, and goats, but hey – the locals made the best of it, and they still are – much to our benefit.
There are varieties you can find almost anywhere in Mexico, like Queso Fresco, Panela, and Oaxaca, but there are far more that are truly regional, and home cheesemaking is still pretty widespread. Today there are at least a dozen major cheese producing states and regions. Most of the output comes from raw cows milk, (albeit the mass produced stuff is pasteurized), with a little bit here and there from sheep and goats – And there are efforts underway to increase the output and variety of non-cows milk cheeses.
Until quite recently, finding good quality, genuine Mexican cheese up here in los Estados Unidos was not all that easy, but that’s changing. In a lot of grocery chains, you’ll discover a few mainstays offered, and if your town is graced with a good Latin grocery or two, you’ll probably find a lot more – At the La Gloria market in Bellingham, Washington, I found a thriving, vibrant store packed with great cheese, (and a fantastic carniceria). The counter guy told me that most of the cheese they offer is imported from Mexico, but there are good queseros establishing themselves here in the states as well..
Alright, so – assuming that you can find decent Mexican cheese, what would you want for stellar fundido? There’s a wealth of great melting cheeses that will fit the bill. Here’s my short list, along with reasonable substitutions in parenthesis.
Asadero (Provolone) – This is a slightly chewy fresh cheese with a nice tang. It melts really well, so it’s great for fundido, (or for chiles relleños).
Chihuahua (Jack) – This is my personal fave. From the state of the same name, and sometimes called Menonita in honor of the Mennonite farmers who first introduced it, good Chihuahua is like Jack cheese used (and aught) to be. Fresh it’s like a tangy mild cheddar with a very light bite – aged it sports a deep and complex tang.
Enchilado (Parmesan) – tangy, aged cheese rolled in paprika, that gets crumblier as it gets older – It’s like cotija that’s tastier, less salty and better at melting. Adds a really nice depth to a blend.
Manchego (Jack or Asiago) – The Mexican swing on the famous Spanish variety, this is a semi-firm cheese with a nice nutty flavor that melts very well. It’s a cows milk cheese, as opposed to the sheep milk Spanish version – The fireworks between the two countries over this topic are truly something.
Oaxaca (Mozzarella) – produced in balls as Mozz is, it’s a mild tasty cheese and a great melter.
My thoughts now turn to what you want from this dish when you make it. If you’re intending to eat everything you make right away, then there’s no need to consider the longevity of the final product. If on the other hand, you want queso that you can keep in the fridge for a few days and pull out for quick use, an alternative recipe is in order – I’ve provided the kicker to make that happen as well. Finally, if you want to try a hand at flameado, there’s a recipe for that, too – Just be bloody careful, (and don’t be ripped when you prepare it). It is not necessary to do the table presentation flaming and mixing trick, and I’ll strongly urge you not to try that, it’s all to often a recipe for disaster – you’ll still get is a lovely, smoky note from the tequila.
Fresh chorizo seco
Final note – Chorizo is not necessary for great queso, but it is a delight. Mexican chorizo is a whole different animal than Spanish – There are a bunch of varieties, and every one I’ve tried is great. Unlike the Spanish stuff, which is a hard, cured sausage, Mexican chorizo is a fresh product, perfect for grilling solo, adding to queso, or for tacos, and anything else you like. If you’ve got a good carniceria near you, I’ll guarantee they make it, so snag some.
Queso Fundido de Urban
1 Cup Queso Chihuahua
1/3 Cup Queso Asadero
1/3 Cup Queso Manchego
1/3 Cup Queso Enchilado
2-4 fresh Jalapeño or Serrano Chiles (sub 1-2 mild Hatch, Anaheim, or even sweet bells, if you don’t want heat)
1 small Sweet or Yellow Onion
2 fresh Roma Tomatoes
2-3 cloves fresh Garlic
3-6 stems fresh Cilantro
1 Cup cold Chicken Stock
1 Tablespoon Arrowroot (Corn Starch is OK for a sub)
1 Tablespoon Avocado Oil
Salt and freshly ground Pepper
Optional: 1/2 Pound fresh Chorizo (Or Chorizo Seco if you can get it)
Grate and portion all cheeses.
Stem, trim, and if necessary, field strip chiles, then dice.
Peel, trim and mince garlic.
Peel, trim and dice 1/2 onion, (I like about a cup of diced – Your mileage may vary).
Dice tomatoes (leave them whole and dice – The liquid is a good thing).
Fine dice the cilantro, stems and all.
If including, cook the chorizo in a heavy skillet or sauté pan over medium high heat – Again, you can incorporate this into the queso, per the steps below, or leave it solo – It’s up to you.
Combine arrowroot and cold Chicken stock in a mixing bowl and whisk to completely dissolve and incorporate.
Add avocado oil to the hot pan and heat through. Add chiles and onion and sauté until the onion starts to brown slightly, about 2-4 minutes.
Add the tomato and sauté until they start to break down slightly, about 2-3 minutes more.
Add the garlic and sauté until the raw garlic smell dissipates, about 1 minute.
Add the arrowroot slurry to the veggie mix and stir with a wooden spoon to incorporate thoroughly – Continue mixing until the sauce starts to thicken, about 1 minute.
Add the cheese in batches, (1/3 to 1/2 Cup at a time), and stir to incorporate thoroughly.
If using, add the chorizo to the queso with a slotted spoon and stir to incorporate thoroughly.
Let the queso simmer for about 3-5 minutes so everything heats through and marries nicely.
Serve in a shallow bowl with fresh tortillas, or chips, with fresh pico de gallo, or as a side for tacos, enchiladas, chimis, what have you. If you can get (or make) fresh corn tortillas, that’s what you want.
To make fresh corn chips, preheat oven to 375° F. Cut tortillas into even 6ths, and arrange in a single layer on a baking sheet, and season lightly with salt. Bake for 8-10 minutes, until top side starts to brown, then flip the chips and bake for another 8-10 until golden brown and crispy. Serve hot.
For the Extended Dance Version of Queso –Substitute 1 Cup of Evaporated Milk for the water, add the arrowroot to that, and whisk until arrowroot is fully dissolved. Proceed as per the recipe the rest of the way. The addition of the milk will create a queso that will stay more liquid instead of seizing up as the cheese cools – Will keep in an airtight refrigerated container for 3-5 days, and makes for easy reheating, or even room temp chowing.
For the Flameado – Add 1/4 Cup Reposado or Anejo tequila to the finished queso while it’s still in the skillet. Flame with a match and allow the alcohol to burn off as it does its magic on the top surface of the queso. Always add booze from a separate cup – Never straight from the bottle! And okay, if you really must, you can flame on and then bring it to the table while she’s still lit, but be bloody careful, for Pete’s sake!