We’ve got pals coming over tonight for dinner and some guitar playing.
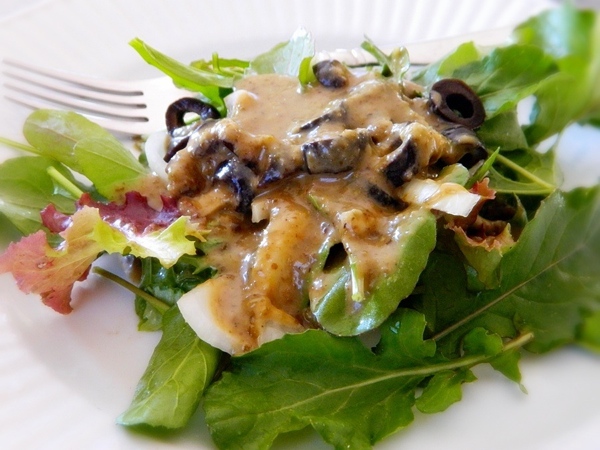
We’ll be doing a nice surf and turf with grilled Angus beef and butter poached true cod; for stuff that rich, you really need a refreshing salad that’ll cut through the fairly hefty proteins. This simple version is a long time fave of ours. The shallot, arugula, and garlic chives are a bit outside the box, and a real delight as well. If you can’t find fresh garlic chives, grow some; they’re easy to raise in a window box herb garden and go wonderfully with lots of stuff.
For the Salad,
2 Cups fresh Arugula
2 medium English Cucumbers
2 medium Tomatoes
1 small bulb Shallot
10-12 Garlic Chives
For the Dressing:
3-4 Tablespoons Extra Virgin Olive Oil
2 Tablespoons Apple Cider Vinegar
1 fresh Lemon
Sea Salt and fresh ground Pepper to taste
Peel, seed and thinly slice the cucumbers.
Core, seed and dice the tomatoes.
Mince the shallot, and chiffenade the garlic chives.
Zest and juice the lemon.
Combine all the dressing ingredients, and allow to rest for 15 minutes.
Combine all salad ingredients in a non-reactive bowl and toss to thoroughly coat veggies; allow the salad to rest, refrigerated, for 30 minutes.
Jambalaya, crawfish pie, filé gumbo… Now before y’all go see Michelle o’ me oh, let’s talk about that last one.
This post was inspired by my friend Jenn Digby, a fine Texas lass who one day noticed a strange tree growing in her back yard down around Austin. She posted a pic on Facebook asking what it was, and this ol’ forestry student recognized Sassafras. And that, friends and neighbors, leads straight to filé, a la that ageless Hank Williams hit.
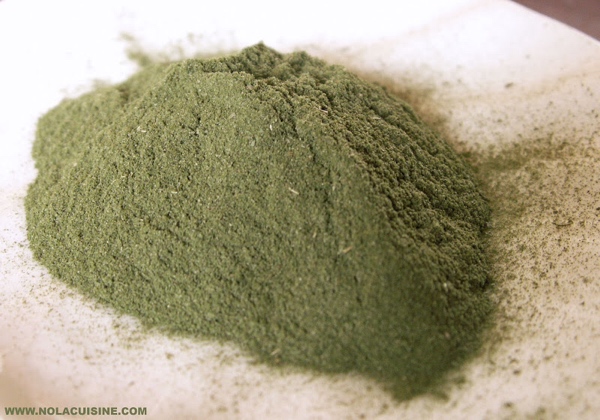
Filé, Pronounced fee-lay, the spicy thickener and spiritual heart of gumbo, is a powder made from the dried and ground leaves of that Sassafras tree (Sassafras albidum), that Jenn found in her yard. That tree is native to North America, and the use of its leaves as a seasoning goes back quite a spell. The Choctaw, who’s home turf included Florida, Mississippi, Alabama, and Louisiana, were the first to use dried, ground sassafras leaves as a seasoning. After the British kicked the Acadians out of what is now the Maritime provinces of Canada during the French & Indian War, many of these Frankish expats found their way down to Lousiana; without question, they picked up a cooking trick or two from the Choctaw along the way.
In addition to gumbo, filé may also be deployed for jambalaya or etouffé as well, again, for its distinctive, earthy flavor and thickening power. Filé powder smells kinda like eucalyptus to me, though I know more than one southern cook who swears it reminds them of Juicy Fruit gum, (I don’t get that, I’m afraid). When introduced to a dish, it’s scent has a definite root beer note, but it’s more complex and earthy than that. I’ve also heard folks say it smells like a blend of thyme and savory, and I’d say that’s a pretty apt description as well. In other words, filé is potent, complex, and adds that certain je ne sais quoi that only it can add; there really ain’t no substitute for it.
If you’re old enough, you’ll recall something about Sassafras as a beverage, and indeed, it was. Back when, root beer was flavored with sassafras root, until the FDA labelled that a possible carcinogen, (That is not a viably proven claim, as far as I am concerned, but that’s another story). The compound safrole is the guilty party, but it is not found in sassafras leaves, so fear not from your filé. By the by, I f you find a tree nearby, dig up some roots and peel back the bark, it will smell like root beer, which is most definitely cool.
Finding prepared filé is not hard; you can buy it in any decent grocery store, but as with most things, the better the source, the better the final product. As such, homemade from fresh leaves is obviously the best option. Cajun Cookbook author Tony Chachere, (who sells a very nice filé of his own), says it is best to harvest the leaves during a full moon, and there may well be something to that. Many preservers of old recommended like practice for a number of pursuits, including pickling and making sauerkraut, so why mess with success then, yeah?
If you’re lucky enough to find your own tree, then by all means take advantage. sassafras is a deciduous tree that grows to 30′ to 40′ when mature, with distinctive lobed leaves, like this…
Once you’ve got a leaf source, harvest nice bright green leaves before fall, when they begin to dry out and turn color. Take whole, small branches for this process.
Rinse the leaves thoroughly under cold running water, then allow them to air dry thoroughly by hanging them, branch end up.
Once dried, hand strip the leaves from the branches and crush them by hand onto clean paper.
With a spice grinder or blender, process leaves into as fine a powder as you can get.
Run your powder through a fine mesh sieve, and don’t force anything through.
Store your filé in a dry, dark place as you should all your spices and herbs; sunlight and excessive moisture robs potency, smell and flavor.
Filé is properly used as a table condiment for gumbo, jambalaya, etouffe, or any soup or stew where you’d like that distinctive flavor. I love a bit on everything from chili to chicken noodle, frankly.
Just sprinkle a bit into the top of your bowl; if you let it set a spell, its thickening power will go to work for you. If you want to add filé to a dish as a thickener, do so after you’ve removed your gumbo, etc from heat and prior to serving. Add a pinch, stir it in, and let it work for a minute before you add more. It’s potent stuff, so go lightly, as a heavy hand will make things thicker and stringer than you want, guaranteed.
Now as it happens, Miss Jenn was sweet enough to do all the heavy lifting for us, so all we gotta do is enjoy – Laissez les bon temps rouler!
Also known as Hen of the Woods, Maitakes are a fabulous treat.
Our dearest friends Christy and Grant, who were largely responsible for this blog coming to be, are inveterate growers of mushrooms. They have fine crops of quite a few fairly exotic and more-often-found as wild varieties growing on their northern Minnesota spread. All that said, they still like to forage, and yesterday, they happened on a real treat and a rarity in their neck of the woods, a 10 pound Maitake mushroom.
Take note – that’s a 16″ ruler!
If the Japanese name for these beauties doesn’t strike a chord, you may know it as Hen of the Woods, Rams Head, Sheeps Head, or the Signorina mushroom. They’re widely prized for eating by numerous cultures. Maitake and its close cousin, Chicken of the Woods, are two of my all time favorite fungi; they have a bright, savory taste profile that even folks who “don’t like mushrooms” will likely dig. Grifola frondosa is the formal name for Maitakes, which are native to the northeastern US and Japan. They grow in clusters at the base of trees, and are particularly fond of oaks. As with all fungi, you should forage only what you can 100% positively identify. Note that Maitakes, like many fungus, becomes just too tough to eat when they get long in the tooth.
Chris asked for some recipe ideas, which we’ll definitely do, but first, a few words on preserving. If you’re lucky enough to come upon a big stash of wild mushrooms like this, you absolutely must preserve some to enjoy in the dark months down the road. Freezing or drying are both viable options.
For either freezing or drying, thoroughly but gently wash each head until the rinse water runs clear.
Separate the heads into smaller, cauliflower-like stalks, and rinse the remaining stalks thoroughly again.
To freeze, allow the stalks to air dry. Arrange stalks on a cookie sheet with room for air flow around each. Place in your freezer overnight.
Frozen stalks can be vacuum sealed, or tossed into ziplock bags that you then suck the air out of. Frozen mushrooms will keep for 4 to 6 months frozen.
To dry Maitakes, place them in a dehydrator, or separated on a cookie sheet in an oven on warm, with the oven door opened slightly. Dry until the stalks are light, shriveled and snap easily without bending, even at their thickest points. Drying has the added advantage of making a big batch of mushrooms much easier to store. Well dried mushrooms will store for up to 12 months.
OK, ’nuff on preserving, let’s cook; here are three recipes that will work wonderfully with Maitake, or dang near any other wild mushrooms you like, solo or blended.
Mushroom Pho
FOR BROTH:
1 Quart cold Water
1 Quart Vegetable Stock
1 Pound Maitake Mushrooms
8-10 Ounce package Rice Noodles
1 Sweet Onion
1-2 Serrano Chiles
3-4 cloves Garlic
2 Tablespoons Mirin, (Rice Vinegar OK for sub)
2 Tablespoons Black Peppercorns
1 Tablespoon Sichuan peppercorns
3″ to 4″ fresh Lemongrass (1-2 tablespoons)
2″ piece fresh Ginger root
10-12 sprigs fresh Cilantro
Soy Sauce to taste
For Garnishing,
Radishes
Fresh bean sprouts
Fresh Cilantro
Fresh Mint
Fresh Basil leaves
Fresh Limes
Combine water and stock in a stock pot over medium high heat.
Rough chop onion and mushrooms. Fine dice chiles and lemongrass. Mince garlic, cilantro, and ginger.
Sauté onions and garlic with a little vegetable oil until they start to caramelize, then toss them into the stock pot.
Deglaze the sauté pan with rice vinegar. Add a tablespoon of soy sauce, allow to heat through. Add chiles, lemongrass, and ginger and sauté until the chiles start to soften. Add another tablespoon of oil and toss in the mushrooms. Sauté for about 5 minutes until heated through, then set mushrooms aside and toss the rest into the stock pot.
Combine peppercorns in a piece of muslin or a reusable tea bag. Toss them into the pot. Add the chopped cilantro and give everything a good stir. Add soy sauce if you need more; if it’s a bit strong for your taste, squeeze in half a lime instead.
Reduce heat to low and let simmer for two to four hours. Remove the peppercorns.
Boil the rice noodles in a separate pot per directions on the bag.
Thinly slice radishes, quarter the limes, rough chop cilantro, mint, and Basil.
Give every bowl a healthy dose of broth, mushrooms, and noodles. Everybody gets to add sprouts, radish, cilantro, mint, and basil as they see fit.
Serve with icy cold Singha Malt Liquor.
Savory mushrooms are incredibly delicious combined with wild rice and a delicate soufflé; the combination is sublimely flavorful and surprisingly hearty.
4 oz. Wild Rice
1/2 Cup Maitake Mushrooms
1 1/2 Cups Half & Half
1 Cup Extra Sharp White Cheddar Cheese
4 Egg Whites
3 EggYolks
3 Tablespoons unsalted Butter
2 Tablespoons All Purpose Flour
1/2 teaspoon Sea Salt
1/2 teaspoon fresh ground Grains of Paradise
Prepare rice according to directions.
In a sauce pan over medium heat, melt butter, then add flour, salt and pepper. Cook the roux for 2-3 minutes, stirring constantly, until you get a nice color to it.
Add the half & half, stirring constantly, until sauce starts to bubble. Add the cheese steadily in 1/4 cup batches, allowing each to melt completely before you add more. Once all the cheese is incorporated, remove from east and set aside.
In a chilled glass or stainless steel bowl, whisk egg whites until they hold a stuff peak. Set aside in the fridge.
In a separate bowl, whisk the egg yolks until they’re thick and lemon colored.
Gradually add the yolks to the cheese sauce, stirring constantly so egg yolks don’t curdle.
Add the rice to the blend and incorporate thoroughly. Cool the blend in hand fridge for 15 minutes.
Preheat oven to 375° F.
Lightly butter and dust with flour a 2 quart soufflé dish or individual ramekins.
Gently fold the beaten egg whites into the rice mixture. Gently pour the mix into the soufflé dish.
Bake for 20 minutes or until the soufflé has risen and is golden brown.
Serve piping hot with a fresh green salad and a nice Chardonnay.
Finally, here’s a fantastic mushroom pâté that’ll blow your socks off, as well as your guests’.
1 Pound Maitake Mushrooms
8 Ounces Chèvre
1/2 Cup fine diced fresh Shallot
1/2 Cup dry White Wine
3 Tablespoons unsalted Butter
2-3 cloves fresh Garlic, minced
2 Tablespoons fresh Parsley leaves, minced
1 teaspoon fresh Lemon Thyme (1 teaspoon dried, any variety, is fine)
1/2 teaspoon Sea Salt
1/4 teaspoon freshly ground black Pepper
Trim stems, wipe clean, and coarsely chop the Maitakes.
In a large sauté pan over medium heat, melt the butter. Add the shallots and garlic and sauté, stirring steadily, until they start to go translucent, about 2 to 3 minutes.
Add the mushrooms and continue to sauté and stir until the Maitakes are wilted and starting to brown. Add the wine, thyme, salt, and pepper, and continue to sauté and stir until the wine is nearly all absorbed, about 5 minutes. Add the parsley and sauté for another minute.
Transfer everything to a food processor. Add the chèvre and process until all ingredients are thoroughly combined. Taste and adjust seasoning.
Transfer to a glass ramekin or bowl, cover and refrigerate for at least 3 to 4 hours to allow pâté to set.
Cut a fresh baguette into round about 1/2″ thick. Rub the rounds lightly with a clove of garlic and toast them on both sides.
Serve pâté with toast rounds and a nice, cold hard cider.
Homemade dressings taste, feel, look, and are better for you.
Who knows what evil lurks inside?
I have a running food joke; it’s, “I love salad bars, because you can get all sorts of bad stuff and still pretend it’s good for you.” The reality here is that the one ingredient that’s truly not good for you nine times out of ten is dressing. The reason? Because most of the time we’re using commercial dressing. Just the other day, I urged y’all to read the ingredients on something as simple as a can of black beans. Reading the label on the vast majority of store bought bottled dressing is anything but simple.
You’re going to find stuff in 99% of the commercial dressing out there that you probably don’t want to eat, even if they say ‘Organic’, ‘Natural’, etc.; big agribusiness figured out that a lot of us like foods that are better for us these days, and they’ll do anything and everything to not lose our business, including trying to make themselves look like they’re onboard the healthy food train.
The main culprits in the You Don’t Wanna Eat That pantheon are the additives. Sure, the FDA says this stuff is safe in small quantities, but there’s a couple of problems with that. First off, the FDA has a serious track record of approving stuff that turned out to not be good for us, and secondly, even if they were safe, they might well be nutritional bad juju. Remember my piece on corn a while back, how we outlined varieties that aren’t used for eating straight away, but are used in a lot of processed foods? That choice isn’t made because of superior quality. Processed food is rife with substandard, cheap ingredients because making a profit is job one. The vast majority of commercial salad dressings contain way too much fat, sugar, high fructose corn syrup, salt/sodium, unhealthy oils, and way, way too many unpronounceable chemicals.
Reading the label prompted this harangue. M checked out a bottle of Famous Label Ranch: Let’s have a look at what she found. This is not gonna be an exciting post, but it’s important; what you’ll learn here will apply to the stuff in 90%+ of the processed food out there. If it scares you, that’s good.
Commercial ranch dressing; what’s in there?!
First ingredient, (and therefore, the greatest percentage of the overall recipe), is profit, with a pinch of advertising, bottling, and production; that is, uber alles, what we’re buying, right?
Second ingredient, water. That’s the dominant note in actual ingredients. I’m not thrilled about paying $3 to $4 for water, and while we’re at it, I’d kinda like to know what water; from where, processed or filtered how? Hmmm…
Next comes soybean oil; got any of that in your pantry? No? Soybean oil is a highly refined, high heat processed fat. Soybeans don’t give up their oil easily. Far and away the most common extraction method is to employ the industrial solvent Hexane, a highly toxic petroleum byproduct. After being treated with hexane, the oil is heated enough to remove the toxin, or so they say. Next, the oil is treated with hydrogen, (hydrogenated), so that it will blend with water and not spoil quickly. Hydrogenated oils are synonymous with the term ‘Trans Fats’. Let’s just be perfectly clear that this process is done to save money and increase profit; it’s not good for us in any way, shape, or form. Trans fats increase bad cholesterol, (low-density lipoprotein, or LDL), and decrease good cholesterol, (high-density lipoprotein, or HDL). Furthermore, they block the production of chemicals that combat inflammation and benefit our hormonal and nervous systems, while simultaneously allowing chemicals to work that increase inflammation. Finally, soy is higher in phytoestrogens than just about any other food source. Phytoestrogens mimic estrogen in our bodies, and that propensity is known to be a leading cause of breast cancer, endometriosis, uterine fibroids, infertility, and low libido. In other words, we really aughta avoid this shit like the plague.
Next comes buttermilk, but again, who made it, from what source? Buttermilk is great, but it’s kinda back to the corn argument vis a vis quality, I think.
Next we have maltodextrin; this is a polysaccharide, an artificial sweetener manufactured by applying acids or other enzymes to cornstarch. Unlike simple, natural sweeteners, maltodextrin does not provide any long-term energy benefits that a natural complex carbohydrate will. Those contain vitamins and minerals that help your body use the carbs as energy; maltodextrin doesn’t. It’s also a very large molecule, so your body has to use up a chunk of its own supply of vitamins and minerals to assimilate it. The end result of eating this stuff is that it leads to depletion of important vitamins and minerals. There are also potential side effects to ingesting maltodextrin, including allergic reactions like rashes, asthma, itching and difficulty breathing.
Next two ingredients are sugar and salt, and again, I ask, what sugar and what salt and from where. Care to bet they’re not super high quality stuff?
Now we get to the rest of the things this dressing is made of, all of which are prefaced with ‘Less than 2% of’. Among the ingredients we’ll explore further, you’ll find reasonably good things like garlic, egg yolk, celery purée, carrot purée, dried onion, vinegar, onion purée, and corn oil. All of these could be good stuff for a dressing, but they’re here in tiny amounts and once again, we have no idea of the provenance or quality. Given we’re talking Big Agribiz, chances are very good that the quality sucks.
Onward; next we get ‘natural flavor (Soy)’. Sounds pretty harmless, right? No such luck. Manufacturers these days are acutely aware that a whole bunch of us don’t want Monosodium Glutamate, (MSG), in our food. Even if they say ‘No MSG’ on the label, they well may be lying to us flat out. Why? Because MSG is cheap, and very effective at adding umami taste, that mysterious savory note. Unfortunately, MSG just ain’t good for ya. Side effects can include burning sensations, weakness of the limbs, headaches, upset stomach, and hives or other allergic reactions. Ingredients labeled like the one we found here, as well as ‘yeast extract,’ or ‘hydrolyzed soy protein,’ are nothing more than MSG in disguise. And there’s another example of things the FDA lets manufacturers get away with that they maybe shouldn’t.
Next up on the rogue’s gallery, Modified Food Starch. This stuff is made by physically, enzymatically or chemically altering starch to extend its shelf life, and little else. The most common types of modified food starch are made from corn, wheat, potatoes, and tapioca. Half way decent labels will tell you what kind you’re about to eat, reading something like ‘Modified Corn Starch’. The kicker is that, unless it is derived from one of the top eight allergens as determined by the FDA, they don’t have to tell you from whence it came. You don’t need it or want it in your diet, and that’s a fact.
Next comes Soy Lecithin, which is incredibly pervasive in processed foods. It’s an emulsifier used to help blend disparate ingredients. In other words, it’s something used solely to keep things looking like they should for longer than we aughta be comfortable with. To make soy lecithin, soy oil is ‘degummed,’ mixed with water until the lecithin is hydrated and separates out. It’s then dried, and sometimes bleached with hydrogen peroxide. See above about soy, and ’nuff said.
Then we have Carrageenan. This stuff is an extract of seaweed, and the refining processes are not particularly nefarious, so this should be OK, right? Not necessarily. Although it’s allowed in almost everything over here in America, it’s restricted in the EU, due to possible health concerns regarding inflammation, gut irritation, and even cancer. It’s in here as a thickener, which I’ll point out, we wouldn’t need if they were making this stuff from real, wholesome ingredients.
On to Phosphoric Acid; got a bottle of that on your pantry shelf? It’s in this dressing to make stuff taste tangy, which real vinegar and buttermilk in proper proportion do just fine all on their own. Why is it here? Because it’s a ridiculously cheap, mass-produced chemical. It’s also commonly used for rust removal, by the way. Some Phosphorus is good for you, and fortunately, compounds containing it occur naturally at very low concentrations in milk, meat, poultry, fish, nuts, and egg yolks, (AKA, stuff you might add to real dressings if you were of a mind). Phosphoric acid, on the other hand, has been linked to lower bone density in some epidemiological studies. There are also studies that refute those claims, (Those ones were funded by PepsiCo, FYI…)
Next comes Artificial Flavor. That’s it, just ‘artificial flavor’. Neat, huh?
Next comes Disodium Phosphate, which is made by treating phosphoric acid with a sodium compound. It’s in our dressing here to enhance texture and increase shelf life, (Is that shelf life thing starting to sound like a broken record?) In addition to enhancing your dressing, it’s used in cleaning products, pesticides, and as a corrosion inhibitor.
And then we get Xanthan Gum. This fermented corn sugar polysaccharide sweetener gets its name from a strain of bacteria used during the fermentation process, Xanthomonas campestris, which happens to be the exact same bacteria that causes black rot on broccoli, cauliflower and leafy vegetables. The bacteria forms a slimy substance which acts as a natural stabilizer or thickener. Combined with corn sugar, you get a colorless goo used to increase viscosity and generate a quality known as ‘pseudoplasticity.’ That means that when the product is shaken, it will thin out, and then thicken back up after you stop shaking it.
Next we have it right there in black and white, Monosodium Glutamate; that makes a double dose.
Artificial Color is next, and again, that’s it, just ‘artificial color’.
Next, we get Disodium Inosinate, the first cousin of the Disodium Phosphate above. This junk is used to enhance the effect of MSG. It’s an artificial ingredients there to enhance another artificial ingredient.
Then we got the second cousin, Disodium Guanylate, a chemical additive that intensifies savory flavors. AKA, another artificial to enhance artificials.
Finally, we have Sorbic Acid, Potassium Sorbate, and Potassium Sodium EDTA, ‘as preservatives.’ Sorbic acid occur naturally in many plants, and is also made synthetically; the second ingredient is a salt of the first. Both of these are effective at inhibiting certain strains of yeasts and molds, but they’re not that effective against bacteria. The third member of this troika, Potassium Sodium EDTA, is another story. First off, it’s made from formaldehyde, sodium cyanide, and Ethylenediamine, none of which you should be thrilled about. Secondly, the EDTA part is short for Ethylenediaminetetraacetic acid, a chemical salt used to separate heavy metals from dyes and other industrial substances. Beyond that concern for human ingestion, EDTA breaks down in the environment into ethylenediamine triacetic acid and then diketopiperazine. Diketopiperazine is a persistent organic pollutant, similar to polychlorinated biphenyls (PCBs) and dichlorodiphenyl trichloroethane (DDT). Heard enough? Wait, there’s more… See, although your FDA has deemed this stuff safe, it has also put it on a priority list of food additives to be studied for mutagenic, teratogenic, and reproductive effects, AKA, the FDA wants to study it further to see if it is associated with birth defects, cancer or reproductive problems. This ingredient has potential side effects including cramps, nausea, vomiting, diarrhea, headaches, low blood pressure, skin problems, and fever. Too much of it can do irreparable liver damage. There, now you’ve heard enough.
There you have it. For the record, ranch, cheesy, or creamy commercial dressings are generally the worst offenders when it comes to artificial ingredients, because all that crap is needed to keep something ranchy or creamy way longer than it should be. Don’t even get me started on the fat free or reduced fat stuff; those often have more artificial ingredients in them than the regular versions. Suffice it to note that those versions will not help your body absorb all the nutrients in a fresh salad at all, which natural fats can and will do. What about those dressings kept in the refrigerated section; are they better than their shelf-stable companions? Short answer, you gotta read the labels. Several of the most popular brands are made with soybean oil and still contain a bunch of artificial crap.
To be fair, there are artisanal and organic dressings out there made with good expeller-pressed vegetable oils like canola or sunflower. Expeller-pressed means those oils are mechanically derived instead of extracted via the use of nasty chemicals. The companies that use them usually make a point of putting it on the label, so, as with all things commercial, if it doesn’t say expeller pressed, it probably ain’t.
Granted, not all food additives are bad; salt, sugar, and other naturally derived substances have allowed us to preserve and store food safely for thousands of years. I suppose that some of the artificial stuff we’ve just outlined have a place, given the worldwide food distribution system and the need for folks to eat something when they have nothing; on an occasional basis, bad food is better than starving. I believe wholeheartedly that the majority of issues folks have with food intolerance is due to the ubiquity of all this crap in processed foods. The popular thing these days is to blame everything on gluten, and fact is, that’s probably bullshit. Less than 1% of us are actually gluten intolerant. It’s not the natural stuff, gang, it’s all this artificial crap, and you can take that to the bank.
The fact remains that the whole ‘Green Revolution’ we began foisting on the world back in the middle of the 20th century has been largely a catastrophic failure. Powered by fossil fuels and chemistry, increased yields have lead to large scale poisoning of the earth, us humans, and myriad other critters. The backlash against processed food and unsustainable agricultural practices is needed every bit as much in second and third world countries, where a lack of nutritional content can mean not just obesity, but life or death.
The answer is to take back control of our food. Buy with intelligence. Buy locally when you can. Always buy quality. Make and grow everything you can at home. Not only is this absolutely much better for you, it tastes, smells, looks and feels better. Add nutrients, flavor, and health benefits, instead of taking those things away. Here’s how.
Dressings are emulsions, an acid suspended in an oil with some herbs and spices. That utter simplicity is the beauty of a good dressing. As with all things good to eat, the fresher and higher the quality of your ingredients, the better the final product. Start with nothing more than great oil and vinegar, and you’ll have amazing dressing, guaranteed. Change the oils and vinegars, and you’ve got variety right there.
First off, the good oils. We’re looking for polyunsaturated and monounsaturated varieties, and there are a good few out there. Canola, sunflower, safflower, and walnut oils are all polyunsaturated. Olive and peanut, (yes, peanut, my fave frying oil), are monounsaturated. Olive oil all by itself offers a wide variety of flavor profiles; you can and should spend years just exploring those. Use the canola, safflower, or sunflower for dressings when you want other flavors to speak louder than the oil. Opt for good extra virgin olive oil when that flavor note will contribute to the finished dressing. Naturally, you don’t want to use a highly flavored, pricy finishing oil in a complex dressing recipe.
Poly and Mono Unsaturated Oils
Next, comes vinegar, and there are once again a myriad of varieties and infused options to try. And of course you can and should make your own, too. Among the common varieties you’ll find, distilled white vinegar has a sharp flavor profile that goes nicely with delicate herbs and spices. Cider vinegar has a sweet tang that compliments fruit and vegetables with a sweet note of their own. Red Wine vinegar is a bit heartier and blends well with vegetables. Malt vinegar is one of my faves, with a great balance of tang and sweet. Rice vinegar is a lighter, more delicate taste if you prefer things a bit less zippy. Balsamic vinegar is a world unto itself, enough for a future post, in fact; its richness and depth prompts me to say that you really don’t want to mix it with much more than good oil and a little salt and pepper. For daily use, a moderately priced balsamic will do just fine.
Vinegar varieties run wild, and so should you!
By the way, there are plenty of other acids to use for house made dressings. Citrus is a great alternative, so try lemon, Meyer lemon, lime, orange, blood orange, as well as pink and white grapefruit. Other tangy fruits with a dominant acidic note will work as well. Mango is one of my favorites, but tomato, tomatillo, kiwi, strawberry and blackberry are also stellar. Squeeze and strain citrus, or purée and strain the others to use them as a dressing base with your favorite oil. With flavorful options like these, you may find yourself not wanting to add much of anything else.
Acidic fruits make great dressings
Likewise, you can use booze or tangy dairy in place of vinegar. The inherent smoky wood and sugar notes of bourbon, or the sweet tang of rum make fabulous dressings. You can use booze straight away, or do a quick flambé to flash off the alcohol and concentrate the flavors. And frankly, there’s nothing like a creamy version made with fresh, local yoghurt, or genuine homemade buttermilk ranch. Contrary to popular belief and its name, buttermilk has less fat and is lower in calories than whole milk. The natural tang comes from lactic acid produced during fermentation. The curdling process also makes buttermilk thicker than milk, which is perfect for dressing.
Booze in dressing? Oh my, yes! Buttermilk & Yoghurt make fabulous creamy dressings.
Adding fresh herbs and spices yields yet more variety, as well as providing a little shot of nutrients and antioxidants with virtually no calories. Try what you like, and then branch out; sage, rosemary, marjoram, parsley, thyme, cilantro, and so on. Here again, think of the varieties of just one of these you can grow, like thyme or basil; each of those will give a totally unique finished dressing.
Don’t miss out on fresh veggies in your dressing either. Garlic, shallot, sweet onion, green onion, cilantro, parsley, lemongrass, peppers, chiles, even puréed root vegetables will make spectacular dressing. Like beets? Try my vinaigrette made with ’em.
Finally, dressings are a perfect showcase for all those varietal and smoked salts and peppers I’ve been yammering at you about. In a small batch of fresh dressing, just changing these will be a whole new ball game as well.
Finishing salts and peppers at custom zing to house made dressings.
Here are a few suggestions to get you started. With all of these versions, it’s best to blend with a fork or a whisk and then let the finished product sit for 30 minutes or longer to allow flavors to develop and marry. These are scaled for two to four folks to enjoy fresh, which for my mind is the way dressing aughta be done; if the volumes seem small, that’s because they are. Dressing should compliment the flavors of a salad, not drown ’em.
Fresh salad and dressing; hungry yet?
Dijon Vinaigrette
3 Tablespoons Extra Virgin Olive Oil
1 Tablespoon Vinegar
1 teaspoon Dijon Mustard
Pinch of Sea Salt
Variant: Add 1/2 teaspoon of good local honey or agave nectar.
Citrus Vinaigrette
3 Tablespoons Extra Virgin Olive Oil
Juice and zest of 1-2 fresh navel Oranges
Juice and zest of 1 fresh small Lime
Pinch of Sea Salt
A few twists of fresh ground Pepper
Variant: sub Meyer Lemon for oranges, add 1 teaspoon local honey or agave nectar.
Balsamic Vinaigrette
3 Tablespoons Extra Virgin Olive Oil
2 Tablespoons Balsamic Vinegar
Pinch of Sea Salt
A few twists of fresh ground Pepper
Creamy Vinaigrette
1/2 Cup plain Greek Yoghurt
3-4 Tablespoons Sunflower Oil
Juice and zest of 1 small Lemon
1/2 teaspoon dried Dill
Pinch of Sea Salt
A few twists of fresh ground Pepper
Variant: Add 1 teaspoon Poppy Seed
Mediterranean Vinaigrette
4 Tablespoons Extra Virgin Olive Oil
2 Tablespoons Red Wine Vinegar
1 Tablespoon Tomato Purée
1 teaspoon fresh squeezed Lemon juice
1/2 teaspoon granulated Garlic
1/4 teaspoon dried Basil
Pinch of Sea Salt
A few twists of fresh ground Pepper
Variants: Add chopped capers, or sun dried tomatoes.
Smoky Vinaigrette
3 Tablespoons Canola Oil
1 Tablespoon Malt Vinegar
1 Tablespoon minced Sweet Onion
1 teaspoon local Honey
1/2 teaspoon Sweet Smoked Paprika
Pinch Alderwood Smoked Salt
A few twists of Smoked Pepper
Garlic Vinaigrette
3 Tablespoons Extra Virgin Olive Oil
1 Tablespoon White Vinegar
1 Tablespoon freshly squeezed Lemon juice
2-3 cloves freshly pressed Garlic
1/2 teaspoon BasPinch of Sea Salt
A few twists of fresh ground Pepper
Variant: Add 1 Tablespoon Tomato purée.
Veggie Vinaigrette (For marinating or sautéing veggies)
Juice and zest of 1 large or 2 small Lemons
1/4 Cup canola Oil
1 Tablespoon Malt Vinegar
1 Tablespoon minced Sweet Onion
1 clove minced Garlic
1/2 teaspoon Sweet Paprika
1/4 teaspoon Sea Salt
A few twists fresh ground Pepper
Blend all and refrigerate for at least an hour prior to marinating or sautéing. Really nice over hot vegetables like broccoli, asparagus, or green beans.
Raspberry Vinaigrette
4 Tablespoons Extra Virgin Olive Oil
2 Tablespoons puréed fresh Raspberries
2 Tablespoons Balsamic Vinegar
1 teaspoon fresh squeezed Orange Juice
1/2 teaspoon Agave Nectar
Pinch of Sea Salt
A few twists of fresh ground Pepper
Variants: Sub blackberries for raspberries, lime juice for lemon. Sub blueberries and orange juice.
Beet Vinaigrette
1/2 Cup Beet Purée
1 Tablespoon Balsamic Vinegar
3 Tablespoons Extra Virgin Olive Oil
1/2 teaspoon creamed Horseradish
1-2 drops Vanilla extract
Pinch of Sea Salt
A few twists of fresh ground Pepper
Variants: try any of your favorite roots veggies in place of the beets.
Add 2 Tablespoons of buttermilk for a creamy dressing.
Honey Mustard
1/2 Cup plain Greek Yoghurt
3-4 Tablespoons Safflower Oil
1-2 teaspoons dried Mustard
1 Tablespoon local Honey
Pinch of Sea Salt
A few twists of fresh ground Pepper
Buttermilk Ranch
1/2 Cup fresh Buttermilk
2 Tablespoons Crema (creme fraîche or sour cream is OK too)
1 Tablespoon Mayonnaise
1 teaspoon minced Celery Leaf
1 clove freshly pressed Garlic
1/2 teaspoon Dijon Mustard
1/2 teaspoon Malt Vinegar
Pinch of Sea Salt
A few twists of fresh ground Pepper
Shot or two Tabasco Sauce
Whisk all like you were making whipped cream. Refrigerate in glass with an airtight lid for at least an hour and up to overnight before serving; like great potato salad, it’s actually better the next day.
Bourbon Vinaigrette
4 Tablespoons Sunflower Oil
1 tablespoon Bourbon
1 Tablespoon Cider Vinegar
1 teaspoon real Maple Syrup
Pinch of Sea Salt
A few twists of fresh ground Pepper
Variant: Add 1/4 cup plain Greek Yoghurt for a creamy alternative.
Buttermilk Rum Dressing
4 Tablespoons Safflower Oil
1 Tablespoon Dark Rum
1 Tablespoon Malt Vinegar
1 teaspoon fresh squeezed Lime juice
4-5 sprigs minced Cilantro
1 clove fresh pressed Garlic
1/4 teaspoon Habanero Chile Sauce
Pinch of Sea Salt
A few twists of fresh ground Pepper
We’re up in northern Minnesota for a gathering of the Luthier Community, and the heirloom tomatoes at Grant and Christie’s, some 25 varieties, are coming ripe every day. I’ve been in hog heaven cooking for the gang, let me tell you.
Far and away, the questions I hear most often when it comes to cooking with milled corn products are these;
‘What’s the difference between corn meal and corn flour’,
‘Can I make the same recipe with either,’
‘What’s the difference between corn meal and grits, or polenta,’
‘What’s the difference between white and yellow corn meal or flour,’
‘What’s the difference between corn flour and Masa?’
The answer to the first is, the degree of milling – meal is coarser than flour, and to further confuse things, there is quite a bit of variety of meals out there. Steel ground yellow cornmeal, probably the most common variant found in the U.S., has the husk and germ of the corn kernel almost completely removed. As such, it’s kind of the equivalent of bleached, enriched wheat flour; a lot of the stuff that is good for you, along with a chunk of the taste, has been removed. Stone-ground cornmeal retains some of the hull and germ, and as such also has better flavor and nutritional properties. It is more perishable, but will store longer if refrigerated. White cornmeal, made from white corn, and also can be found in steel ground or stone ground variants.
The answer to the second is, technically, I guess you could, but you wouldn’t get the same results, and you probably wouldn’t like one of the variants. Recipes designed for meal want a different texture than those made with flour; think cornbread versus a biscuit, and you get the gist.
The answer to the third is, maybe nothing, but if there is a difference, it’s a pretty fine point of variance in the coarseness of milling. Google the difference between grits and polenta and you’ll see a firestorm of opinion akin to asking ‘What is real chili?’ I have the solution for you; avoid the controversy and go find a bag of Bob’s Red Mill Corn Grits, also know as Polenta. Works great for both; debate over…
The answer to the fourth is, it depends on who you ask. Some will tell you that the only difference between the two is the the color; that may or may not be true, as there is more than one variety used for making the things we eat. In any case, the bottom line is that they are absolutely interchangeable in recipes.
And finally, for question five, corn flour and masa harina are quite different preparations of corn. Masa harina is corn flour that is ground from dried hominy. White, yellow, or blue corn is used for making hominy, also known as posole or pozole. The corn is boiled in a solution containing powdered lime, then washed, dried, and ground to form masa harina. Masa is the only thing to use for making corn tortillas and tamales, far as I’m concerned. Untreated corn flour is basically fine-ground cornmeal. I use it in recipes where I want corn flavor without the gritty texture of corn meal. Corn flour contains no gluten, so makes a good substitute for wheat flours in pan and short bread and cake recipes, though the proportions may need a bit of tweaking to get just right. If you sub corn flour for wheat flour in a rising bread or cake recipe, you need to add vital wheat gluten, since corn has none.
While we’re describing the various things corn is made into, let’s not forget cornstarch. Cornstarch is obtained from the white heart of the corn kernel. It’s a tasteless, fine powder that is very useful as a thickener; it boasts twice the thickening power of wheat or corn flour. It’s best to stir cornstarch into water first before it is added to other foods, so that it can be incorporated without getting lumpy; use enough water to make a loose slurry as opposed to a paste when you mix it. One thing to note if you’re on the other side of the pond; cornstarch is referred to as corn flour in England.
There is a broad assumption that white corn meal is preferred in the South and yellow is preferred in Texas and the rest of the U.S. While that statement certainly was true in the past, it’s not so valid as it used to be. The population base that made that a fact has aged and died, frankly, and the following waves are more likely to experiment, mix, and match.
All your meals, flours, and masa should always be relatively fresh. Stored in a cool, dry place in an airtight container, you can expect around 6 months of use from them.
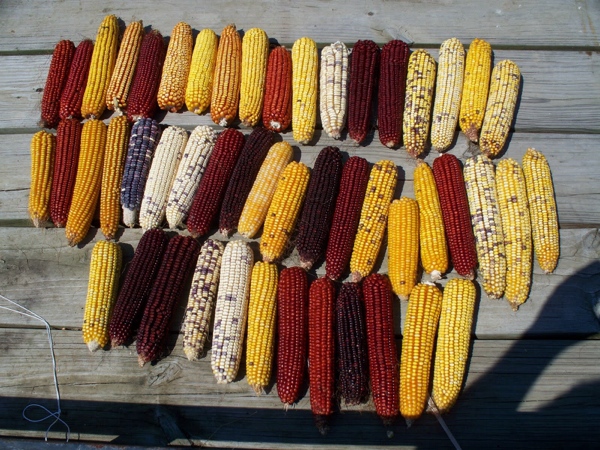
As mentioned above, there are several varieties of corn used for making the stuff we eat and cook with. Here’s a brief primer that will help you get a better grasp on things. This is a fairly rudimentary outline. For many decades, corn in America, like beer and cheese, was reduced to a few basic varieties; that trend has changed radically in the 21st Century. Heirloom varieties have exploded in the last 15 years; this has tumbled out to the folks growing their own, as well as to small cottage industries. As such, varieties have expanded and reemerged in unprecedented numbers. This is most definitely a good thing.
Dent (Zea mays indenata)
Dent or Field corn may be either white or yellow, and is predominantly used for processed foods, industrial products, and as livestock feed often used as livestock feed. No-name, really cheap corn meal or flour may be made from this variety. Dent kernels become notably indented at maturity, hence the name for the variety.
Flint (Zea mays indurata)
Flint or Indian corn is used for similar purposes as dent corn, as well as for decoration come fall. This variety is distinguished by a hard outer shell and kernels with a wide range of colors. When you see blue, red, or white flours, meals, chips and tortillas, you’re looking at flint corn. The variety is named for it’s hard or ‘flinty’ exterior.
Sweet (Zea saccharata or Zea rugosa)
Sweet corn is the variety we eat as corn on the cob. It is also canned and frozen. Seldom used for feed or flour, this variety is named for its higher sugar content, (around 10%, versus maybe 4% for Field corn). THE thing to remember is that roughly half the available sugars in sweet corn degrade notably within 24 hours of picking; if ever there was a thing you wanted to get locally from a good CSA, sweet corn is it.
Flour (Zea mays amylacea)
Flour corn has a soft, starchy kernel that lends itself well to grinding, so it is the primary variety used by companies in the U.S. to make meal and flour. Flour corn is primarily white, although it can be grown in other colors, including yellow, red, and blue. One of the oldest varieties, flour corn was grown by Native Americans before the rest of us showed up here.
Popcorn (Zea mays everta)
Popcorn is a variant of flint corn, with a soft starchy center surrounded by a very hard exterior shell. When heated, the natural moisture inside the kernel quickly turns to steam and builds up enough pressure for the kernel to explode, exposing the white starchy mass we like to graze on. All types of corn will pop to some degree, but they won’t necessarily have enough starch to turn inside out, or an outside layer that will create enough pressure to explode. One of the oldest forms of corn, evidence of popcorn over 5,500 hundred years old has been found in New Mexico.
OK, so enough learnin’, lets talk about what you should have in your pantry if you want to build corn recipes. The bottom line is that corn flours and meals are cheap and readily available, so you should aim for stocking the same stuff I do. Remember that quality counts; opt for fresh and local whenever you can and you’ll never go wrong. I stock white corn flour, masa, and white and yellow corn meal, and grits/polenta.
Alright, now we’re ready to cook. Here’re my go-to recipes for corn bread, tortillas, grits, and polenta.
Urb’s Corn Bread
1 1/2 Cups Yellow Corn Meal
1/2 Cup Corn Flour
2 teaspoons Baking Powder
1 Cup Whole Milk (or, in order of rising decadence, Half & Half or Buttermilk)
1 Egg
4 Tablespoons Lard (Unsalted Butter is fine)
1/2 teaspoon Sea Salt
Optional Additions:
Add 1/2 Cup extra sharp Cheddar or Pepper Jack cheese.
Add 1 – 3 seeded, cored and diced Jalapeño chiles.
1 ear of corn on the cob, cut down to kernels
Preheat oven to 400° F
Pour cornmeal into a bowl and add the milk; mix well and allow to sit for 15 minutes. This is a biggy in terms of making moist cornbread.
Mix remaining dry ingredients in a large bowl.
Melt the fat, then combine all ingredients and mix by hand to a nice, even batter consistency.
Place the pan(s) you’ll do the bread in into the oven, with a small dot of fat in each pan, (Or a tablespoon full if using a single pan).
When the fat is melted and sizzling, remove the pan, pour in the batter and return to the oven.
Bake for 20 to 25 minutes, until golden brown.
Serve Hot with, as Julia Child would say, ‘lots and lots of butter!’
Corn Tortillas
2 Cups Masa Harina
1.25 to 1.50 Cups hot Water
In a mixing bowl, combine the Masa and water by hand and blend until you get a nice, consistent dough that does not stick to your hands. You don’t want the dough too dry, either; shoot for a dough that holds together, isn’t sticky, but feels moist to the hand.
Roll the dough into 12 equal balls and allow to sit for about 10 minutes.
Whether you use a pin or a press, cut a gallon plastic storage bag into two equal sheets and place a ball of dough between them, then press or roll to roughly 6″ around.
In your pan or comal over medium high heat, cook the tortillas until you see that nice brown blistering form on each side. Each side will get 30 to 60 seconds of cooking time.
Stack your finished wrapped tortillas on a warmed plate under a clean towel to keep them warm.
Grits
1/2 Cup Bob’s Red Mill Grits
1/2 Cup whole Milk, (Half & Half, Whole Cream, and Buttermilk all work even better)
1 3/4 Cups Water
3/4 teaspoon Sea Salt
1/2 teaspoon freshly ground Pepper
Options:
1/4 Cup grated Extra Sharp Cheddar Cheese
2 Slices crisp cooked, thick cut bacon, chopped
In a saucepan over medium high heat, combine milk, water, salt, and pepper and bring to a rolling boil.
Shake grits into the center of the pan, stirring constantly to avoid lumps.
As soon as all the grits are incorporated, reduce heat to low and cover. You want your grits to cook at a low simmer, so keep an eye on that and adjust heat as needed.
You’re going to cook your grits for 20 minutes, but set a timer for 5 minutes and stir the grits, (So, you’re going to stir every 5 minutes for a total of 20 minutes).
After 20 minutes, taste your grits; if they’re not tender enough, cook for another 10 minutes, stirring after 5 minutes.
If you’re adding cheese and bacon, you can toss it in for the last 5 minutes of cooking, or offer it at the table with butter.
Leftover Grits?
Spread grits about an inch thick in a glass baking pan or oven proof skillet and refrigerate until firm to the touch.
Cut grits into roughly 4″ squares, season lightly with salt and pepper, then dust both sides with Wondra flour.
Fry in 2 ounces of butter and 1 ounce light vegetable oil, turning once, until golden brown. Served with red eye gravy, this is the bees knees.
Red Eye Gravy (Serves 2)
1/4 Cup Vegetable Oil
1 smoked ham steak, (About 1/2 Pound)
1 1/2 Cups brewed Coffee
1/2 teaspoon Sea Salt
1/4 teaspoon fresh ground Pepper
1-2 shots Tabasco Sauce
In a cast iron skillet over medium high heat, heat oil until shimmering.
Fry ham steak until nicely browned, remove to a warm oven.
Deglaze skillet with the coffee, stirring to incorporate all the juices and little bits of ham stuck to the pan. Season with salt and pepper
Bring liquid up to a high simmer and cook until gravy reduced by 1/3 and nicely coats a spoon.
Serve with grit cake, game and a over medium egg for a true little slice of breakfast heaven.
Basic Polenta
6 Cups Water
2 cups Bob’s Red Mill Corn Polenta
3 Tablespoons Unsalted Butter
1 teaspoon Sea Salt
1/2 teaspoon fresh ground Pepper
1/2 Cup hard Cheese for topping, (Parmesan, Romano, Asiago)
1/2 teaspoon Extra Virgin Olive Oil
In a large, deep sauce pan over high heat, bring water and sea salt to a boil.
Add polenta gradually, stirring constantly to blend.
Reduce heat to a low simmer; you’ll cook polenta for about 30 minutes, so set a timer to stir and check the progress of the dish every 5 minutes. Make sure to stir gently but thoroughly, all the way to the bottom to check for sticking and burning.
When the polenta is very thick, stir in the butter and then season with salt and pepper.
Oil a glass baking pan; spoon the polenta into the pan, even out with a spatula, and allow to set for 15 minutes, until very firm to the touch.