That’s why we do this!


This just in via email:

Had to tell you that I finally got around to doing the rump roast and yorkshire pudding that you had given the instructions for on the blog last Dec or so. The pud’ was terrific. I tried making it many years ago without much success. I followed your recipe to the T and it was great! Pretty easy, too. Just have to remember the timing, as it’s not a last minute thing.

And that’s why we do this…

Al Carbon y Verde


For anyone familiar with Tex Mex, Tacos Al Carbon will prolly induce a serious bout of mouth watering. Al Carbon literally means ‘the coal,’ the obvious implication being that the meat for this dish should rightfully be done over charcoal, and it should. Aficionados will also argue that the only correct cut for the dish is skirt steak; that can and should be argued, however. The dominant notes of lime, cumin and garlic used for this wonderful marinade lend themselves equally well to chicken, pork, lamb, goat, venison, buffalo, and even shrimp or snapper. In other words, just as fajitas have transmogrified from a particular cut of beef to a ubiquitous Tex Mex dish, it’s not entirely unreasonable to assign the term Al Carbon to the seasoning/marinating blend used on this wonderful dish. That’s my excuse and I’m sticking to it. Oh, and you can easily do a great job on this cooking it inside in a pan if you’re unable or unwilling to fire up the grill, so we’re gonna do that too.

Al Carbon Marinade

3 Limes for juicing
2 – 4 cloves of garlic, peeled
1 – 3 fresh Chiles, (Jalapeno is wonderful, but Serranos work great too)
Handful of fresh Cilantro, (About a 1/4 cup, chopped)
1 teaspoon Cumin
1 teaspoon Sea Salt
1 teaspoon Black Pepper

Juice your limes, of course, keeping the pesky seeds out.

I use whole Cumin seed and Pepper berries, so zap them up if you do too

Throw everybody into the blender and zap ’em until evenly blended and liquified

Cut your flesh into appropriately sized strips and arrange it in a glass pan. Note: If you are using skirt steak, DON’T slice it up first! It’ll need to marinate and cook and rest whole before being sliced or it will come out like shoe leather. I used cheap sirloin, because we had it and needed to use it, so I sliced it to allow the marinade to penetrate better…

Slather on your marinade and leave refrigerated for at least 2 hours and as long as overnight; as far as we’re concerned, the longer the better!

Pour off the majority of your marinade and saute in a hot pan until done to your liking.

Now, you simply must make a fresh salsa for something this good, so do so! When I was at the store I saw that the Tomatillos looked pretty good and managed to pick out about a pound that were indeed as you want ’em; that is, with skins intact and the flesh firm with no blemishes or soft spots. So Tomatillo Salsa it is!

If you’re not familiar with Tomatillos, then as a lover of Mexican and Tex Mex cuisine, you’ll want to be. Contrary to all too common belief, Tomatillos are not related to the Tomato very closely at all: They come from the Nightshade family and are closer to a Cape Gooseberry than they are to tomatoes.
You’re most likely to find green tomatillos in the market, but when ripe they can be yellow, red, green, or even purple. The ripened red and purple guys find their way into jams and jellies down south; like a Cape Gooseberry, they have a ton of pectin and therefore lend themselves well to such condiments.
If you choose carefully and don’t intend to cook with ’em right away, tomatillos wil keep refrigerated for a week at least; remove the papery husks, wash the sticky sap off the outsides and store them in a sealed container in your veggy drawer. You can also freeze them, either whole or processed and they’ll hold up for a few months.

Roasted Tomatillo Salsa

1 Pound of fresh Tomatillos
1 – 2 Fresh red tomatoes of your choice
2 – 5 small cloves of Garlic
2 – 4 fresh Chiles, (Again, Jalapeno or Serrano are our go-to choices)
1/4 of a medium sweet Onion
1/4 to 1/2 cup chopped Cilantro
1/2 teaspoon of Salt
2 cups water

Wash and prep tomatillos by removing husks, stems and sticky sap. If you don’t want a hot salsa, field strip the seeds and membranes from your chiles, (And as always, follow our common sense rules for chile handling, please!)
Arrange tomatillos, tomatoes, chiles, garlic and onions on a pan suitable for broiling.

Roast or broil the gang until skins on tomatillos are browned to charred and tomatoes are soft.

Throw everybody into a pot with the water and bring to a low boil; allow to simmer for about 10 minutes, until veggies are starting to come apart and the mixture has reduced a bit. If you like a thicker salsa, allow it to go a few minutes more.

Throw everybody into the blender and let ‘er rip until you reach your desired consistency, kinda like this here…

Et viola! Keep in a sealed glass container in your fridge, and the salsa will be good for about a week, (And it gets even better the day after you make it…)

We used local flour tortillas for our feast, since I was too lazy to make fresh. We garnished with fresh tomato, onion, coleslaw and aged pepper jack from WSU. And yeah, in fact, they tasted even better than they look!

¡Ábre tus ojos!


I have a friend at the cafe I tease with food pics. Shaking his head one day, he asked, “Do you guys cook like this every day?”

The answer;
yep, purty much

Once you get used to production and pick out a plan, doing things like we do doesn’t take all that long.

I like picking ingredients and meals for all the senses; for sight and feel as much as taste and smell, frankly. For instance, I actually like Huitlacoche, but its’ so dang fugly, I just don’t use it. Ever tried black salt? Looks great, but it smells like egg, beer and onion farts until you cook it; that’s a big no thanks for me.

So this morning, I’m knocking around and decide to make some flour tortillas, (You can find that whole process in the archives right here, BTW, for both flour and corn tortillas).

I made big ones, so then of course the question is what to put in them. Chimichangas passed through my mind, so I went with a brunch version of that. Sweet onion for flavor and aroma, cilantro and fresh tomato because you must, jalapeno for crunch and bite, black olives ’cause they’re pretty, smoked ham and extra sharp cheddar for texture and chew. I mean come on, that’s a dang pretty prep board, yeah?

Plain ol’ scrambled eggs with a dash of salt and pepper…

Everybody else onboard, rolled up and fried quick in a hot pan with a little olive oil. A big helping of homemade salsa, and tell me, what else could you possibly need? (OK, well, it was too early for beer…)

Apple Blueberry Tart


OK, OKAY!!

Got several notes to the effect that we’re too meat and potatoes during a time where we should be more desertcentric – And so, we hear and obey.

Monica whipped up an awesome blueberry compote for our Christmas cheesecake, and that got me thinking about where else we could go with that lovely stuff. It lead here!

Apple Blueberry Tart

Crust:

1 ¼ cups All Purpose Flour
¼ cup Almonds
6 Tablespoons Unsalted Butter
3 Tablespoons Sugar
¼ teaspoon Salt
2 – 4 Tablespoons Ice Water

Process almonds to a coarse meal texture.

Add flour, sugar and salt and blend thoroughly.
Cut cold butter into ½” cubes, add and process until the mix is well incorporated, (Again, like a rough meal consistency).

Add water a tablespoon at a time until the dough begins to clump; make sure the mix is moist to the touch.
Gather dough, flatten into a roughly 1” thick disk, wrap in plastic and refrigerate for at least 2 hours, (And up to a day).

When ready to build, line a pan with parchment, then roll dough out to fit, (Tart or sheet pan, depending on whatcha got).

Blueberry compote:

1 Cup Blueberries
2 Tablespoons Unsalted Butter
2 Tablespoons Cointreau
1 Tablespoon Agave Nectar (Or honey)

In a sauté pan over medium-high heat, add Cointreau and heat through.

Add butter and agave nectar and combine thoroughly.

Add blueberries, drop the heat to medium, and allow sauce to thoroughly coat. Continue heating and mixing until roughly ¾ of the berries have burst. Remove from heat and set aside.

Apples:
Of course, this begs the question, what apples are best for tarts?
The answer, for the most part is, those you like that come from as close to you as possible!
You can use either sweet or tart varieties as you prefer, and you can in fact mix both together – Do what you like, and try something else next time!
Jonathan, Winesap, Pippins, and Jonagold are great varieties with both sweet and tart elements to them.
For the tart side, try a Northern Spy.
For sweeter types, Honey Crisp, (Which is what we used), and Pink Lady are great choices.
What you do not want are varieties that go to mush or have no flavor: Delicious apples are great for baking if they’re fresh and local, otherwise, truth be told, they’re usually crap. Macintosh, Cortland and Fuji are probably not what you wanna bake with, either…

2 – 3 Apples of your choice
¼ Cup Sugar
2 Tablespoons Unsalted Butter
1/2 teaspoon ground cinnamon

Preheat oven to 400º F.
Peel and halve, core, and stem the apples.
Cut apples into ¼” thick slices.
Spread an even, thin layer of the compote over the dough.

Layer apples, overlapped by about ¼ their width, starting in the middle and working out toward the edges, until you’ve covered the whole shebang. Don’t use the ends/little nasty pieces if your concerned about appearance, (Which ya aughta be…)
Combine sugar and cinnamon, and shake evenly over the apples.
Cut butter into ¼” cubes and toss onto the apples as well.

Place tart in middle of oven. Bake for 25 minutes, rotate pan 180 degrees, and continue baking for another 25 minutes. Edges of the tart should be nicely browned, and don’t fret if the apple juice burns a little on the pan.

Allow to cool on a wire rack.

Devour with abandon.

Ho Ho Ho pour Deux


OK, so this year, Christmas is one day off for me, a couple for M. That said, it happens to be one day off together with a fantastic built in excuse to make great food!

For my family, the traditional Christmas dinner is a set piece: Eye of the Round, Yorkshire Pudding, Brussels Sprouts, and mashed spuds. Call it decadent, call it over the top, but definitely call it!

We’ll just lightly go over the easy stuff and focus where folks seem to have the hardest time, and that’s with Yorkshire Pudding. If you’re one of those who’s had a less than stellar try at this wonderful dish, don’t feel bad; for something so simple, it can be a real bear to make! OK, onward…

A nice eye of the round is a lovely, relatively cheap cut of roast. You can find this for around $3 a pound and it’ll be well worth your while. There’s a temptation to add fat to this cut because it’s so lean, but I caution you not to. Find one with a decent little fat cap and call yourself lucky. I season with salt, pepper and olice oil and nothing else. You can sear it off in a hot pan if you wish to and plunk that bad boy into a 350 F oven with a thermometer on board, (Note this little 2+ pounder had a nice fat cap, so I did not sear, just rubbed oil, salt and pepper into it and sent it to the oven…) We take this up to 145 F internal temp and then pull it, cover it and leave it alone for a good 10 to 15 minutes; it’ll come up to a perfect medium rare and keep all its juices that way.

The smell of that beast cooking all by its lonesome is pretty spectacular, indeed!

M preps the sprouts, which get steamed with butter, salt, pepper and lemon juice – Nothing more need apply, (The little bowl of pepperoncini and Nicoise olives were cook munchies only!)

Spuds got steamed, mashed and done up with butter, cream, salt and pepper – No, I am not screwing around…

M made crazy good gravy with pan drippings, beef stock and not much else –
It was un-be-lievable!

OK, so Yorkshire Pudding here we come!
Here’s the drill. Use exactly what I’m showing you here and do the procedure exactly as outlined – No shortcuts!

Have everything at room temp before you start; no BS, honest room temp, all around!

All you need is:

1 Cup Flour
1/2 Teaspoon Salt
1 Cup Whole Milk
1 Cup Water
2 Eggs.

That’s it! Combine the flour and salt well, then make a well in the middle and pour in the water and milk. With a whisk, combine everything until smooth and uniform.

Add the eggs, switch to a hand blender or mixer and start a mixin’! You want to mix for a good 5 minutes on a low setting, until you get roughly 1/2″ bubbles forming in the mix. Once you do, stop, cover the bowl and refrigerate for at least an hour, and 90 minutes is better yet.

Keep in mind, it’s all about temperature and incorporation; anything less than complete attention to details
will
not
work!

After you’ve chilled your batter, bring it out and back up to room temp, (Honestly, no cheatin’ in method or temp – It takes time, so plan accordingly!)

Toss 2 or 3 ounces of unsalted butter into a straight sided dish: A souffle pan is perfect, of course, and you want one sized such that your batter will be about 3/4″ thick in the bottom when first poured in.

Put the dish into a 400 oven until the butter and dish are sizzling hot. Pour your batter right in and throw the whole thing back into the hot oven.

Bake for 20 minutes at 400 F, and 15 more at 350 F – As with Popovers, souffles, etc, DO NOT OPEN THE OVEN DOOR, period, end of story, (Yes, it really matters!).

And if you do all that faithfully, why then, viola, you got Yorkshire!

Have everything set so that you can plate and serve immediately, ’cause the pudding don’t wait well for others…

And there ya go, Bon Appetite and Feliz Navidad!

Oh, gosh, where are my manners?

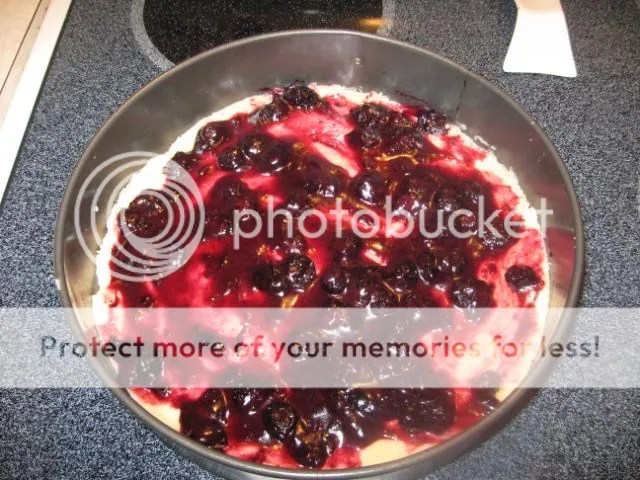
Desert, you ask? Of course! We cheated and bought a nice little, locally made cheesecake, for which M whipped up a compote with blueberries, Agave nectar, butter and Cointreau – Outta this world good, if you still have room!

We wish you all happy, healthy, safe holidays and a joyous New Year!