I tweak and republish this post annually; I think you’ll see why when you read it.
See, I’m not out to be tragically hip, in fact quite the contrary. Or maybe Matthew Selman said it best; “I wish there was another word than foodie; how about ‘super food asshole’, or ‘pretentious food jerk’?” I just don’t wanna go there.
Granted, there are a lot of great food blogs out there, but right now, many are judged ‘Great’ because somebody took a really, really nice pic of some food, or is on the fast track to be the next Food Channel Super Food Asshole. Frankly, when the ‘best’ food blog sites reject people because they don’t meet criterion such as that, I’m more than not interested, I’m actively turned off.
I write about food from some pretty simple perspectives. I’m interested in sharing recipes, methods, processes and such. I’m interested in sourcing, using wisely, and preserving food that is good for you, in a world where much of what we are offered to eat is not very good. I’m interested in the science behind cooking, because I’ve never liked simply being told to ‘do it this way.’ I trust that if you’re reading this, you’re interested in these things as well. To be honest, if no one read this blog, I’d write it anyway, because I do it for me first and foremost; I gotta share what I love. That’s just how I’m wired.
So, when I look at ‘real’ food blogs, I see the stuff that, fairly often, folks ask me about here, or more to the point, ask me why I don’t do these things. There are three oft repeated comments, and they are,
Why don’t you list nutritionals and calories,
Why don’t you post prep and cooking times, and
Why do you post exotic ingredients that I’m not likely to have?
So, in a nutshell, here’s why;
Frankly, listing nutritionals means, more than anything, that I am determining what kind of portion size you and yours eat, and frankly, I don’t have any idea about that. If I list a casserole recipe and you make it, how much do you eat? How about your partner? Do you have seconds, are there leftovers, and on and on. This ain’t a restaurant, and I’d bet your house isn’t either; neither of us needs everyone to eat the same portion. For the record, I predominantly do recipes for two, with planned leftovers, the idea being general efficiency, and the fact that anything good will be great the next day. Other than that, you’re kinda on your own. I mean I can give you a great biscuit recipe, but how big you make ’em, and how many y’all wolf down is kinda your gig, right?
Don’t get me wrong, nutrition IS important and should be monitored in some way, shape, or form. The best way to this is to buy carefully and thoughtfully. Buy locally whenever you can. Read the labels on food and avoid the stuff that’s truly bad for you. Grow anything and everything you can. Preserve what you buy or grow so that you can notably extend the time it is available to you. Make everything you can, from scratch, at home. That may sound more intensive than what you do now, but if you really care about nutrition, you’ll do it. And as far as we go, whenever you need or want detailed nutritionals on our recipes, just click on our link for Calorie Count and go to town. There’s a mobile version out for your Apple or Android smart phone as well now.
Next comes prep and cooking time.
Weeeeeellllll, how do I say this? Listing prep time is, in my not even remotely close to humble opinion, one of the dumbest things I’ve ever read. The problem is actually pretty obvious. Listing prep time says we all prep at the same level, and nothing could be further from the truth. Heck, I have three preppers in my cafe and they all perform differently… So really, the question is who’s prep time are we talking about? Mine? Yours? Emeril’s? I’ve been cutting things for decades and have pretty damn good knife skills; do you? I can stem, seed and core a tomato blindfolded, without cutting myself, in about 15 seconds; can you? I don’t even think about process and procedure any more, it just comes naturally; does it for you? And if your answers are ‘No’, does that make you slow? If I can prep Dish A in 10 minutes and you take 20, should you not make that dish? Of course not! And really, that’s just the tip of the iceberg. How about what ingredients you have right on hand when you start your prep, how well equipped your kitchen is, how your day went, how many rug rats are flying around your feet, or how many critters need to go out right NOW?! Get the picture? My bottom line is simple – Who gives a rats ass how long it takes if you have the time and want to make it? If you’re cooking regularly, you either already have a decent sense of what you can and will accomplish in a given time, or you will develop one in time. If you really do like cooking and want to do it, you’ll do it.
Finally, there’s the exotic ingredient thing. Yes, I have a whacky spice cabinet. You may or may not have a pantry like ours, but I really don’t think that matters. We have all this stuff because we dedicated lot of time and energy into developing and perfecting recipes to share with y’all. Whether or not you need that much stuff is up to you. Does a couple avocado leaves and a little annatto really make or break good chili? If you’re asking me, I think the question is rhetorical. And frankly, I don’t buy the ‘why do you use ingredients I’m not likely to have’ complaint for a second; in this day and age, almost anyone in this country, and many others, can get anything they want. I recently shared a bacon recipe with a pal from South Africa. He ended up having to go all over creation to find several ingredients, but he did it, ’cause he really wants to try my recipe. Kinda like that last discussion on prep and cooking, huh? Ive mailed corn meal to Australia and mustard seed to Israel; if you can’t get something you wanna try, hit me up, I’ll help. I’ve also gotta point out that we constantly encourage and desire experimentation, so if you’re making it, put what you like in it: Give us credit the first time, and then it’s yours…
I say that if you love cooking and great food, maybe you should check out Tasmanian Pepperberry, or Urfa Bebir; who knows what you’ll do with them?
We do this because dear friends who love to grow, cook, preserve and explore as much as we do asked us to. We do this because we have a love for good food and cooking shared. We do this because we hope to inspire such in y’all. If that ain’t good enough, so be it.
Noticed the other day that ribs are big in the stores, now that summer has officially begun. Seems like a good time to offer a fave take on those bad boys. Now first off, I admit here and now that M does ribs better than I do in terms of process, so I’ll just synthesize her method and my seasoning.
So why are ribs so dang tasty; there’s not much there, so what’s the secret? In a word, bones; bones and some marrow influence, too. Little cuts of meat attached to the stuff that we use to make amazing stocks, soups, stews, and reductions from, that’s the ticket. When cooked low and slow, the influence of the bones and marrow make their presence known in a way nothing else can really emulate.
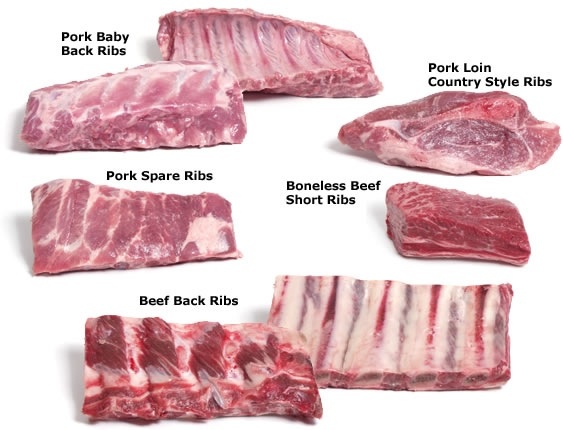
Do you know your ribs? All of ’em? Here’s a quick run down on the variations you’ll find out there.
Spareribs
Or spare ribs, either spelling works, and either way, it always means pork, period. Spareribs are cut from the side or belly. Nowadays, they’re usually sold trimmed and ready to go, but you still may find them offered with the brisket bone attached; if you get them that way, just cut the bone out and save it along with the rest for making stock. Spareribs may or may not have the skirt attached, (a thin flap of meat that runs along the meaty side). If the skirt is there, you’ve got St. Louis style ribs, and if it’s trimmed off, you’ve got Kansas City style. If you ever wondered what those two terms were all about but were afraid to ask, you may now consider yourself enlightened. If you’re serving spareribs as an appetizer, two ribs per person will do the trick; a half rack, (six ribs), is a decent entrée portion.
Baby Back Ribs
Arguably the most popular pork rib variety, baby backs are less meaty than many other styles, but tend to be leaner than their bigger cousins as well. Baby backs are, in fact, cut from the back of the rib cage. They tend to include a high proportion of loin meat, which explains their lean and tender nature. Reasonable portions for baby backs are 3 ribs per as an appetizer, or a half slab entrée.
Country Style Ribs
This cut is a bit of a misnomer. Cut from the sirloin or rib end of the pork loin, this meatiest variant of the rib family doesn’t really include ribs at all. You can often find this cut in single portion packages, as well the equivalent of a half or full slab; they’re perfect for those who want to use a knife and fork instead of getting all handsy with their meal. Country ribs can be pretty fatty and may need some trimming prior to cooking. Portion sizes are one apiece for appetizer, two as an entrée.
Beef Back Ribs
These big ribs come from the back of the loin; they’re the beef version of baby backs. Meatier than pork ribs, they contain five or six bones per slab. That said, while the bones are big, they’re not super meaty. They will, however, be plenty tasty if given a good rub and lightly smoked. Portions are two per as an appetizer and five or six as an entrée.
Beef Short Ribs
This cut used to be a tremendous bargain, until every chef in the world decided to make them popular. Now, they can often be pricier than they’re worth – If you see other cuts for much less, buy those. Short ribs come from the bottom end of the rib cage, or plate cut. Short ribs are not a tender cut and really shouldn’t be grilled or barbecued; they need low and slow braising or smoking to really shine. The cut can be fatty, so trim as needed before you cook. A quarter pound appetizer and half pound entrée will do the trick.
Lamb Ribs
A full rack of lamb contains eight ribs. The ribs themselves are really quite skimpy, so the chop is typically left attached;you’ll find them offered as rib chops or as a whole rack. The racks are a fairly famous cut and make a great roast. Fancy stuff has been done with these for many moons, like cutting the rack into 3-3-2 and tying them tips up as a crown roast, or trimming the meat at the tips of the chops back to the bone, which is the famous French chop or rack. A double French rack is two racks tied tips up back to back. If you’re not familiar working with the lamb rack cut, make sure to ask if the chine, (backbone), between the ribs has been cut, so that the roast is easy to carve. If you’ve not cooked a lot of lamb before, be aware that it’s usually quite a bit gamier than beef and pork. The heart of the gamy flavor is fat, so trim appropriately if you’re not comfortable with that. Soaking lamb in buttermilk for at least 2 hours and as much as overnight will help a lot to tame the game and keep them moist and juicy. While you can certainly cook and serve single rib chops, you’ll get a much juicier result if you leave them as doubles; you can then cut them into singles for an appetizer and leave them doubled as an entrée.
Game Ribs
Then there’s game; I’ve personally had and cooked venison, elk, boar, buffalo, bear and ostrich. The first thing to remember with game ribs is to use them; I don’t know how many hunters and cooks I’ve known who don’t even consider this, but we all should. First off, if you harvest, you’ve got the responsibility not to waste, and that’s a biggy. Seconly, if you love game, ribs can and should be a signature taste of the beastie. As with lamb, game ribs can be gamy, so trim the fat, if any, and marinate. Buttermilk works great here, but wine and herb, or a nice flavorful brine will shine as well. Keeping in mind that fleet-footed game like deer and elk are quite lean to begin with, so marinating will do a lot to keep things tender and juicy.
Here’s a wet rub and BBQ sauce that will go great with any of the above.
This recipe will serve for a couple of racks of ribs.
We’ll do a low and slow cook with a grilled finish for knockout flavor.
2 Tablespoons extra virgin Olive Oil
1/4 Cup Honey or Agave Nectar
2 Tablespoons Smoked Sweet Paprika
1 Tablespoon cracked black Pepper
1 teaspoon Onion powder
1 teaspoon granulated Garlic
1 teaspoon Sea Salt
3-4 Shots Tabasco or dried Chile Powder
Optional: 1 teaspoon Smoke Powder
Preheat oven to 225° F.
Rub ribs generously with the olive oil.
In a mixing bowl, combine the honey, paprika, pepper, onion powder, garlic and Tabasco or chile powder, and the smoke powder if you’re using that. Rub evenly over the ribs, taking time to work it on to all surfaces.
Wrap racks, meaty side down, in a large piece of metal foil (The wide, heavy duty stuff does best; if you’ve got light weight stuff, double it). Seal the edges of foil with a double fold.
Cooking Stage 1, oven low and slow.
Cook smaller, more delicate ribs like baby backs for three and a half hours; the bigger ones can go four hours.
Preheat grill on high, then reduce heat to low with lid open. If you’re just using your oven, leave it at 225° F.
Remove ribs from oven and drain off any excess drippings. Carefully flip ribs over to bone side down, using a big grilling spatula or two smaller ones. Your ribs should be at the pint where they’re starting to fall off the bone, so be gentle.
Trim the foil back to so you’ve got a baking sheet kind of affair, with a 3/4″ inch lip of rolled foil all the way around the ribs, to catch juices and keep the sauce in place for the remainder of the cooking.
Apply an even, thick layer of sauce to the meat side with a basting brush.
Cooking Stage 2, sauced and grilled, (or not)
Transfer ribs to the grill if you’re going that route.
Cook on low heat, with the lid down, for 20 to 30 minutes more.
If you’re using the oven for the whole job, cook uncovered for 20 to 30 minutes more.
Remove from oven and serve promptly with more sauce, house made potato salad, and baked beans.
A nice local Pilsner, Lager or dry white wine is the perfect accompaniment, refreshing your pallet and cutting through the fat for that next juicy rib.
Try this amazing cranberry powered sauce; folks are gonna make yummy noises and ask “what IS that?” in a good way…
Eben’s Cranberry BBQ Sauce
1 bag Cranberries
1 Cup Sweet Onion
1 bottle Porter or Stout
1 large Navel Orange
1/2 Cup dry Red Wine
1/2 Cup Balsamic Vinegar
1/2 Cup Honey or Agave Nectar
1/3 Cup Worcestershire Sauce
1/3 Cup Soy Sauce
2 cloves Garlic
Peel and dice onion, peel and mince garlic. Zest and juice the orange.
Use a nice, fresh local Porter or Stout.
Throw everybody into a large stainless steel sauce pan over medium high heat and blend well.
As soon as the cranberries start to pop, reduce heat to achieve a nice, steady simmer. Allow to simmer for 1 hour, stirring occasionally.
Process sauce with an immersion blender, or carefully transfer to a blender, if that’s what you’ve got. Be very careful if you use a blender; process in batches and watch out for the hot sauce. Process until the sauce is uniform and smooth. If you don’t have an immersion blender, AKA. A motor boat, go buy yourself one for Christmas, they’re indispensable.
If you like your sauce a bit chunkier, as we do, you’re done; if you like it smoother, run the sauce through a strainer once.
Transfer to a glass bowl or jar and refrigerate for at least 4 hours prior to use, to allow the flavors to marry and the sauce to finish thickening.
And remember, save those piles of bones for making pork or beef stock; they’re way too good to toss!
My friend Kevin Rosinbum, a seriously talented photographer, cook, and renaissance guy, turned me on to this page at Traditional Oven – Initially, I was impressed with the versatility of the yeast conversions they had cookin’ there – Then I started poking around on the myriad of other stuff on that right hand column, and my impressed became a seriously wowed.
It happens in every professional kitchen, to some degree, every day – And folks, truth be told, it happens exactly the same way in our home kitchens, too. Classically, it’s known as being dans le merde – You might not know the term, but I guarantee you know the feeling. You’re in the shit.
Anyone who’s worked in a professional kitchen knows the term. My first professional kitchen training was French, then a Basque kitchen, then another French outfit. ‘On est dans la merde,’ was a thing I heard early on, and quickly came to understand – If you want the proper pronunciation, it’s onnay don la maird – It means, we are in the shit, and in it deep. It’s a colorful phrase, indeed. The Americanized version is ‘in the weeds’, but it means the same thing, and it’s rarely good – I’ll explain my choice of rarely over never down the line a spell.
What in the shit or the weeds means is simple – It’s the Murphy’s Law of cooking – What can go wrong, will go wrong, and usually at the most inopportune moment. It makes sense, frankly. While some advocate that the phenomenon is more prevalent and has greater negative repercussions in a fine dining outfit, I personally think that’s hooey. Let’s face it, we’ve all been to a fast food chain when they’re in the weeds, and frankly, I have zero doubt that staff and patrons there feel it every bit as acutely as they would at The French Laundry. It sucks, bad, and sometimes it can be damn near impossible to get out of quickly or cleanly. Yet most of the time, that’s not true, thank the gods.
Before we explore the what, a moment to discuss the term – Where does in the shit/weeds come from – The etymology isn’t crystal clear. Some posit that it stems from a sports analogy, hitting a golf ball into the rough, or getting tangled in seaweed during a swim. Mark Liberman, a Professor of Linguistics at Yale, suggests it refers to getting off the beaten path, and that strikes me as closer to the mark, (no pun intended). It’s hard to say how old this chunk of kitchen lexicon is. A search for the origins or first use of the term as kitchen slang yields almost nothing of value, it’s an arcane term that apparently hasn’t been explored well. My earliest finding for it is George Orwell’s Down and Out in Paris and London, published in 1933. The inference therein is that the term was common among kitchen staff then, so it likely has its roots back a spell from Orwell’s time.
All it takes to be weed bound is for one link in the chain to fail…
What being dans le merde means is, overwhelmed. In a restaurant, it means that something has swamped a station or stations, and they can’t keep up. When everything, literally everything, must be precisely timed and finely coordinated, that’s all it takes to bring about disaster. And if the orders keep piling up after it’s happened, it’ll take that much longer to get out of.
What I do nowadays in the cafe during peak periods is expedite – I’m standing on the front of house side of the pass, the high counter where completed plates are placed by the kitchen staff when they’re ready to go. I give everything one more check, confirm each element of the plate with my QC, and then hand the plate on to a server. But in reality, I’m watching the clock, and all the stations. My QC, (literally Quality Control – The most important person in that kitchen), the one who has final say on what comes out to me, has control of her line, but her back is to it most of the time, whereas I’m facing the various stations – She can feel what’s shaking, because she’s really good, but I can see it – The expressions on faces, the sudden slow down in assembly steps as somebody gets bogged down, the lack of plates at a given station, where there should be several. As such, a great deal of what I actually do is orchestrate things to keep us from being dans le merde. It’s a constant, demanding dance, and I love it.
Now we reach the point of asking, so what? Why would we be interested in exploring a term that describes catastrophic failure? The answer, my friends, is simple – Search your hearts and memories, and you’ll find plenty of examples of this happening to you, in your own kitchen. Sure, we’re not Le Bernardin, but the fact is that, on a Tuesday night, after a long, hard day at work, when you’ve got to have dinner on the table for your family in X minutes, and the shit hits the fan, it matters a great deal. It has happened, and as sure as hitting a deer while driving eastern Washington, it will happen again, and therein lies the crux of the matter – When it does, what will you do? The sitcom and cartoon answer is, order pizza, and sometimes that works, but the fact remains that most of the time that’s not an option, so, just as I do at work, we at home must act to save the day.
Craig Thornton is the wildly creative LA Chef and founder of Wolvesmouth, what he describes as, “a communal dinner party, kind of like the old-world salon.” A dinner party that just happens to be one of the most sought after dinner reservations in that town. In an interview a while back, he said something that speaks perfectly to why understanding and studying being dans le merde is important – “Cooking is creating a big fucking problem and learning how to solve it.” Truer words were never spoken. No matter how accomplished you are, no matter how broad your repertoire, Murphy says that things will go wrong when you can least afford it. Made Yorkshire pudding a thousand times? You’ll fuck it up on Christmas Eve, with the whole fam damily in attendance. Think about it – Cooking is chemistry, math, history, memory, ambition, imagination, all done with a cornucopia of methods and processes almost guaranteed to make all that fail at some point. It’s a given, and as such, we need to recognize and acknowledge failure – Bow to the gods of chaos, and then smile back at ’em. Failure is, quite literally, a vital part of the cooking process. As with most things in life, it’s not what happens to us, but what we do about it when things don’t exactly go swimmingly that tests our mettle.
So, what’s the take away, S’il vous plaît? The answer depends on the disaster. Fortunately, this being the 21st century, answers are but a click away, if you don’t already know one. When a disaster hits your kitchen, it’s time to go into triage mode. Whatever the crisis, when it happens, you need to do what we do at work. Stop for a moment. When you’re in the shit, it feels like you’ve just got to forge on, a la the Winston Churchill quote, “If you’re going through hell, keep going.” Fact is, that’s usually not a good idea when everything is going to shit.
Epic kitchen fail? Take a time out first.
Disaster requires a moment of observation first and foremost – What went wrong? We may or may not be able to answer that question, but you need to take the time to observe and assess. Thats literally what I do at work – “Gang, stop – Let’s figure this out – Do we need to move people around, do we need more hands, what’s the deal? Let’s figure it out and fix it.” That’s why up there in that second paragraph I said being dans le merde isn’t always bad – If you’re barreling down the wrong path and something critical brings you to a full stop, it can be a hidden blessing – You only ruin one dish, instead of a whole meal.
How do I fix THIS? Google that sucker!
Take stock of what happened – If you’re not sure what it was, grab your smart phone and google that sucker, ‘why did my Sauce separate?’ With all the resources out there, you’ll likely not only find the cause, but a wealth of possible solutions as well. For the time being, screw the sauce – What’s done is done, and a minute or two more isn’t going to do a bunch more damage. Here’s another tip – Ask for help at home. If you’re a solo cook, (as most of us at are), you’re probably not big on helpers, (I’m not, as many well know). That tendency is, in fact, the cause of many disasters – you’ve taken on a big ass menu of stuff that’s new to you for a party, and wham, things go to shit – Ask for help – Chances are good there’s a spouse, kid, hell even a neighbor you can call on in a pinch. That extra set of hands, eyes, and heart may be exactly what’s called for.
Finally, accept the circumstances. Soufflé pan cracked mid bake? May be salvageable, may not – If not, what’s your alternative? Perfect scrambled eggs are a thing of beauty – No, they’re not a soufflé, but after that disaster, who would argue with great comfort food? Burned the butter in the sauté pan? Don’t wipe it out and charge forward. Stop, get a new pan, take a sip of wine while it heats up. Take a deep breath, get rid of whatever distraction that drew your attention from where it should have been, and calmly go forth to culinary success.
If nothing else, I’ll guarantee you this – Screw something up in an epic kitchen fail, and it’s a safe bet you’ll never, ever do that again. Count your hidden blessings.
It’s a safe bet that one of the most important skills, (if not the most), a home cook can posses is also one of the most feared – knife skills. The reasons for this are obvious. Back in the my public service days, a friend who happened to be a local E.R. Doc told me that the leading cause of hand lacerations was folks cutting bagels – sad, but distinctly illustrative. The fact is that proper knife skills are rarely passed from home cook to home cook. Some folks naturally get it, but many don’t, and unless you’ve been formally trained in culinary school or in a restaurant setting, you’ve likely never gotten the instruction and training you need to use knifes safely and effectively. Fortunately, what any good home chef needs to know is pretty simple, and that’s what we’ll cover today.
Knife skills in some form or another go back through pre-history, of course, and the recorded part farther back than you might think. In the Zhou dynasty of China, (1045 to 256 B.C.), the art of fine cooking was called ‘k’o’peng,’ ‘to cut and cook.’ By the end of that lengthy reign, Chinese cookbooks contained a plethora of terms for different cuts, illustrating the importance of good knife skills. As the western world caught on and the golden age of haut cuisine in Europe arrived, knife skills were paramount for any and every chef, and they largely remain so to this day. In virtually every genuine professional kitchen, when you step in, you’re expected to know the mechanics and vocabulary of professional knife skills, (and there are no knives provided by the venue – You bring your own, and you’re expected to know how to use and care for them). And yes, for the record, it’s still considered extremely bad form, verging on culinary blasphemy, to even think about touching another chefs knives.
For home cooks, safe and effective knife use is arguably more important than knowing all the fancy cuts – And doing so safely and efficiently requires reps – hundreds, if not thousands of them, to get truly good. This is true not only in order to make the safe and proper steps of cutting food autonomic, but to understand that ingredients behave quite differently when being cut – Carrots react totally differently than tomatoes, and you really do need to know how those vagaries. Speaking of fancy cuts, forget all that razzle dazzle you see on food porn TV – Those folks are Pro’s with tens of thousands of cuts under their belts, and hell, they’re on TV – Naturally they’re going to show off – Trying to match that kind of speed is a recipe for disaster for the home chef, and frankly, it’s just not necessary. In a professional kitchen, we work under extreme time constraints that require intense speed and focus. At home, we need to get dinner on the table, in decent form, in reasonable time, and first and foremost, without cutting the shit out of ourselves. As the inimitable Anthony Bourdain so aptly put it, “When you cut yourself cooking, half the pain you feel is the realization that you’re a dumbass.”
Thankfully, the first step in reducing our dumbassedness factor is a relatively simple thing – don’t use dull knives. I can attest, from a myriad of personal experience, that the vast majority of home kitchens I’ve cooked in have dull knives, (and too often, dull, crappy knives). This is a recipe for disaster. You’re far more likely to cut yourself with a dull knife, because it simply doesn’t work as it should – That makes you try harder, and the next thing you know, it’s E.R. time. This being the 21st century, there is a wealth of information and equipment out there to help you keep your knives sharp – Find it and use it.
Parts of a chefs knifeThe next thing that must be learned is a proper knife grip. Chances are that a bunch of us are doing this very fundamental thing wrong, and correcting that is, no fooling, the most important step you can take toward better knife skills. To illustrate we first need to diagram out the components and features that make up a typical chefs knife, from butt to tip. The butt is the farthest end from the tip of the blade, the end of the handle/grip/scales of the knife, (the part we grasp). The handle ends at the bolster/finger guard – That feature, often metal, is what separates handle from blade. The blade consists of a point, tip section, cutting edge, and heel. The top side of the blade is the spine. And in any decent knife, the metal that forms the blade continues fully through the handle and ends at the butt – This is what is referred to as a full tang blade.
With that map in mind, chances are good that when you grip your go-to kitchen knife, you grab it by the handle, and only by the handle, such that all of your grip hand is solely on the handle, behind the bolster/finger guard. This is called, naturally enough, a handle grip, and it’s what the vast majority of inexperienced home cooks use. While a handle grip seems to make sense and is generally comfy, it has distinct problems, because the it offers quite limited control of the blade. If you’ve got itty, bitty hands, a handle grip makes sense, otherwise, not so much.
Handle grip on a chef knife Handle grip on a chef knifeHere’s the solution – The blade grip. Although this might seem counter-intuitive, I promise you that it is not. With a blade grip, your thumb and forefinger are placed along the spine of the blade, on the blade side of the bolster/finger guard. Effectively, you pinch the blade between thumb and forefinger. What a blade grip does is shift the balance point of the knife to your advantage, and affords much greater control and sensitivity for your cutting hand. It may feel a bit weird, even scary to have fingers up there near a sharp blade, but trust me, you’ll have a much better feel for what your knife is doing with this grip. One caveat – A blade grip can feel really awkward on a cheaply made knife, especially one without a bolster/finger guard – And I can’t think of a better reason not to own or use such a thing, frankly.
Blade grip on a chef knife Blade grip on a chef knifeOnce you start to use a blade grip, you’ll quickly get a feel for it, and for the advantages it brings. This grip alone will markedly improve your knife skills, and the safety with which you wield your blades. Note that the blade grip works best with chefs knives, santokus, and the like – It’s harder to employ on something small like a parer, although there is a modified grip for that, as you can see in the image below. Pinching the parer right at the bolster, or placing a forefinger along the spine, works great for fine control. That said, a handle grip will work just fine with a parer for most of what you’ll want to do.
Parer grip Parer control gripOne more piece of the puzzle is needed to complete thisx lesson, and that’s what to do with your non-cutting hand, the hand you grip the stuff you’re cutting with. Mistakes and miscues in this regard are, in fact, the cause of much dumbassedness amongst cooks – Even Pro’s, (watch Chopped for a while, and you’ll see more working professional Chefs cut themselves badly than you might care to watch.) The solution is known as The Claw, and it’s every bit as important as a proper knife grip. Employing the claw requires some set up, and here again is a place where home cooks screw up and hurt themselves all too often. Naturally, the hand you’re going to cut when you do things wrong is the food gripping hand, right? Any time a finger tip, palm, etc is exposed unduly, Murphy’s Law will indeed kick in. The Claw is how you avoid that pain.
First things first – Get a flat stable surface to cut Using the Claw – Finger tips tucked back, knife guided by knuckles Completing a large dice, using a blade grip and the clawThe first and foremost mistake made with a home cooks non-cutting hand is trying to cut something that’s not stable, and it’s usually veggies that are the culprit – Take your pick, onion, carrot, tomato – the first slice attempted on a thing that does not want to sit flat on a cutting board, combined with an improper grip, is a recipe for disaster. The solution is to make a first cut that stabilizes things. Using the claw grip to make that stabilizing cut is key – grip the onion, or whatnot, such that no finger tips protrude near the intended path of the blade. As you’ll see from the image above this paragraph, I use a thumb and pinky to do that. Then, use the knuckles of your reminding fingers, (you should have three…), as a guide for the side of the knife blade – your finger tips are curled back on the onion, your knuckles are above the cutting edge, and you make the cut – Doing this makes it very difficult to cut yourself. Cut the target food in half, or at least produce one nice, flat side – You can now rest that against the cutting board, and proceed with confidence that your stuff won’t go skittering across the kitchen when you get after it. The images below show the sequence of employing the claw grip to safely complete a large dice on that onion.
One other technique of note that provides safety as well as effective cutting for a very common task. When you need to mince something, home cooks tend to get a bit wild, attacking, for instance, the celery leaf I’m dealing with in the images below with a whole bunch of clattering whacks with a chefs knife – Two problems there, one is, you’re again inviting serious injury, and secondly, you often end up with more of a mess than you do a well cut ingredient. The solution is to set the tip of your knife on the cutting board, just beside the stuff to be minced. Next, place a finger tip or two on the top of the blade end to anchor that tip to the board. Now you can use a series of relatively gentle, rocking cuts to achieve the mince, chiffonade, etc, without cutting yourself or turning your ingredients into bruised goo.
Mincing cut Mincing cutSo, there are the basics to provide you with a solid foundation toward better, safer knife skills. My advice is this – Practice, practice, practice – Take very chance to slow down, study things a bit, and get a feel for the skills. One more caveat – never, ever hold something in your palm and attack it with a sharp blade – You may think you’ve got the chops, but it only takes that one tired, distracted moment to invite disaster.
What about all those fancy cuts you read, see, and hear about? How important to a home Chef is that stuff? The answer lies in how serious you want to get about your cooking. Do you really need to know a large dice from a brunoise? Yes and no – The aim of all those cuts is providing exacting uniformity, in a language that any Chef in any kitchen can understand. If you’re working with recipes that call for a brunoise, then yes, you need to know how to do a consistent julienne, (a matchstick cut roughly 1/8″ square by 2 1/2″ long), that can then be cut into 1/8″ cubes – The brunoise.
If all of that gives you a migraine, then consider this – Strive for two things when you prep ingredients – First, make them uniform. That’s important for even cooking, and for aesthetics. Secondly, know how ingredients react to being cut – You’re gonna have a real hard time trying to brunoise a soft tomato – You end up with mangled tomato bits and juice. When you run into a specific cut you don’t know, stop, dry off your hands, grab a smart phone, and google that sucker – You’ll find plenty of specific, step by step instructions to guide you through the process.
From left to right – Parer, parer, boning, slicer, santoku, chefFinally, a question that often comes up from the home Chef is, ‘what knives, exactly, do I need’? That is kind of a trick question, because the answer is somewhat dependent on how good your knife skills are, and how broad your cooking ambitions. Home chefs, just like the Pro’s, are quite enamored of good blades, (present company included), and said knives run the gamut from cheap crap to one off works of art. All in all, a home cook can get by just fine with a decent chefs knife and a parer – Those can be used for easily 90%of the work you need to do. As your skills improve and your cooking advances, you may well be back for more.
NOTE: The knives you see in this post were made by Andy Gladdish of Element Fe Forge, of Guemes Island, Washington – you won’t find anything finer, or a finer maker!
Sugar, and spice, and everything essential. That’s no nursery rhyme – That’s what needs to be in every home pantry, if spontaneity and discovery are to happen in your kitchen. Fact is, without a decent assortment of staples – Sweeteners, flours, herbs, spices, oils, vinegars, and the like, it can be awfully hard to successfully create on the fly. At the same time, its easy, (and pricy!), to go overboard on this stuff. What’s the happy medium, and what are the must haves? Let’s dive in and see.
Here at our kitchen, we have, well, pretty much everything. We have to, in order to do what we do for y’all – researching, creating, and testing recipes requires a ridiculous amount and variety of resources. Thankfully, your kitchen needn’t be quite so whacky to be well equipped. That said, you may want more than you’ve got currently, so how to decide what’s necessary? Let’s use our place as a guide, and pare things down to manageable for the average home kitchen. That should allow a cook to do as much as reasonably possible from scratch, and also encourage spontaneity.
Spice & Herb Overflow – It happens…
Before we dive in to specifics, a note on organization. Some manner thereof is, of course, absolutely necessary. How that takes shape is up to you. The most common sense approach is to consider what you use most, and have those closest at hand. As far as I’m concerned, the Season As You Go rule is non-negotiable, so the core stuff needs to be close at hand. We keep our go-to salts and peppers front and center, right on top of the stove. Oils, vinegars, and other common sauces shouldn’t be much farther away, ditto for herbs and spices. Flours, sugars, canned, boxed, and bagged stuff is pantry fodder, if you’re fortunate enough to have one.
The fundamentals, salt and pepper, center stage.
In any case, make arrangements that make sense to you. Once you establish an order that works for you, keep it – In a professional kitchen, having things in the same place every time is a necessity, given the time constraints under which we cook. That rule really isn’t any different for us at home – Sometimes cooking is leisurely, but more often than not, it’s home at five and dinner needed around six, or some version thereof – So having everything where you expect to find it is imperative for efficiency and peace of mind. All that said, be open minded about change, if down the road your best laid plans don’t thrill you any more. Quarterly reviews of your resources and where you have them is a very good plan to follow. That gets you looking at expiration dates, freshness, amounts on hand, and what you haven’t used in forever on a regular basis – Include your fridge and freezer in that survey as well.
Why not start with those essentials, your go-to seasonings. As savvy cooks everywhere know, the core secret to great cooking is seasoning as you go. That means that the stuff you rely on for that process should be, as noted, closest at hand. This needn’t be complex. Salt and pepper really are all you need. Were one to pick a single version of each, what should they be? I’ll advocate for a sea salt, one with a moderate grain size – For this, you don’t want either really chunky stuff or super fine – Real sea salt contains a wealth of trace minerals that taste good and are good for you. There’s a bunch out there – I like the Bob’s Red Mill a lot, as well as the Celtic brand. For Pepper, you’re hard pressed to do better than a genuine Tellicherry berry, and that requires a little explanation.
Tellicherry Pepper – Size matters.
Contrary to popular culinary myth, Tellicherry Pepper does not come from its namesake city in India. Tellicherry berries are defined by size, not location or heritage, per se. Pepper berries, Piper Nigrum, are harvested in February and March, then dried to become what we recognize as a pepper corn. In order to be called Tellicherry, pepper corns need to be 4.25 mm or larger, (and there’s actually a jumbo version, at 4.75mm and up). In any given crop, maybe 10% to 15% of the berries reach Tellicherry size, so it’s a bit rarer and a bit pricier, but well worth it – You’re getting the literal cream of the crop. As for other pepper, a look through our spice cabinet finds long, Tasmanian, grains of paradise, smoked, Szechuan, Lampung, Aleppo, white, green, and red, so yeah – You can go pretty ballistic on those. As far as I’m concerned, Tellicherry is all you really need.
Culinary Salts now run the gamut from A to Z
There are many more options for salts these days, as well – and you may or may not want or need them. Some of the legendary ones, like Malden, Sal de Mer, Himalayan pink, Bolivian Sunrise, and the like are truly spectacular, but they’re expensive – Really better suited as finishing salts for a special touch. I counted fourteen salt varieties in our spice cabinet, including kosher, flaked, smoked, and a raft of those fancy varietals – Again, you really don’t need most of those. If I had to pick a must have selection, it’d be sea, kosher, and flaked – That’ll cover the vast majority of uses you’re likely to want to mess with – And if the others catch your fancy, I say try those too, but sparingly. Salt and pepper don’t have an endless shelf life, so buy in small quantities, and use them up before adding more.
Essential oils, vinegars, and sauces get the same storage treatment as herbs and spices.
Next up, oils, and here too one can be complex or simple. For eons, what you could get was corn oil and olive oil, and little else. With the rising popularity of home gastronomy, the variety of oils available to cooks has blossomed considerably. For basic cooking, you can now find a number of relatively heart healthy oils in almost any store – canola, peanut, safflower, and sunflower, for instance. As with fancy salts, there are a bunch more fairly exotic oils – walnut, grape seed, coconut, hazelnut, avocado, and infused olive oils. While the latter bunch are delicious indeed, they’re really more for finishing or making vinaigrette than for cooking – And they’re fabulously expensive to boot. What you need is genuine Extra Virgin Olive Oil, for sure, and then a go to veg oil – Those will do the trick for 90% of your daily cooking chores. I’ll add one caveat, and that’s avocado oil. It’s become our go to, for several reasons – It’s got a light, buttery taste, it handles heat well, and is high in monounsaturated fatty acids.
For all thing flour, I’ll refer you to our Flour Power post from a while back – It’ll probably tell you more than you need to know.
Pantry is for bulk storage of staples.
Sweeteners are a bit more complex than refined white sugar, and should be – There are tastier, more potent options worth your shopping dollar. That’s not to say that you shouldn’t have white sugar on hand – You should, and maybe even a couple variants – Regular white is a go to for many things, and the finer cut Baker’s sugar dissolves much faster, for baking or other cooking. Honey, real honey, local whenever possible, not only has greater sweetening power than sugar, it has the added benefit of subtle flavor notes that reflect the terroir your local bees worked to bring you their joy. Regulars here will know we’re also big on agave nectar. In addition to a lovely, light taste, like honey, agave has a lower glycemic index than white sugar, so here again, you can use less to obtain a commensurate level of sweetening power. Other sugars, brown, raw, and the like, carry a molasses flavor note white refined doesn’t, and some folks like that. If you bake, you’ll likely want some of those on hand. Molasses and corn syrup might also find favor with bakers. Alternative molasses, like Pomegranate, sorghum, carob and date, are popular for cooking Middle Eastern cuisine, and can add an exotic touch to many dishes and sauces.
Vinegar is a must as well, for everything from house made vinaigrettes to sauces and shrubs. Depending on what you like to do, you may need one or more variations on the theme. A few years back, I wrote a little primer on the basics – You can find that here. The one caveat I’ll underline is this – Infused vinegars are expensive, and they needn’t be. You can make great versions at home for next to nothing, and you should. Here are some ideas for that project.
There are a bunch of ready made sauces out there, so what do you really need? For my mind, a hot sauce or three is a necessity – A few drops of Tabasco, for instance, wakes flavor much as salt does, and adds a nice backbone note to soups and stews. Jalapeño based sauce has a milder, fruitier profile that goes great with everything from veggies to eggs. What else? Soy sauce is a must, (though beware, there are a slew of gourmet and ‘premium’ varieties that can get really pricy and aren’t really all that spectacular. There are now an abundance of dark and light varieties. Preference comes down to taste, so try a few until you find something you like, and then stick with it – The lighter version, by the way, differs mostly in color, the idea being not to turn things muddy when that’s not appealing. Fish sauce is another must have, and here you do need to be careful – There’s a lot of crap, even among the pricy stuff. Red Boat is the real deal – You can’t go wrong with a small bottle of that, and since this is added literally by the drop, a small bottle goes a long way. Obviously there are a bunch more sauces, and you may accumulate a few over time. Hopefully, you don’t get as crazy as we are, but then you never know…
Oils, vinegars, and sauces will break down in the presence of direct sunlight and heat, so store them in a cool, dark spot, in glass containers, and always read the label to see if something belongs in the fridge after opening.
Herbs and spices need dark, cool temps, and airtight glass jars.
And lastly, we come to herbs and spices. Here’s a place where, as you can see from our cabinet, a cook can go seriously off the deep end – That’s a blessing and a curse. Almost everything in a spice cabinet is sensitive to conditions and age – The volatile compounds that make herbs and spices do what they do mean that they can and will break down and degrade if stored improperly or kept too long. For dried herbs and spices, there are important caveats. First, sourcing – All herbs are not created equally – Provenance and proven quality matter. Although things are improving in terms of variety and quality, getting herbs and spices from the average grocery store isn’t what you want to do. A simple test illustrates why – A generic, store bought jar of oregano versus real stuff from a quality source like World Spice, or Penzeys, will prove the point. Open both and take a nice, long sniff. The sheer power and complexity of the good stuff quickly overwhelms the relatively insipid generic version. What you’re experiencing is ‘oregano’ against Mexican or Turkish oregano, with known sources of high quality – Game over. Everything you get from a good purveyor will perform like that. If you needed further motivation, what you get in the grocery is often more expensive than what the good providers charge. You’ll also have a choice as to how much of what you want to buy, and you can opt for whole or ground/mixed as well. Overall, it’s a no brainer if you’re serious about your cooking, (and if you’re here, you are.)
Onwards to storage – If your spices are in little jars in a spinny thingy on your counter top, and you got that stuff as a wedding gift and are still using it, you seriously need to repent, and soon. Sunlight, oxygen, and warmth are our friends, but for dried herbs and spices, not so much. Your stuff needs to be in a cabinet, out of direct light, away from extremes of temperature, and stored in small, airtight glass jars. That will safeguard your hard won goodies. Even so, age creeps up on us all, and spices are as susceptible as anything. This means that limiting how much and what you store is the best plan. We buy our staple, go to stuff, by the pound, but again, that’s because we do a lot of cooking to make this joint run – There are few, if any things in the spice world that the average home kitchen needs by the pound – An ounce of lemon thyme goes quite a long way, and you can have another in your mailbox in a matter of days. Buy quality, buy enough for maybe three months of use, and you’re good to go.
Of course, some herbs just beg to be used fresh, and if ever there’s an indoor gardening task you should undertake, a fresh herb window box is it. Check out our page on what we call the essentials, here. Between that and an annual herb and veggie garden, you can grow and then dry of freeze home grown stuff – There’s nothing finer, frankly.
This isn’t meant as a comprehensive kitchen analysis, but as a good starting point from which to learn and grow. Always be open to change, embrace what works and tastes good, and you’ll be hard pressed to go wrong. What we’ve outlined here should be sufficient to allow decent spur of the moment creativity on your part.